Disassembly bottom: Difference between revisions
Jump to navigation
Jump to search
(Added note about the silver tape tabs.) |
(Added missing replacement of connection between the battery and computer.) |
||
| Line 111: | Line 111: | ||
=== Step 1 === |
=== Step 1 === |
||
[[image:Keyboardstep6g.JPG|thumb|left|Reseat the hinge.]] [[image:Keyboardstep6h.jpg|thumb|left|Latching the XO shut can help hold it in place.]] [[image:Keyboardstep6i_pickrightscrew.jpg|thumb|left|Make sure to use the long silver screws on the hinge.]] [[image:Keyboardstep6i.jpg|thumb|left|Screw down the hinge.]] |
[[image:Keyboardstep6g.JPG|thumb|left|Reseat the hinge.]] [[image:Keyboardstep6h.jpg|thumb|left|Latching the XO shut can help hold it in place.]] [[image:Keyboardstep6i_pickrightscrew.jpg|thumb|left|Make sure to use the long silver screws on the hinge.]] [[image:Keyboardstep6i.jpg|thumb|left|Screw down the hinge and replace the connection between the battery and computer.]] |
||
<br style="clear:both" /> |
<br style="clear:both" /> |
||
Revision as of 12:37, 11 October 2008
This is a description of how to disassemble the bottom portion of an XO laptop. This is part of the Disassembly section of the Troubleshooting Guide and Repair Manual.
Video walkthrough
These instructions are also available in video format with English subtitles, courtesy of ILXO.
XO before disassembly

Removing the handle cover / reaching the spare screws
Step 1


Step 2


Removing the hinge / disconnecting the top and bottom halves of the XO
Step 1

Step 2

Step 3


Removing the bottom cover
Step 1


Step 2


Removing the ALPS (touchpad and keyboard control) board
Step 1


Step 2


Step 3


Removing the keyboard
Step 1


Pull the green side panels apart to free the board. Warning: if you want to pull the side panels off completely, you should be aware that there are two one-way clips (ramps that snap into slots) holding them on to the white plastic body - the slots are located on each side at the top edge of the keyboard area, and at the bottom edge of the Enter key. You may find it helpful to gently warm the assembly, e.g. in the sun, before gently prying the side pieces apart from the body.


Replacing the keyboard
Step 1


Step 2


Replacing the ALPS (touchpad and keyboard control) board
Step 1

Place four screws in the holes.
Step 2


Step 3


Replacing the bottom case cover
Step 1


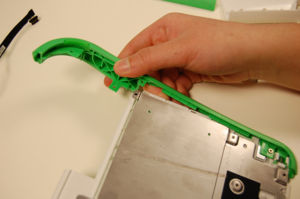
Replacing the hinge / Reconnecting the top and bottom halves of the XO
Step 1


Replacing the handle cover
Step 1


Step 2


Step 3
