OLPCities/Hello World!: Difference between revisions
No edit summary |
No edit summary |
||
| (12 intermediate revisions by 3 users not shown) | |||
| Line 5: | Line 5: | ||
What is a "Lot"? |
What is a "Lot"? |
||
[[Image:Tut1-00.jpg |
[[Image:Tut1-00.jpg ]] |
||
In the figure you see a "City" having 12 "Lots". They are empty. At a real OLPCity each Lot has an activity that can be an educational game, a link to some article etc. etc. |
In the figure you see a "City" having 12 "Lots". They are empty. At a real OLPCity each Lot has an activity that can be an educational game, a link to some article etc. etc. |
||
| Line 13: | Line 13: | ||
You can use one of the sprites of our Inventory downloading from one of the pages: |
You can use one of the sprites of our Inventory downloading from one of the pages: |
||
*[[Floors]] |
*[[OLPCities/Floors|Floors]] |
||
*[[Avatares]] |
*[[OLPCities/Avatares|Avatares]] |
||
*[[3D objects]] |
*[[OLPCities/3D objects|3D objects]] |
||
*[[Hard objects]] |
*[[OLPCities/Hard objects|Hard objects]] |
||
*[[Animated objects]] |
*[[OLPCities/Animated objects|Animated objects]] |
||
*[[Links]] |
*[[OLPCities/Links|Links]] |
||
Or you can create a new one (remember to put it available for everybody). You can modify something in the downloaded sprite. You can use the free [http://www.gimp.org GIMP] to do it. At the exercice we will create only a floor having a plaque (it's one of the "Hard objects") where can be readed: "HELLO WORLD!" |
Or you can create a new one (remember to put it available for everybody). You can modify something in the downloaded sprite. You can use the free [http://www.gimp.org GIMP] to do it. At the exercice we will create only a floor having a plaque (it's one of the "Hard objects") where can be readed: "HELLO WORLD!" |
||
[[Image:Tut1-1.jpg |
[[Image:Tut1-1.jpg ]] |
||
<b>IMPORTANT: If you are developing and don't have a real XO, the emulator for Windows has an useful area of 640 x 390 but the XO has an useful area of 1180x780. So, you need to do the corrections before tests at the real machine!!! ALL THE DIMENSIONS OF THESE TUTORIALS ARE FOR THE EMULATOR!!! BE CAREFUL!!!</b> |
|||
| ⚫ | |||
| ⚫ | |||
| ⚫ | |||
| ⚫ | |||
Like we said, a Lot is a web page. Look the code. We will do some explanation after it: |
Like we said, a Lot is a web page. Look the code. We will do some explanation after it: |
||
| Line 68: | Line 70: | ||
</pre> |
</pre> |
||
A Lot always have a "floor" whose dimension is 614 x 390 pixels because this is the useful area at the OLPC station screen. |
|||
| ⚫ | |||
| ⚫ | |||
[[Image:Tut1-0.jpg|center ]] |
|||
WOW! It's very easy to create a Lot. (We don't have an avatar walking on it, yet... At the next lesson we will create him.) |
|||
| ⚫ | |||
| ⚫ | |||
| ⚫ | |||
Try to create another Lot having a different plaque. |
|||
<b>At any lesson, if you have any problem, use the "discussion" area at the page. Everybody can answer. Thanks.</b> |
|||
| ⚫ | |||
<center>PREVIOUS LESSON: [[Introduction]]...........TOC :[[OLPCities |
<center>PREVIOUS LESSON: [[OLPCities/Introduction|Introduction]]...........TOC :[[OLPCities/Tutorials|Tutorials]]..........NEXT LESSON : [[OLPCities/The avatar|The avatar]]</center> |
||
[[Category:OLPCities]] |
[[Category:OLPCities Tutorials]] |
||
Latest revision as of 00:05, 14 February 2007
It's a tradition. The first application of a programer, when learning a new language, will write: "HELLO WORLD!"
Ok... but here "world" is too much! We are creating a "City"... Or, better our first exercice will be to create a "Lot".
What is a "Lot"?
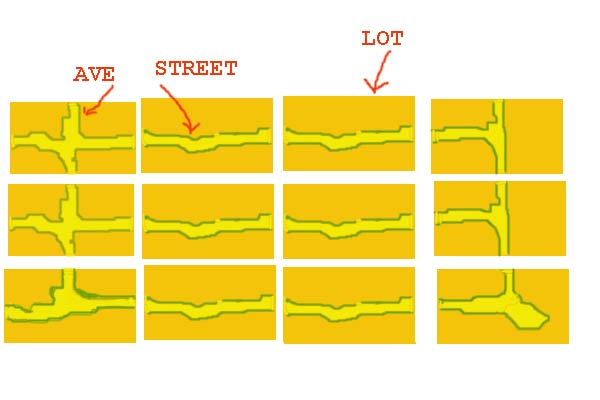
In the figure you see a "City" having 12 "Lots". They are empty. At a real OLPCity each Lot has an activity that can be an educational game, a link to some article etc. etc.
A Lot is really a "normal" webpage created using objects of the "OLPCities Inventory". We are talking about objects in the OOPL sense. Some of these objects will have a graphic representation that are "sprites".
You can use one of the sprites of our Inventory downloading from one of the pages:
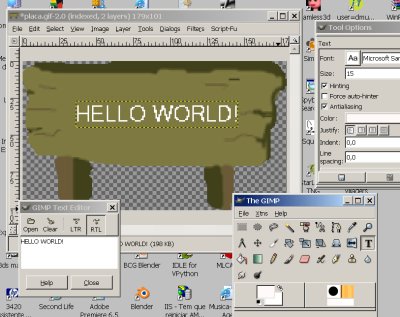
Or you can create a new one (remember to put it available for everybody). You can modify something in the downloaded sprite. You can use the free GIMP to do it. At the exercice we will create only a floor having a plaque (it's one of the "Hard objects") where can be readed: "HELLO WORLD!"
IMPORTANT: If you are developing and don't have a real XO, the emulator for Windows has an useful area of 640 x 390 but the XO has an useful area of 1180x780. So, you need to do the corrections before tests at the real machine!!! ALL THE DIMENSIONS OF THESE TUTORIALS ARE FOR THE EMULATOR!!! BE CAREFUL!!!
At the OLPCities/JavaScript Libraries you will find the "references" of all the Classes of the OLPCities API.
At this exercice we will use some methods of the Class Sprites.
Like we said, a Lot is a web page. Look the code. We will do some explanation after it:
<html>
<head>
<script language="Javascript" src="http://www.dmu.com/olpc/gamelib_core.js"></script>
<script language="Javascript" src="http://www.dmu.com/olpc/gamelib_sprites.js"></script>
<script language="Javascript">

 function init(){
  Sp_linuxcompatible=true;

  floor=new Sp_Sprite();
  floor.setImage("floorW05N07.gif",614,390,1,1);
  floor.setXlimits( 0,614);
  floor.setYlimits( 0,390);
  floor.setFrame(0);
  floor.moveTo(0 , 0 );
  floor.setZ(5);
  floor.switchOn();

  pl=new Sp_Sprite();
  pl.setImage("plaquehello.gif",179,101,1,1);
  pl.setXlimits( 0,614);
  pl.setYlimits( 0,390);
  pl.setFrame(0);
  pl.moveTo(355 , 45 );
  pl.setZ(12);
  pl.switchOn()
}

</script>
</head>

<title>TUTCITY  </title>
<body  bgcolor="black"  onload="init()" >
</html>
The "Z" axis is that going to the user and "5" is the level of a floor. Some things that need to be hided will have a Z = 0. It's our convention that "normal" objects are at Z = 12.
The position of an sprite is that of the left superior corner of its "box" (the rectangle that contains it).
WOW! It's very easy to create a Lot. (We don't have an avatar walking on it, yet... At the next lesson we will create him.)
Look the Lot of the exercice (we said that it's a web page) at our web server: http://www.dmu.com/olpctut/tut1.html
Try to create another Lot having a different plaque.
At any lesson, if you have any problem, use the "discussion" area at the page. Everybody can answer. Thanks.

