Keyboard field repairs: Difference between revisions
(Directions for repair of torn keyboard. Photos to follow.) |
No edit summary |
||
| (6 intermediate revisions by 3 users not shown) | |||
| Line 1: | Line 1: | ||
{{TOCright}} |
{{TOCright}} |
||
===*See note about cracked screens at the bottom=== |
|||
While OLPC recommends replacing ripped keyboards, that may not always be possible or, may be too costly if several laptops are involved. This simple fix uses a relatively non-toxic silicone sealer that has no harmful fumes. The repair could be, and has been, done safely by children. |
While OLPC recommends replacing ripped keyboards, that may not always be possible or, may be too costly if several laptops are involved. This simple fix uses a relatively non-toxic silicone sealer that has no harmful fumes. The repair could be, and has been, done safely by children. |
||
== Materials == |
== Materials == |
||
[[image:A1-Supplies.jpg|thumb|center]] |
|||
(photo A1) |
|||
| ⚫ | |||
| ⚫ | |||
| ⚫ | |||
| ⚫ | |||
| ⚫ | |||
| ⚫ | |||
| ⚫ | |||
| ⚫ | |||
If only a few keys are involved, you may wish to do the repair with the keyboard in place. Follow the second set of directions below to do the repair without removing the keyboard. |
If only a few keys are involved, you may wish to do the repair with the keyboard in place. Follow the second set of directions below to do the repair without removing the keyboard. |
||
If the damage is more extensive, you will probably want to remove the keyboard following these |
If the damage is more extensive, you will probably want to remove the keyboard following these [[Disassembly|disassembly instructions]]. |
||
(Add link to dis-assembly instructions) |
|||
==Repair With Keyboard Removal== |
==Repair With Keyboard Removal== |
||
| Line 27: | Line 26: | ||
Using one toothpick to hold the key in place, gently apply a small amount of silicone to the torn sides of the key with a second toothpick. |
Using one toothpick to hold the key in place, gently apply a small amount of silicone to the torn sides of the key with a second toothpick. |
||
[[image:A2-Apply Silicone.jpg|thumb|center]] |
|||
(Photo A2) |
|||
Use a damp (not soaking wet) cotton swab to remove the excess silicone sealer. |
Use a damp (not soaking wet) cotton swab to remove the excess silicone sealer. |
||
[[Image:A3-Remove Excess.jpg|thumb|center]] |
|||
Photo A3) |
|||
More cleanup may be needed. |
More cleanup may be needed. |
||
[[Image:A4-Needs More Cleanup.jpg|thumb|center]] |
|||
(Photo A4) |
|||
Use a damp tissue for a final touchup. In this photo, the F, G, and H keys and the right half of the space bar were repaired previously and have already dried. |
Use a damp tissue for a final touchup. In this photo, the F, G, and H keys and the right half of the space bar were repaired previously and have already dried. |
||
[[Image:A5-Touch Up With Tissue.jpg|thumb|center]] |
|||
(Photo A5) |
|||
Allow the silicone to dry overnight before re-assembling the laptop according to the directions on the wiki. |
Allow the silicone to dry overnight before re-assembling the laptop according to the directions on the wiki. |
||
| Line 49: | Line 52: | ||
A key that had been completely torn off was re-fitted in this repair. |
A key that had been completely torn off was re-fitted in this repair. |
||
[[Image:B1-"R" Key ripped completely off.jpg|thumb|center]] |
|||
(Photo B1) |
|||
Carefully fit the key back into its place in the keyboard. |
Carefully fit the key back into its place in the keyboard. |
||
[[Image:B2-Put key back in place.jpg|thumb|center]] |
|||
(Photo B2) |
|||
Apply silicone to one edge of the key and carefully clean it. If you try to do the entire key at once, it will be difficult to keep it in place while working. |
Apply silicone to one edge of the key and carefully clean it. If you try to do the entire key at once, it will be difficult to keep it in place while working. |
||
[[Image:B3-Apply silcone to one side.jpg|thumb|center]] |
|||
(Photo B3) |
|||
Allow the first side to dry overnight. |
Allow the first side to dry overnight. |
||
[[Image:B4-Wait for first side to dry.jpg|thumb|center]] |
|||
Holding the key in place with one toothpick, carefully apply silicone to the remaining three sides, being careful not to get it under the key. |
Holding the key in place with one toothpick, carefully apply silicone to the remaining three sides, being careful not to get it under the key. |
||
[[Image:B5-Apply Silicone To Other 3 Sides.jpg|thumb|center]] |
|||
(Photo B5). |
|||
Clean up with a toothpick. To avoid having sealer run under the key, it is probably best not to use the wet cotton swab or wet tissue here. |
Clean up with a toothpick. To avoid having sealer run under the key, it is probably best not to use the wet cotton swab or wet tissue here. |
||
[[Image:B6-Clean With Toothpick.jpg|thumb|center]] |
|||
(Photo B6) |
|||
| ⚫ | |||
[[Image:B7-Silicone Has Dried.jpg|thumb|center]] |
|||
| ⚫ | |||
[[Image:B8-It Works!.jpg|thumb|center]] |
|||
| ⚫ | |||
| ⚫ | |||
(Photo B7) |
|||
===*Cracked Screen Repairs=== |
|||
| ⚫ | |||
This method has also been successfully used with a cracked screen. The screen had an approximately 4" diagonal crack across one corner, but still operated normally. The crack was cleaned with alcohol, then covered with a bead of the same Silicone sealer used to repair the ripped keyboard. It was cleaned with a toothpick to be just a small "bead" over the crack. Later, when it was completely dry, it was trimmed close to the surface with a sharp knife. Now, it is difficult to see that there is a crack and the XO continues to work normally. |
|||
(Photo B8) |
|||
[[Category:Repair]] |
|||
| ⚫ | |||
Latest revision as of 02:03, 1 January 2011
*See note about cracked screens at the bottom
While OLPC recommends replacing ripped keyboards, that may not always be possible or, may be too costly if several laptops are involved. This simple fix uses a relatively non-toxic silicone sealer that has no harmful fumes. The repair could be, and has been, done safely by children.
Materials
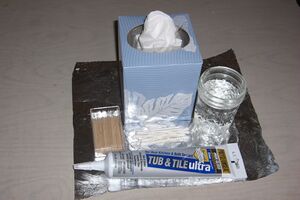
- Clear Silicone tub and tile sealant (goes on white, dries clear). A 6 oz tube costs less than $3 at most hardware stores and is enough to do dozens of laptops.
- Toothpicks for applying the sealer
- Cotton swabs, tissues and water for cleanup
- Something to protect your table top if doing the repair with the keyboard removed from the laptop (aluminum foil is shown here).
If only a few keys are involved, you may wish to do the repair with the keyboard in place. Follow the second set of directions below to do the repair without removing the keyboard.
If the damage is more extensive, you will probably want to remove the keyboard following these disassembly instructions.
Repair With Keyboard Removal
After removing the keyboard, gently lift off the green silicone keypad, being careful to not tear additional keys. Lay it on your table protector.
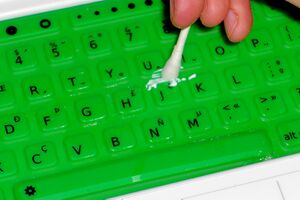
Using one toothpick to hold the key in place, gently apply a small amount of silicone to the torn sides of the key with a second toothpick.
Use a damp (not soaking wet) cotton swab to remove the excess silicone sealer.
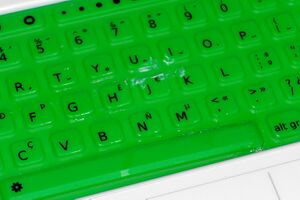
More cleanup may be needed.
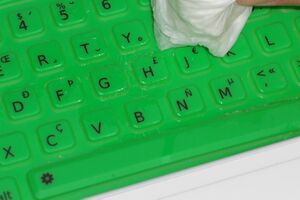
Use a damp tissue for a final touchup. In this photo, the F, G, and H keys and the right half of the space bar were repaired previously and have already dried.
Allow the silicone to dry overnight before re-assembling the laptop according to the directions on the wiki.
Repair Without Keyboard Removal
While this may seem easier than removing the keyboard, you must work very carefully to not allow silicone to get under the green silicone keypad.
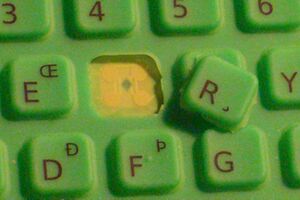
A key that had been completely torn off was re-fitted in this repair.
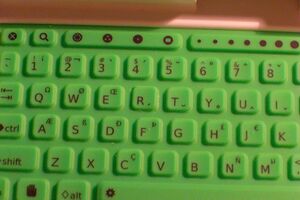
Carefully fit the key back into its place in the keyboard.
Apply silicone to one edge of the key and carefully clean it. If you try to do the entire key at once, it will be difficult to keep it in place while working.
Allow the first side to dry overnight.
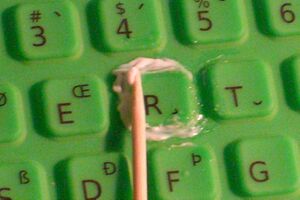
Holding the key in place with one toothpick, carefully apply silicone to the remaining three sides, being careful not to get it under the key.
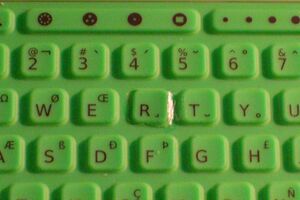
Clean up with a toothpick. To avoid having sealer run under the key, it is probably best not to use the wet cotton swab or wet tissue here.
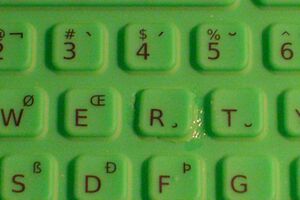
Let they keyboard dry overnight. Note the repair isn't as clean as the one with the keyboard removed. That is because we did not use the water in the cleanup.
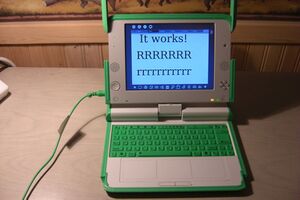
Test the results. This one worked.
If the key does not work, you may wish to remove the keyboard according to the dis-assembly instructions, clean off any excess sealer, and follow the instructions above.
*Cracked Screen Repairs
This method has also been successfully used with a cracked screen. The screen had an approximately 4" diagonal crack across one corner, but still operated normally. The crack was cleaned with alcohol, then covered with a bead of the same Silicone sealer used to repair the ripped keyboard. It was cleaned with a toothpick to be just a small "bead" over the crack. Later, when it was completely dry, it was trimmed close to the surface with a sharp knife. Now, it is difficult to see that there is a crack and the XO continues to work normally.
