XO 1.75 11089 Fix: Difference between revisions
Jump to navigation
Jump to search
(May be the first time some people have to use serial adapters) |
|||
| Line 7: | Line 7: | ||
# [[Disassembly_top|Disassemble the laptop]] to access the motherboard (the heat spreader does not have to be removed). |
# [[Disassembly_top|Disassemble the laptop]] to access the motherboard (the heat spreader does not have to be removed). |
||
# Plug in a serial cable (see [[#Finding_the_Serial_Port|below]]), and a USB key with Q4B06 or later. |
# Plug in a serial cable (see [[#Finding_the_Serial_Port|below]]), and a USB key with Q4B06 or later. |
||
# Attach the serial cable/adapter to another computer, and configure a terminal emulation program on this other computer to access the serial adapter at 115200 baud, 8 bits, No parity, 1 stop bit. |
|||
# Boot the laptop. It should print out a boot sequence |
# Boot the laptop. It should print out a boot sequence over the serial port, ending in ''Unrecognized SPI Flash ID''. It should then provide an ''ok'' prompt. If at this point, it stops somewhere else or doesn't provide a prompt (like after ''Releasing'') you have another problem. Please contact [[User:wad|wad]]. |
||
# Type "dir u:" to initialize the USB stack. |
# Type "dir u:" in the terminal program to initialize the USB stack. |
||
# Type "flash u:\q4b06.rom". When the laptop finishes reflashing and returns an ''ok'', either reboot (type "bye") or poweroff the laptop. |
# Type "flash u:\q4b06.rom". When the laptop finishes reflashing and returns an ''ok'', either reboot (type "bye") or poweroff the laptop. |
||
# [[Disassembly_top#Replacing_the_back_cover|Reassemble]] |
# [[Disassembly_top#Replacing_the_back_cover|Reassemble]] |
||
| Line 14: | Line 15: | ||
===Finding the Serial Port=== |
===Finding the Serial Port=== |
||
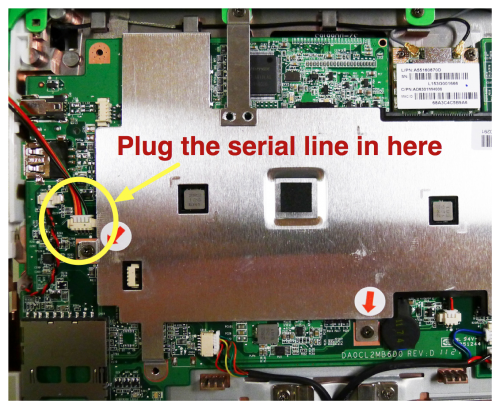
You will need an [[Serial_adapters|XO serial adapter]]. The serial port to use is UART3 (CN8). There is a [[Media:XO_1.75_Connectors_B1.pdf|chart showing the location]], and this photo: |
You will need an [[Serial_adapters|XO serial adapter]] designed for use with XO 1.5's or higher (which also work with XO-1's). The serial port to use is UART3 (CN8). There is a [[Media:XO_1.75_Connectors_B1.pdf|chart showing the location]], and this photo: |
||
[[Image:1.75_serial_connector.png|500px|center]] |
[[Image:1.75_serial_connector.png|500px|center]] |
||
Revision as of 14:13, 6 August 2011
This page is monitored by the OLPC team.
Version Q4B05 of Open Firmware for the XO 1.75 B1 laptop had a bug (<trac>11089</trac>) which causes the laptops to boot up with a white screen if it has been ten days since their manufacture, or if the RTC battery is removed. The symptom is a white screen (nothing on it) on boot.
The Fix
Fortunately, the fix to this is simple (yet tedious):
- Disassemble the laptop to access the motherboard (the heat spreader does not have to be removed).
- Plug in a serial cable (see below), and a USB key with Q4B06 or later.
- Attach the serial cable/adapter to another computer, and configure a terminal emulation program on this other computer to access the serial adapter at 115200 baud, 8 bits, No parity, 1 stop bit.
- Boot the laptop. It should print out a boot sequence over the serial port, ending in Unrecognized SPI Flash ID. It should then provide an ok prompt. If at this point, it stops somewhere else or doesn't provide a prompt (like after Releasing) you have another problem. Please contact wad.
- Type "dir u:" in the terminal program to initialize the USB stack.
- Type "flash u:\q4b06.rom". When the laptop finishes reflashing and returns an ok, either reboot (type "bye") or poweroff the laptop.
- Reassemble
Finding the Serial Port
You will need an XO serial adapter designed for use with XO 1.5's or higher (which also work with XO-1's). The serial port to use is UART3 (CN8). There is a chart showing the location, and this photo:
