Serial adapters/Arduino: Difference between revisions
Jump to navigation
Jump to search
(Created page with 'How to use an Arduino Uno as a serial adapter for an OLPC XO laptop. * disconnect all wires from the Arduino Uno, * connect the USB cable to a system (the host) running the [[Ar…') |
m (I just did this, do not need resistor.) |
||
| (3 intermediate revisions by one other user not shown) | |||
| Line 1: | Line 1: | ||
How to use an Arduino Uno as a serial adapter for an OLPC XO laptop. |
How to use an Arduino Uno as a serial adapter for an OLPC XO laptop. |
||
== Ingredients == |
|||
| ⚫ | |||
| ⚫ | |||
* an Arduino Uno, called the ''Arduino'', |
|||
| ⚫ | |||
| ⚫ | |||
* a USB cable to connect the ''Arduino'' to the ''host'', normally supplied, |
|||
* an OLPC XO laptop, disassembled to expose the serial connector, called the ''target'', |
|||
* a way to connect wires between the ''Arduino'' and the ''target'' (jumper leads, solder, iron, connectors, etc). |
|||
== Method == |
|||
| ⚫ | |||
* connect the USB cable between the Arduino and the host, |
|||
| ⚫ | |||
* on the host, start a serial terminal application like screen, and verify that pressing keys causes the D13 LED to flash, |
* on the host, start a serial terminal application like screen, and verify that pressing keys causes the D13 LED to flash, |
||
* connect a GND pin on the Arduino to the GND pin on the serial connector of |
* connect a GND pin on the Arduino to the GND pin on the serial connector of the target, |
||
* connect the D0 (RX) pin on the Arduino to the RX pin on the target; this carries keys from the host to the target, |
* connect the D0 (RX) pin on the Arduino to the RX pin on the target; this carries keys from the host to the target, |
||
* connect the D1 (TX) pin on the Arduino to the TX pin on the target; this carries text from the target to the host, |
* connect the D1 (TX) pin on the Arduino to the TX pin on the target; this carries text from the target to the host, |
||
* turn on the target, and the boot text should be displayed |
* turn on the target, and the boot text should be displayed, |
||
* press Escape key, and the [[Ok]] prompt should appear. |
|||
== Diagram == |
|||
[[Image:Arduino-uno-serial-passthrough.jpg|900px]] |
|||
Latest revision as of 14:55, 25 February 2022
How to use an Arduino Uno as a serial adapter for an OLPC XO laptop.
Ingredients
- an Arduino Uno, called the Arduino,
- a computer running the Arduino development environment, called the host,
- a USB cable to connect the Arduino to the host, normally supplied,
- an OLPC XO laptop, disassembled to expose the serial connector, called the target,
- a way to connect wires between the Arduino and the target (jumper leads, solder, iron, connectors, etc).
Method
- disconnect all wires from the Arduino,
- connect the USB cable between the Arduino and the host,
- download passthrough-serial-adapter.ino and program it into the Arduino,
- on the host, start a serial terminal application like screen, and verify that pressing keys causes the D13 LED to flash,
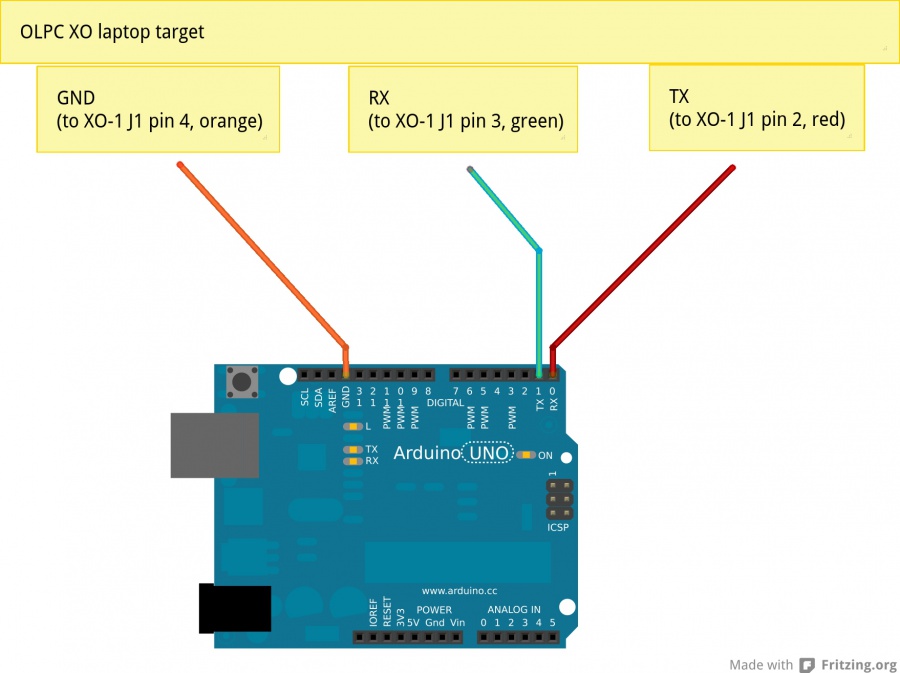
- connect a GND pin on the Arduino to the GND pin on the serial connector of the target,
- connect the D0 (RX) pin on the Arduino to the RX pin on the target; this carries keys from the host to the target,
- connect the D1 (TX) pin on the Arduino to the TX pin on the target; this carries text from the target to the host,
- turn on the target, and the boot text should be displayed,
- press Escape key, and the Ok prompt should appear.
