XS Configuration Management: Difference between revisions
No edit summary |
|||
| Line 34: | Line 34: | ||
The <tt>[http://dev.laptop.org/git?p=projects/xs-config;a=blob;f=fsroot.olpc.img/etc/sysconfig/olpc-scripts/network_config network_config]</tt> script may be run manually to reconfigure a system in response to a change in the wired interfaces. |
The <tt>[http://dev.laptop.org/git?p=projects/xs-config;a=blob;f=fsroot.olpc.img/etc/sysconfig/olpc-scripts/network_config network_config]</tt> script may be run manually to reconfigure a system in response to a change in the wired interfaces. |
||
[[Image:XS_Usage_Minimal.png|700px]][[Media:XS_Usage_Minimal.png|Full Scale]] |
|||
===Large School Scenario=== |
===Large School Scenario=== |
||
| Line 39: | Line 41: | ||
The more common scenario is that a school server will be one of many in a school. As each school server provides additional network access and storage, the school infrastructure automatically scales with the number of servers installed. (''Sort of'') One school server typically provides the connection to the internet, and is designated the ''''principal'''' school server. The other servers in a school are peers, and are designated ''''auxiliary'''' school servers. |
The more common scenario is that a school server will be one of many in a school. As each school server provides additional network access and storage, the school infrastructure automatically scales with the number of servers installed. (''Sort of'') One school server typically provides the connection to the internet, and is designated the ''''principal'''' school server. The other servers in a school are peers, and are designated ''''auxiliary'''' school servers. |
||
[[Image:XS_Usage_Multiple.png|700px]] |
[[Image:XS_Usage_Multiple.png|700px]][[Media:XS_Usage_Multiple.png|Full Scale]] |
||
For purposes of backup, each laptop is associated with a single school server. Other services, including internet access, are provided either by the closest server or the principal school server. At installation time, each server is given a unique number (currently 1 through 8, soon higher). These numbers do not |
|||
have to be sequential, but should be viewed as fixed --- if the server number changes, all kids data stored on that server will currently be lost... |
|||
===Internet Connection=== |
===Internet Connection=== |
||
Revision as of 07:09, 16 January 2008
This page describes how the software packages comprising an XS School server are configured.
This page is sadly unfinished.
Server Configuration
Configuration of packages
School Specific Configuration
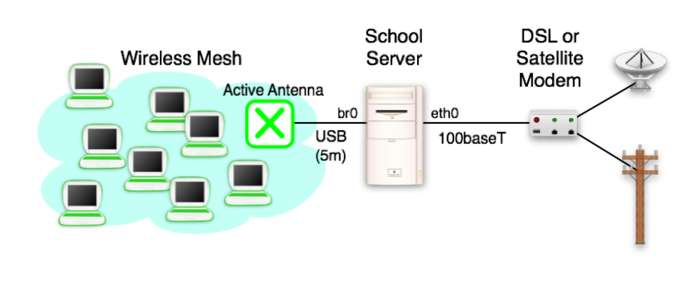
The default server setup is to connect to the Internet on the first wired ethernet network interface, using IPv4 DHCP. Laptops connect to the server over the wireless mesh using one or more Active Antenna, connected through USB interfaces. Optional second (and additional) ethernet interfaces are configured by default to provide an internal LAN within the school. Traditional WiFi access points, if used, should be located on this internal LAN.
We are working on a better configuration interface. Suggestions are welcome in the discussion page.
For now, the configuration is mainly manual. See Troubleshooting School Servers for help determining what is wrong.
Access
Access to the school server is via console login, or ssh. Console login must be used to establish accounts for ssh access. Root access via ssh is disabled by default, and accounts must use an SSH key for authentication.
Networking
The school specific configuration is largely done by a script, /etc/init.d/olpc-network-config, run upon every boot. Upon the first boot, this script runs the /etc/sysconfig/olpc-scripts/network_config script, which configures the network interfaces for the server, assuming it is server #1.
There are two main usage scenarios: a single server providing access to a small school, and a set of servers cooperating to provide access to a larger school.
Small School Scenario
The network_config script may be run manually to reconfigure a system in response to a change in the wired interfaces.
Large School Scenario
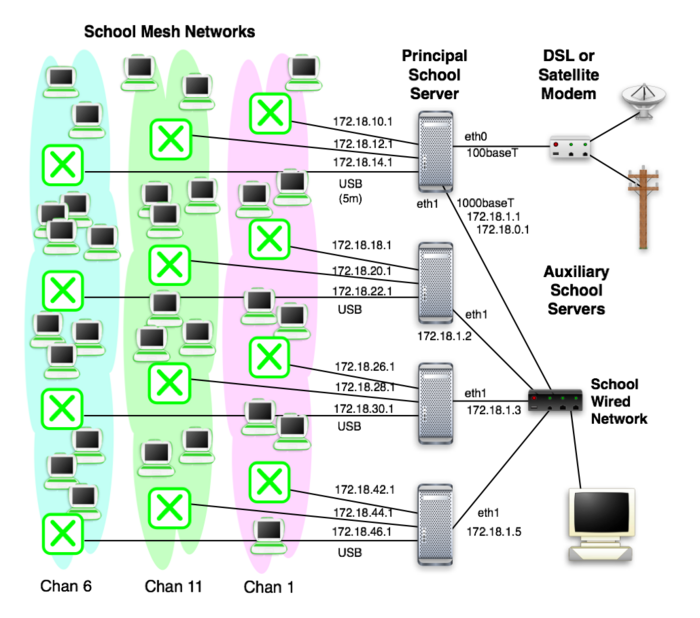
The more common scenario is that a school server will be one of many in a school. As each school server provides additional network access and storage, the school infrastructure automatically scales with the number of servers installed. (Sort of) One school server typically provides the connection to the internet, and is designated the 'principal' school server. The other servers in a school are peers, and are designated 'auxiliary' school servers.
For purposes of backup, each laptop is associated with a single school server. Other services, including internet access, are provided either by the closest server or the principal school server. At installation time, each server is given a unique number (currently 1 through 8, soon higher). These numbers do not have to be sequential, but should be viewed as fixed --- if the server number changes, all kids data stored on that server will currently be lost...
Internet Connection
The internet (WAN) connection is currently the eth0 interface by default. The file which configures this interface is /etc/sysconfig/network-scripts/ifcfg-eth0. The current default is to use DHCP to assign an IP address to this interface, and obtain DNS server info.
IPv6
To enable external IPv6 you will have to configure the global address of the machine and setup an IPv6 tunnel. Unfortunately, you are not currently able to use IPv6 in school with multiple servers. We are working on this ASAP.
Instructions coming
Name Service
Manual Configuration
This name currently set to random.xs.laptop.org is unfortunately embedded in a number of files:
/etc/named.conf
/var/named/school.zone.inaddr.db
/var/named/school.zone.16.inaddr.db
/var/named/school.zone.32.inaddr.db
/var/named/school.zone.48.inaddr.db
User Accounts
When a school server is installed, it has no user accounts, remote (SSH) login to the root account is disabled, and remote logins must be authenticated using a public/private key pair. If exploring or developing with a school server, as root from the console you will need to add a new account (username wad in the example):
adduser wad
passwd wad
wget http://dev.laptop.org/~wad/dsa_public_key
mkdir /home/wad/.ssh
mv dsa_public_key /home/wad/.ssh/authorized_keys
chown -R wad:wad /home/wad/.ssh
chmod -R g-w /home/wad/.ssh
The public key, downloaded from http://dev.laptop.org/~wad/dsa_public_key in the above example, can be generated on any Linux system using the ssh-keygen command (which leaves your new public/private key pair in .ssh). You want to copy the id_rsa.pub or id_dsa.pub file to other machines to allow logins.

