ProtoSnap Contributors Guide: Difference between revisions
(→Recipe) |
No edit summary |
||
| (12 intermediate revisions by 2 users not shown) | |||
| Line 1: | Line 1: | ||
{{TOCright}} |
{{TOCright}} |
||
This ProtoSnap Contributors Guide connects your XO to the real world of electronics, sensors and activators -- using SparkFun's |
This ProtoSnap Contributors Guide connects your XO to the real world of electronics, sensors and activators -- using SparkFun's now retired [https://www.sparkfun.com/products/10889 ProtoSnap - Pro Mini]. We used the Logo-like [http://wiki.sugarlabs.org/go/Activities/Turtle_Blocks Turtle Blocks]<ref>Turtle Blocks was previously known as Turtle Art.</ref> visual programming environment. Please ask questions on the unleashkids@googlegroups.com mailing list! You can join right here: http://groups.google.com/group/unleashkids |
||
These instructions have been tested on the XO-1 and XO-4 Touch laptop using the latest [[Release_notes/13.2.0|13.2.0]]. |
These instructions have been tested on the XO-1 and XO-4 Touch laptop using the latest [[Release_notes/13.2.0|13.2.0]]. |
||
==Ingredients== |
|||
Some deployments are using older releases such as [[Release_notes/11.3.1|11.3.1]] in Haiti 2013. This release has not yet been tested. |
|||
* a ProtoSnap or Arduino Pro Mini, with the StandardFirmata already uploaded, if not see [[/Upload|How to upload StandardFirmata to a ProtoSnap using ino]], or [[Arduino|How to upload StandardFirmata using the Arduino IDE]], |
|||
* an XO laptop, with OLPC OS [[Release_notes/13.2.6|13.2.6]], |
|||
* a USB cable between the two. |
|||
| ⚫ | |||
Loosely speaking, this 5-phase install will proceed as follows: |
|||
* install the [http://activities.sugarlabs.org/en-US/sugar/addon/4434 TurtleBots-22] activity<ref>TurtleBots is a repackaging of TurtleBlocks by the Butia project with the Arduino plugin already present.</ref>, and start it, |
|||
# install requirements |
|||
* plug the ProtoSnap or Arduino Pro Mini into the XO laptop using the USB cable, and wait a few seconds for the indicators to stop flashing, |
|||
# setup build environment |
|||
* click on the palette of Arduino blocks, |
|||
# build it |
|||
* notice how only the ''refresh Arduino'' block is available, |
|||
# upload it (to the ProtoSnap board) |
|||
* drag a ''refresh Arduino'' block into the main area, then click on it, |
|||
# install the TurtleBlocks plugin |
|||
* notice how the rest of the palette is made available; if this doesn't happen you have a problem and cannot proceed, |
|||
* drag a ''pin mode'' block into the main area, drag the ''OUTPUT'' block to the mode socket on the ''pin mode'' block, |
|||
* drag a ''digital write'' block and attach it to the bottom of the ''pin mode'' block, |
|||
* click on the ''pin mode'' block, and it will run both blocks, and the D13 LED on the ProtoSnap or Arduino Pro Mini should turn on. |
|||
Alternatively, try our [[Media:TurtleBlocks_Activity.ta|sample TurtleBlocks project]] which uses the other LED on a ProtoSnap: |
|||
Once the ProtoSnap has been programmed with the StandardFirmata, only the last step is needed on each subsequent laptop. |
|||
| ⚫ | |||
| ⚫ | |||
* Install [[Release_notes/13.2.0|13.2.0]] onto your XO laptop |
|||
* Connect your XO to Wifi Internet ([http://laptop.org/start/neighborhoodview.shtml Neighborhood View] = F1 key) |
|||
* Open the Terminal Activity (within Sugar's "List View" in the top-right of the [http://laptop.org/start/homeview.shtml Home View] = F3 key) |
|||
* On an XO-1 the 1 GB of flash is not enough to do the following installs (an extra 133 MB is needed). So you will need to make space first. One tested method is to delete the Library (72 MB) and several Sugar activities such as Scratch (59 MB), Speak (19 MB) and TamTam (20 MB), which you can reinstall later if necessary, or reflash, |
|||
rm -rf Library Activities/{Scratch*,TamTam*,Speak*,Help*,Memo*} |
|||
* Install 3 packages, each of which take a couple minutes to install. Run: |
|||
sudo yum install -y ino git make |
|||
* Run the following 4 commands to create a project directory: |
|||
mkdir firmata |
|||
cd firmata |
|||
ino init |
|||
mkdir lib |
|||
* Correct a packaging error in "ino", running these 2 commands: |
|||
sudo mkdir /usr/share/arduino/hardware/tools |
|||
sudo cp /etc/avrdude/avrdude.conf /usr/share/arduino/hardware/tools |
|||
* Copy the StandardFirmata source into the project directory and build it: |
|||
cp /usr/share/arduino/libraries/Firmata/examples/StandardFirmata/StandardFirmata.ino ./src/sketch.ino |
|||
ino build |
|||
* Plug in a "USB-A to mini-USB" cable, connecting your XO to the ProtoSnap (Ian can provide these, or 80 cents @ monoprice.com). Then run: |
|||
ino upload |
|||
* ProtoSnap's bright white light will turn on! Finally, run: |
|||
git clone <nowiki>https://github.com/itdaniher/turtleblocks-arduino.git</nowiki> ~/Activities/TurtleBlocks.activity/plugins/arduino |
|||
* Return to Sugar's Activity wheel (Home View) and launch the TurtleBlocks Activity. Load the sample TurtleBlocks project here: |
|||
http://wiki.laptop.org/go/File:TurtleBlocks_Activity.ta |
|||
| ⚫ | |||
== Screenshots == |
== Screenshots == |
||
| Line 46: | Line 28: | ||
[[image:Screenshot_of_TurtleBlocks_Activity_3.png|600px]] |
[[image:Screenshot_of_TurtleBlocks_Activity_3.png|600px]] |
||
[[image:Itdaniher--photo.JPG|400px]] |
[[image:Itdaniher--photo.JPG|400px]] |
||
| ⚫ | |||
=== why is this not easier? === |
|||
* nobody has stepped up to package this into a Sugar activity, and it is only needed once for each ProtoSnap, not once for each laptop. |
|||
=== programmer is not responding === |
|||
* The Arduino Pro Mini supplied on the ProtoSnap is different to the Arduino Pro Mini sold alone, in that it has the Arduino Uno bootloader. Since ino defaults to ''uno'', this is normally harmless. If using an Arduino Pro Mini sold alone, create a default .inorc file: |
|||
echo board-model = pro5v328 >> ~/.inorc |
|||
* "Sometimes the [https://www.sparkfun.com/products/10889 proMini] gets stuck and needs a manual reset to reprogram. Try programming it again, and hit the RESET button just before the code is downloaded to the board. This often fixes the board. Afterwards, you shouldn't need to do this again. Hopefully." ''Thanks to the amazing Brian Huang at SparkFun!'' |
|||
== See Also == |
== See Also == |
||
* [[Arduino]] |
* [[Arduino]] |
||
* [http://inotool.org/ Ino], a command line toolkit for working with Arduino hardware, |
|||
| ⚫ | |||
* [http://inotool.org/quickstart Ino quick start guide] |
|||
<references/> |
|||
Latest revision as of 01:56, 17 November 2015
This ProtoSnap Contributors Guide connects your XO to the real world of electronics, sensors and activators -- using SparkFun's now retired ProtoSnap - Pro Mini. We used the Logo-like Turtle Blocks<ref>Turtle Blocks was previously known as Turtle Art.</ref> visual programming environment. Please ask questions on the unleashkids@googlegroups.com mailing list! You can join right here: http://groups.google.com/group/unleashkids
These instructions have been tested on the XO-1 and XO-4 Touch laptop using the latest 13.2.0.
Ingredients
- a ProtoSnap or Arduino Pro Mini, with the StandardFirmata already uploaded, if not see How to upload StandardFirmata to a ProtoSnap using ino, or How to upload StandardFirmata using the Arduino IDE,
- an XO laptop, with OLPC OS 13.2.6,
- a USB cable between the two.
Recipe
- install the TurtleBots-22 activity<ref>TurtleBots is a repackaging of TurtleBlocks by the Butia project with the Arduino plugin already present.</ref>, and start it,
- plug the ProtoSnap or Arduino Pro Mini into the XO laptop using the USB cable, and wait a few seconds for the indicators to stop flashing,
- click on the palette of Arduino blocks,
- notice how only the refresh Arduino block is available,
- drag a refresh Arduino block into the main area, then click on it,
- notice how the rest of the palette is made available; if this doesn't happen you have a problem and cannot proceed,
- drag a pin mode block into the main area, drag the OUTPUT block to the mode socket on the pin mode block,
- drag a digital write block and attach it to the bottom of the pin mode block,
- click on the pin mode block, and it will run both blocks, and the D13 LED on the ProtoSnap or Arduino Pro Mini should turn on.
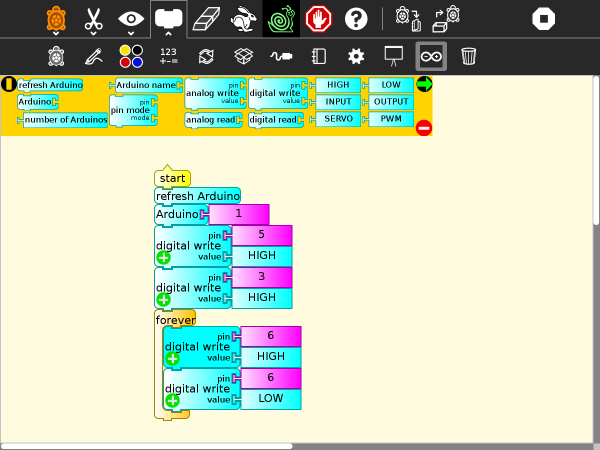
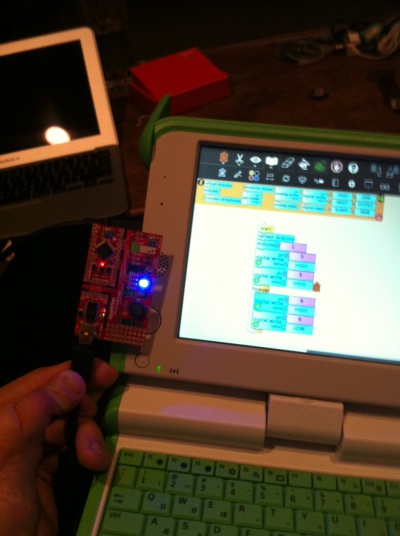
Alternatively, try our sample TurtleBlocks project which uses the other LED on a ProtoSnap:
Please submit all ProtoSnap bug reports to our mailing list: unleashkids@googlegroups.com (join @ http://groups.google.com/group/unleashkids), and all TurtleBlocks or TurtleBots bug reports to sugar-devel@lists.sugarlabs.org
Screenshots
See Also
Notes
<references/>

