Demo notes: Difference between revisions
m (dated!) |
|||
| (23 intermediate revisions by 11 users not shown) | |||
| Line 1: | Line 1: | ||
{{Obsolete|link=see: [[Manuals]]}} |
|||
This page describes demonstration instructions and common bugs and fixes for B1 and B2 laptops. |
|||
{{Translations}} |
|||
:''See also: [[Hardware release notes]], [[Software release notes]], [[Library release notes]]'' |
|||
This page has demonstration instructions and common bugs and fixes ''from 2007'' for B1 and B2 laptops. |
|||
: See also: [[Hardware release notes]], [[Software release notes]], [[Library release notes]] |
|||
: Notes for specific builds: <big>'''[[Demo notes/542|build 542]]''', '''[[Demo notes/608|build 608]]'''</big> |
|||
<div style="float:right; font-size:90%"> |
|||
<!-- |
|||
__TOC__ |
|||
{|width="100%" border="0" cellspacing="0" cellpadding="5" |
|||
</div> |
|||
|- |
|||
|<div style="position:relative;width:60px;height:60px;z-index:2;overflow:hidden;"><div class="nodeco" style="position:absolute;font-size:64px;overflow:hidden;line-height:60px;letter-spacing:60px;">[[:Categorie:Demonstrations|<span title=":Categorie:Demonstrations" style="text-decoration:none;"> </span>]]</div>[[Image:AAAAA.jpg|60px|:Category:Demonstrations]]</div> |
|||
|width="50%" style="font-size:95%"|'''[[:Category:Demonstrations|Demo]] release notes'''<br /> |
|||
[[1]] |
|||
· [[2]] |
|||
· [[3]] |
|||
==Important notes== |
|||
|rowspan="4" style="padding:6px;font-size:1px"| |
|||
|<div style="position:relative;width:60px;height:60px;z-index:2;overflow:hidden;"><div class="nodeco" style="position:absolute;font-size:60px;overflow:hidden;line-height:60px;letter-spacing:60px;">[[:Category:Software|<span title=":Category:Software" style="text-decoration:none;"> </span>]]</div>[[Image:BBBBB.jpg|60px|:Category:Software]]</div> |
|||
|width="50%" style="font-size:95%"|'''[[:Category:Software|Software release notes]]'''<br /> |
|||
[[1]] |
|||
· [[2]] |
|||
· [[3]] |
|||
|- |
|||
|<div style="position:relative;width:60px;height:60px;z-index:2;overflow:hidden;"><div class="nodeco" style="position:absolute;font-size:60px;overflow:hidden;line-height:60px;letter-spacing:60px;">[[:Category:Hardware]]</div>[[Image:CCCCCCC.png|60px|:Category:Hardware]]</div> |
|||
|width="50%" style="font-size:95%;border-top:2px dotted #DDDDF7;"|'''[[:Category:Hardware|Hardware]] release notes'''<br /> |
|||
[[1]] |
|||
· [[2]] |
|||
· [[3]] |
|||
|<div style="position:relative;width:60px;height:60px;z-index:2;overflow:hidden;"><div class="nodeco" style="position:absolute;font-size:60px;overflow:hidden;line-height:60px;letter-spacing:60px;">[[:Category:Content]]</div>[[Image:DDDDDD.svg|60px|:Category:Content]]</div> |
|||
|width="50%" style="font-size:95%;border-top:2px dotted #DDDDF7;"|'''[[:Category:Content|Library]] release notes'''<br /> |
|||
[[linka]] |
|||
· [[linkb]] |
|||
· [[linkc]] |
|||
|} |
|||
--> |
|||
==IMPORTANT:== |
|||
Please note that this is a Beta unit with an Alpha software load. There are bugs that are currently being worked on and not all components are operational, e.g., some keys do not work. We will do our best to document these and get them fixed in a timely manner. |
Please note that this is a Beta unit with an Alpha software load. There are bugs that are currently being worked on and not all components are operational, e.g., some keys do not work. We will do our best to document these and get them fixed in a timely manner. |
||
| Line 41: | Line 18: | ||
# We have yet to implement power management, so keep the machine plugged in as much as possible. |
# We have yet to implement power management, so keep the machine plugged in as much as possible. |
||
More detail is available online at [[ |
More detail is available online at [[BTest Software Notes|http://wiki.laptop.org/go/BTest_Software_Notes]]. |
||
==An overview of the machine== |
==An overview of the machine== |
||
[[image:Drawing75c1.jpg|none]] |
|||
[[image:Drawing75c1.jpg|thumb|300px|center|Click to enlarge]] |
|||
==Getting Started== |
==Getting Started== |
||
===Opening the laptop=== |
===Opening the laptop=== |
||
Position the handle away from you and lift both antennae up and toward you until the laptop clicks open. Lift the screen up from the keyboard; you may have to hold the keyboard down as you lift up on the display. |
Position the handle away from you and lift both antennae up and toward you until the laptop clicks open. Lift the screen up from the keyboard; you may have to hold the keyboard down as you lift up on the display. |
||
<gallery> |
|||
[[Image:Opening-1.jpg]] [[Image:Opening-2.jpg]] |
|||
Image:Opening-1.jpg|lifting the 'bunny' ears |
|||
Image:Opening-2.jpg|laptop 'clicking' open |
|||
</gallery> |
|||
===Power on=== |
===Power on=== |
||
The Power Button is located in the bottom right-hand corner of the bezel surrounding the screen. Note that it takes approximately two minutes for the machine to boot. However, the green power LED should come on immediately. If, for some reason, you do not see text appear on the screen within 15 seconds, or if the machine does not power on at all, please see the [[#Bugs and or Known Issues]] Section at the end of this document. (Note that sometimes the power button gets caught under the bezel.) |
|||
[[Image:Power-button.jpg| |
[[Image:Power-button.jpg|thumb|right|Power button]] |
||
The Power Button is located in the bottom right-hand corner of the bezel surrounding the screen. Note that it takes approximately two minutes for the machine to boot. However, the green power LED should come on immediately. If, for some reason, you do not see text appear on the screen within 15 seconds, or if the machine does not power on at all, please see the [[#Bugs and or Known Issues]] Section at the end of this document. (Note that sometimes the power button gets caught under the bezel.) |
|||
===Power off=== |
===Power off=== |
||
'''Update ''' |
'''Update ''' |
||
There is no longer a shut down mode, just power the device off by using the power button when you want to turn it off. |
There is no longer a shut down mode, just power the device off by using the power button when you want to turn it off. |
||
--------------------------- |
|||
Since we do not yet have suspend/resume implemented, it may be necessary to power off the machine: bring up the Frame onto the screen (using the Frame key or by moving the cursor to a corner.) |
|||
[[Image:Power-off.jpg|none]] |
|||
Put cursor over the X with a circle around it on the upper right-hand corner of the frame. After a moment, “Shut Down” will appear. Click on shutdown. |
|||
==The Frame and the icons== |
|||
Bring up the Frame onto the screen by pushing the button with the “empty rectangle” on it on the upper right-hand corner of the keyboard... |
|||
==The [[OLPC Human Interface Guidelines/The Laptop Experience/The Frame|Frame]] and the icons== |
|||
[[Image:Key_frame.jpg|none|the button with the “empty rectangle”]] |
|||
Bring up the [[OLPC Human Interface Guidelines/The Laptop Experience/The Frame|Frame]] onto the screen by pushing the [[Image:Key_frame.jpg]] key (an “empty rectangle” on it) on the upper right-hand corner of the keyboard or by moving the cursor to any corner of the screen ([[OLPC Human Interface Guidelines/The Laptop Experience/The Frame#Hot Corners|aka 'Hot Corners']]). |
|||
or by moving the cursor to any corner of the screen. |
|||
[[Image:Frame-photo.jpg| |
[[Image:Frame-photo.jpg|center|Here is how the frame is organized and a screen capture of the frame.]] |
||
===Top-left icons (places)=== |
===Top-left icons (places)=== |
||
[[Image:Zoom. |
[[Image:Zoom icons.png|thumb|left|Top-left icons]] |
||
* |
*Disc with 8 dots: This icon shows you the entire [[OLPC Human Interface Guidelines/The Laptop Experience/Zoom Metaphor#Neighborhood|Neighborhood]]. Brings up all users available on the mesh network; |
||
* |
*Disc with 3 dots: This icon takes you to your [[OLPC Human Interface Guidelines/The Laptop Experience/Zoom Metaphor#Groups|Friends/Groups]] view. Shows all users on mesh network that you have identified as friends; |
||
* |
*Disc with 1 dot: This icon takes you to your [[OLPC Human Interface Guidelines/The Laptop Experience/Zoom Metaphor#Home|Home]] screen; |
||
* |
*Disc with rectangle: This icon takes you back to the [[OLPC Human Interface Guidelines/The Laptop Experience/Zoom Metaphor#Activity|Activity]] you were working on. |
||
<br clear='all'> |
|||
===Top-right icons (status)=== |
===Top-right icons (status)=== |
||
'''Update:''' On Build 368 these icons are not available. |
|||
---------------- |
|||
[[Image:Status.jpg|none]] |
|||
'''Update:''' On Build 303+ only the bulletin-board icon is in the upper-right of the frame. |
|||
*Circle with an X: This icon shuts down the laptop; |
|||
*Five bars growing in size from left to right: This icon shows the wireless connection. Click on it to choose a wireless network from a drop-down menu; |
|||
*Circle with overlapping rectangles: This icon toggles the bulletin-board (chat) framework on and off. |
|||
===Bottom-left icons (actions)=== |
===Bottom-left icons (actions)=== |
||
[[Image:Actions.jpg| |
[[Image:Actions.jpg|thumb|200px|left|Bottom-left icons]] |
||
Different builds have different collections of activities. You should see something along the lines of the following: |
|||
From left to right (Note that the order of the icons changes in different builds): |
|||
*'''Globe''': This icon starts the web browser; |
*'''Globe''': This icon starts the web browser; |
||
*'''Shooting Star''': This icon starts the |
*'''Shooting Star''': This icon starts the Etoys activity; |
||
*'''Speaking Bubble''': This icon starts the chat activity; |
*'''Speaking Bubble''': This icon starts the chat activity; |
||
*'''Abstract A''': This icon starts the text editor; |
*'''Abstract A''': This icon starts the text editor; |
||
| Line 110: | Line 80: | ||
*'''Eye''': This icon starts the camera; |
*'''Eye''': This icon starts the camera; |
||
*'''Drum''': This icon start the Tam Tam activity. |
*'''Drum''': This icon start the Tam Tam activity. |
||
Other activities include BlockParty, an ebook reader, a slideshow viewer... |
|||
<br clear='all'> |
|||
==The Keyboard== |
==The Keyboard== |
||
The center part of the touchpad can be used as a pointing device. The entire surface can be used with a stylus. |
|||
The center part of the touchpad can be used as a pointing device. |
|||
[[Image:keyboard-touchpad.jpg|none]] |
|||
==Demo instructions== |
==Demo instructions== |
||
| Line 121: | Line 93: | ||
Demo Suite: |
Demo Suite: |
||
#Web Browsing |
#Web Browsing |
||
#Etoys |
|||
#eToys |
|||
#Memosono Game |
#Memosono Game |
||
#Tam Tam |
#Tam Tam |
||
| Line 128: | Line 100: | ||
#Chat |
#Chat |
||
===[[OLPC Human Interface Guidelines/The Laptop Experience/Zoom Metaphor#Home|Home]] screen=== |
|||
===Home screen=== |
|||
After you turn on the laptop you will come directly to the Home screen. |
|||
[[Image:Hone-screen.jpg|thumb|100px|right|[[OLPC Human Interface Guidelines/The Laptop Experience/Zoom Metaphor#Home|Home]] view]] |
|||
[[Image:Hone-screen.jpg|none]] |
|||
After you turn on the laptop you will come directly to the [[OLPC Human Interface Guidelines/The Laptop Experience/Zoom Metaphor#Home|Home]] screen. |
|||
To begin, bring up the Frame by pushing the “Frame” button on the upper-right corner of the keyboard. |
|||
To begin, bring up the [[OLPC Human Interface Guidelines/The Laptop Experience/The Frame|Frame]] by pushing the “Frame” [[Image:Key_frame.jpg]] key on the upper-right corner of the keyboard. |
|||
[[Image:Key_frame.jpg|none]] |
|||
====The Network==== |
====The Network==== |
||
As many demos use the network (browser, RSS feed, mesh demos), before you begin, the laptop should be associated with a network. The laptop should be able to access any wireless networks in the area. |
As many demos use the network (browser, RSS feed, mesh demos), before you begin, the laptop should be associated with a network. The laptop should be able to access any wireless networks in the area. |
||
Click on the network icon (five bars on the upper-right of the Frame). A list of available wireless networks will show up in a drop down menu. |
Click on the network icon (five bars on the upper-right of the [[OLPC Human Interface Guidelines/The Laptop Experience/The Frame|Frame]]). A list of available wireless networks will show up in a drop down menu. |
||
If you cannot see any networks, it may be because the embedded control did not properly initialize the USB ports (the network controller is a USB device)—you will need to reboot. |
If you cannot see any networks, it may be because the embedded control did not properly initialize the USB ports (the network controller is a [[USB peripherals|USB device]])—you will need to reboot. |
||
====Switching between activities==== |
====[[OLPC Human Interface Guidelines/Activities/Activity Basics#Switching Activities|Switching between activities]]==== |
||
You can have multiple activities running at once—moving between them by returning to the Home view (button with one dot) and clicking on an activity that you'd like to go to. |
|||
You can have multiple activities running at once—moving between them by returning to the Home view (key with one dot—[[Image:Key zoom.jpg]]) and then clicking on an activity that you'd like to go to. |
|||
====Exiting Activities==== |
|||
To exit an activity, click on the Frame button to bring up the Frame. |
|||
====[[OLPC Human Interface Guidelines/Activities/Activity Basics#Ending Activities|Exiting Activities]]==== |
|||
To [[OLPC Human Interface Guidelines/Activities/Activity Basics#Ending Activities|exit an activity]], click on the Frame [[Image:Key frame.jpg]] key to bring up the [[OLPC Human Interface Guidelines/The Laptop Experience/The Frame|Frame]]. |
|||
Put the cursor over the activity icon at the top center of the frame and click on the X with the circle around it. |
Put the cursor over the activity icon at the top center of the frame and click on the X with the circle around it. |
||
| Line 156: | Line 130: | ||
===1. Web Browsing=== |
===1. Web Browsing=== |
||
[[Image:Browser.jpg|thumb|right|Browsing]] |
|||
To launch the web browser, click the "globe" icon at the bottom-left-hand corner of the Frame; place the cursor over the icon and click the left button below the touch pad '''ONCE'''. |
|||
To launch the web browser, click the "globe" icon [[Image:Activity3.png]] at the bottom-left-hand corner of the [[OLPC Human Interface Guidelines/The Laptop Experience/The Frame|Frame]]; place the cursor over the icon and click the left button below the touch pad '''ONCE'''. |
|||
Type search terms into the Google search field or type URL in bar at the top of the screen. |
|||
Type search terms into the Google search field or type URL in bar at the top of the screen. |
|||
[[Image:Browser.jpg|none]] |
|||
Please note that currently, the web browser does not support Flash, Java or Chinese characters. |
Please note that currently, the web browser does not support Flash, Java or Chinese characters. |
||
<br clear='all'> |
|||
===2. Etoys=== |
===2. [[Etoys]]=== |
||
[[Image:etoys-start.jpg|Etoys start screen|thumb|right|Etoys]] |
|||
From the frame, click the shooting-star icon, '''ONCE'''. The etoys activity will load and show a launch screen: |
|||
From the frame, click the shooting-star icon [[Image:Activity1.png]], '''ONCE'''. The Etoys activity will load and show a launch screen: |
|||
* yellow "demo": shows a "welcome demo" that will run in a loop. You can exit the demo by clicking "PREV" in the orange "Navigator" bar at the bottom left. |
* yellow "demo": shows a "welcome demo" that will run in a loop. You can exit the demo by clicking "PREV" in the orange "Navigator" bar at the bottom left. |
||
* orange "tutorial game": a nice tutorial to learn about Etoys "handles". |
* orange "tutorial game": a nice tutorial to learn about Etoys "handles". |
||
* violet "new project": start creating your own projects. Journal integration is still missing, but you can save your work to the MyEtoys folder by pressing "PUBLISH" in the orange navbar. There is extensive documentation on [[Etoys]] in the wiki (start [[Sugar |
* violet "new project": start creating your own projects. Journal integration is still missing, but you can save your work to the MyEtoys folder by pressing "PUBLISH" in the orange navbar. There is extensive documentation on [[Etoys]] in the wiki (start [[Sugar Etoys|here]]) and at [http://squeakland.org squeakland.org]. |
||
* green "project gallery": Load example science and fun projects |
* green "project gallery": Load example science and fun projects |
||
* blue "load project": find a project on disk. |
* blue "load project": find a project on disk. |
||
[[Image:NavigatorFlap.jpeg|center]] |
|||
[[Image:etoys-start.jpg|Etoys start screen]] |
|||
===3. Memosono game=== |
===3. Memosono game=== |
||
This is a memory game for two players. Winner matches the most images and completes his/her ice-cream cone on the right-hand side. |
This is a memory game for two players. Winner matches the most images and completes his/her ice-cream cone on the right-hand side. |
||
From the Frame, click on the icon that looks like a 3×3 matrix. |
From the [[OLPC Human Interface Guidelines/The Laptop Experience/The Frame|Frame]], click on the icon that looks like a 3×3 matrix—[[Image:Activity7.png]]. |
||
Play game by giving each player a turn to click on pairs of blocks to reveal images with corresponding sounds. The object of the game is to make as many matches as possible. |
Play game by giving each player a turn to click on pairs of blocks to reveal images with corresponding sounds. The object of the game is to make as many matches as possible. |
||
===4. |
===4. [[TamTam]]=== |
||
From the Frame, click on the drum icon. |
|||
[[Image:Tamtam.jpg| |
[[Image:Tamtam.jpg|thumb|right|[[TamTam]]]] |
||
From the [[OLPC Human Interface Guidelines/The Laptop Experience/The Frame|Frame]], click on the drum icon—[[Image:Activity8.png]]. |
|||
Each picture on the right-hand side of the screen makes its own distinct sound. Click on the drum icons on the lower-right corner to set a beat for your composition. The far-right slider controls tempo of the drum. |
Each picture on the right-hand side of the screen makes its own distinct sound. Click on the drum icons on the lower-right corner to set a beat for your composition. The far-right slider controls tempo of the drum. |
||
| Line 193: | Line 169: | ||
===5. Dual-resolution display=== |
===5. Dual-resolution display=== |
||
These are instructions for demonstrating both the color and the black-and-white modes of the display from any activity. In black-and-white mode, with the backlight off, the screen is high resolution and viewable in sunlight; it is the most energy-efficient setting. |
These are instructions for demonstrating both the color and the black-and-white modes of the display from any activity. In black-and-white mode, with the backlight off, the screen is high resolution and viewable in sunlight; it is the most energy-efficient setting. |
||
| Line 213: | Line 190: | ||
When in this mode, keyboard and touchpad are covered, so only game controller buttons (which can be used for scrolling), camera, and microphone work. |
When in this mode, keyboard and touchpad are covered, so only game controller buttons (which can be used for scrolling), camera, and microphone work. |
||
<gallery> |
|||
[[Image:Rotate-1.jpg|none]] |
|||
Bring the display up to a 90-degree angle (and put the antennae down). |
Image:Rotate-1.jpg|Bring the display up to a 90-degree angle (and put the antennae down). |
||
Image:Rotate-2.jpg|Rotate the display 180 degrees until it is facing backwards. |
|||
Rotate the display |
Image:Rotate-3.jpg|Lay the display down onto the keyboard. |
||
Image:Rotate-4.jpg|Enjoy! |
|||
</gallery> |
|||
Lay the display down onto the keyboard. |
|||
[[Image:Rotate-4.jpg|none]] |
|||
====Using the camera==== |
====Using the camera==== |
||
The camera can be used in ebook mode, but needs to be turned on in laptop mode: from the Frame, click on the eye icon. Turn off the Frame and then put the laptop into ebook mode. |
The camera can be used in ebook mode, but needs to be turned on in laptop mode: from the [[OLPC Human Interface Guidelines/The Laptop Experience/The Frame|Frame]], click on the eye icon—[[Image:Activity6.png]]. Turn off the Frame and then put the laptop into ebook mode. |
||
===7. Chat=== |
===7. Chat=== |
||
Prerequisite--sign onto Wireless network--I had better luck with an open network that required no authentication. |
|||
Prerequisite--sign onto Wireless network—preferably an open network that requires no authentication. |
|||
* Go to network view. (Circle with 8 dots: This icon shows you the entire Neighborhood. Brings up all users available on the mesh network;) |
|||
* Go to network view. ([[Image:Key zoom.jpg]]—Circle with 8 dots: This icon shows you the entire [[OLPC Human Interface Guidelines/The Laptop Experience/Zoom Metaphor#Neighborhood|Neighborhood]]. Brings up all users available on the mesh network;) |
|||
* Add other XO icons as friends by selecting them. |
* Add other XO icons as friends by selecting them. |
||
* Open Chat application by clicking on balloon icon. |
* Open Chat application by clicking on balloon icon—[[Image:Activity2.png]]. |
||
* Return to network view |
* Return to network view |
||
* You should see the XO characters as well as the chat activity |
* You should see the XO characters as well as the chat activity |
||
| Line 236: | Line 213: | ||
* Wait a minute |
* Wait a minute |
||
* Start chatting. |
* Start chatting. |
||
===8. Write=== |
===8. Write=== |
||
[[Image:Activity4.png]] |
|||
===9. BlockParty=== |
===9. BlockParty=== |
||
This is a tetris-like game |
This is a tetris-like game |
||
===10. Paint=== |
===10. Paint=== |
||
This is an activity to make drawings and paintings. |
This is an activity to make drawings and paintings. |
||
| Line 249: | Line 231: | ||
===13. Calculadora=== |
===13. Calculadora=== |
||
This is a simple calculator, it can sum,substract, divide and multiply. |
|||
This is a simple calculator, it can sum, subtract, divide and multiply. |
|||
==Other How To’s:== |
|||
==Other HowTo's== |
|||
===How to see what programs are running=== |
===How to see what programs are running=== |
||
Turn on the |
Turn on the [[OLPC Human Interface Guidelines/The Laptop Experience/The Frame|Frame]] and click the circle with one dot in it at the top left hand corner of the frame or push that same button on the top row of the keys on the keyboard. |
||
[[Image:Key_zoom.jpg]] — Buttons from Left to Right: [[OLPC Human Interface Guidelines/The Laptop Experience/Zoom Metaphor#Neighborhood|Neighborhood]], [[OLPC Human Interface Guidelines/The Laptop Experience/Zoom Metaphor#Groups|Friends/Groups]], [[OLPC Human Interface Guidelines/The Laptop Experience/Zoom Metaphor#Home|Home]], Back to [[OLPC Human Interface Guidelines/The Laptop Experience/Zoom Metaphor#Activity|Activity]] |
|||
[[Image:Key_zoom.jpg|none]] |
|||
Buttons from Left to Right: Neighborhood, Friends, Home, Back to Activity |
|||
[[Image:Home.jpg|thumb| |
[[Image:Home.jpg|thumb|right]] |
||
Home screen will come up, but this time, icons that represent the programs running will appear in a circle around the XO logo. This is called the activity ring. When the ring is full you will not be able to start any more activities. |
[[OLPC Human Interface Guidelines/The Laptop Experience/Zoom Metaphor#Home|Home]] screen will come up, but this time, icons that represent the programs running will appear in a circle around the XO logo. This is called the activity ring. When the ring is full you will not be able to start any more activities. |
||
Click the icon to access that activity. |
Click the icon to access that activity. |
||
| Line 266: | Line 249: | ||
==Bugs and or Known Issues== |
==Bugs and or Known Issues== |
||
===1. Keys that do not work=== |
===1. Keys that do not work=== |
||
[[Image:Key_volume.jpg|none]] |
|||
[[Image:Key_camera_mic.jpg]] — Camera/microphone toggle key |
|||
Volume keys on the top row |
|||
[[Image:Key_camera_mic.jpg|none]] |
|||
[[Image:Key_grab.jpg]] — Grab keys (on either side of the space bar) |
|||
Camera/microphone toggle key |
|||
[[Image:Key_grab.jpg|none]] |
|||
Grab keys (on either side of the space bar) |
|||
===2. The laptop does not turn on=== |
===2. The laptop does not turn on=== |
||
You must unplug the laptop and remove the battery. |
You must unplug the laptop and remove the battery. |
||
Turn the XO over and move the button on the right side to the right. This will unlock the battery. |
Turn the XO over and move the button on the right side to the right. This will unlock the battery. |
||
[[Image:Battery-1.jpg|thumb|none]] |
|||
[[Image:Battery-1.jpg|250px]] [[Image:Battery-2.jpg|250px]] |
|||
Move button on the left side to the left while lifting up the battery. Remove the battery '''and wait at least 30 seconds'''. Replace the battery and lock the battery in place. Plug the laptop back in. |
Move button on the left side to the left while lifting up the battery. Remove the battery '''and wait at least 30 seconds'''. Replace the battery and lock the battery in place. Plug the laptop back in. |
||
[[Image:Battery-2.jpg|thumb|none]] |
|||
Note that if you have completely discharged your battery, you will have to run the laptop without the battery—a bug in the battery-charge circuit prevents the charging of a completely dead battery. |
Note that if you have completely discharged your battery, you will have to run the laptop without the battery—a bug in the battery-charge circuit prevents the charging of a completely dead battery. |
||
===3. The touch pad and keyboard are locked up=== |
===3. The touch pad and keyboard are locked up=== |
||
This most likely caused by static. Try the "four-finger salute": depress the four keys in the four corners of the keyboard (Fn, Esc, Frame, and Right Arrow). If this does not help, follow the instructions for restarting the laptop by removing the battery. |
|||
This most likely caused by static. |
|||
Follow the instructions for restarting the laptop by removing the battery. |
|||
===4. I can’t shut an activity down because the icon does not show up in the Frame=== |
|||
There is no other fix for this except shutting the device down and removing the battery. |
|||
===4. I can’t shut an activity down=== |
|||
[[Category:Press]] |
|||
If an activity doesn't show up in the frame, try restarting Sugar by typing Ctrl-Alt-Erase. It should take about 30 seconds for Sugar to restart. If that fails, then try power-cycling the machine by pushing the power button. If all else fails, unplug the machine and remove the battery. Wait 30 seconds and then reinsert the battery, plug it back in, and power on. |
|||
[[Category:General Public]] |
|||
[[Category:Developers]] |
|||
[[Category:Sugar]] |
|||
Latest revision as of 22:55, 3 November 2011
This page has demonstration instructions and common bugs and fixes from 2007 for B1 and B2 laptops.
- See also: Hardware release notes, Software release notes, Library release notes
- Notes for specific builds: build 542, build 608
Important notes
Please note that this is a Beta unit with an Alpha software load. There are bugs that are currently being worked on and not all components are operational, e.g., some keys do not work. We will do our best to document these and get them fixed in a timely manner.
- The touch pad is sensitive and can be hard to maneuver until you get used to it. (It needs tuning.)
- When you click on an icon, please click only ONCE or the application will load many times. Sometimes applications are slow to load. BE PATIENT.
- Static is an issue with these units, please use static guard around demo areas to reduce static from carpet.
- We have yet to implement power management, so keep the machine plugged in as much as possible.
More detail is available online at http://wiki.laptop.org/go/BTest_Software_Notes.
An overview of the machine

Getting Started
Opening the laptop
Position the handle away from you and lift both antennae up and toward you until the laptop clicks open. Lift the screen up from the keyboard; you may have to hold the keyboard down as you lift up on the display.
lifting the 'bunny' ears

laptop 'clicking' open


Power on

The Power Button is located in the bottom right-hand corner of the bezel surrounding the screen. Note that it takes approximately two minutes for the machine to boot. However, the green power LED should come on immediately. If, for some reason, you do not see text appear on the screen within 15 seconds, or if the machine does not power on at all, please see the #Bugs and or Known Issues Section at the end of this document. (Note that sometimes the power button gets caught under the bezel.)
Power off
Update
There is no longer a shut down mode, just power the device off by using the power button when you want to turn it off.
The Frame and the icons
Bring up the Frame onto the screen by pushing the ![]() key (an “empty rectangle” on it) on the upper right-hand corner of the keyboard or by moving the cursor to any corner of the screen (aka 'Hot Corners').
key (an “empty rectangle” on it) on the upper right-hand corner of the keyboard or by moving the cursor to any corner of the screen (aka 'Hot Corners').

Top-left icons (places)
- Disc with 8 dots: This icon shows you the entire Neighborhood. Brings up all users available on the mesh network;
- Disc with 3 dots: This icon takes you to your Friends/Groups view. Shows all users on mesh network that you have identified as friends;
- Disc with 1 dot: This icon takes you to your Home screen;
- Disc with rectangle: This icon takes you back to the Activity you were working on.
Top-right icons (status)
Update: On Build 303+ only the bulletin-board icon is in the upper-right of the frame.
Bottom-left icons (actions)

Different builds have different collections of activities. You should see something along the lines of the following:
- Globe: This icon starts the web browser;
- Shooting Star: This icon starts the Etoys activity;
- Speaking Bubble: This icon starts the chat activity;
- Abstract A: This icon starts the text editor;
- Penguin in front of the TV: This icon starts the RSS-feed reader;
- 3×3 Matrix: This icon starts the Memosono game;
- Eye: This icon starts the camera;
- Drum: This icon start the Tam Tam activity.
Other activities include BlockParty, an ebook reader, a slideshow viewer...
The Keyboard
The center part of the touchpad can be used as a pointing device.
Demo instructions
Patience is very important: the user interface does not yet tell you that it is busy starting activities, and we have just begun performance work. You are using alpha test software.
Demo Suite:
- Web Browsing
- Etoys
- Memosono Game
- Tam Tam
- Dual resolution monitor
- eBook and Camera
- Chat
Home screen

After you turn on the laptop you will come directly to the Home screen.
To begin, bring up the Frame by pushing the “Frame” ![]() key on the upper-right corner of the keyboard.
key on the upper-right corner of the keyboard.
The Network
As many demos use the network (browser, RSS feed, mesh demos), before you begin, the laptop should be associated with a network. The laptop should be able to access any wireless networks in the area.
Click on the network icon (five bars on the upper-right of the Frame). A list of available wireless networks will show up in a drop down menu.
If you cannot see any networks, it may be because the embedded control did not properly initialize the USB ports (the network controller is a USB device)—you will need to reboot.
Switching between activities
You can have multiple activities running at once—moving between them by returning to the Home view (key with one dot—![]() ) and then clicking on an activity that you'd like to go to.
) and then clicking on an activity that you'd like to go to.
Exiting Activities
To exit an activity, click on the Frame ![]() key to bring up the Frame.
key to bring up the Frame.
Put the cursor over the activity icon at the top center of the frame and click on the X with the circle around it.

1. Web Browsing

To launch the web browser, click the "globe" icon ![]() at the bottom-left-hand corner of the Frame; place the cursor over the icon and click the left button below the touch pad ONCE.
at the bottom-left-hand corner of the Frame; place the cursor over the icon and click the left button below the touch pad ONCE.
Type search terms into the Google search field or type URL in bar at the top of the screen.
Please note that currently, the web browser does not support Flash, Java or Chinese characters.
2. Etoys

From the frame, click the shooting-star icon ![]() , ONCE. The Etoys activity will load and show a launch screen:
, ONCE. The Etoys activity will load and show a launch screen:
- yellow "demo": shows a "welcome demo" that will run in a loop. You can exit the demo by clicking "PREV" in the orange "Navigator" bar at the bottom left.
- orange "tutorial game": a nice tutorial to learn about Etoys "handles".
- violet "new project": start creating your own projects. Journal integration is still missing, but you can save your work to the MyEtoys folder by pressing "PUBLISH" in the orange navbar. There is extensive documentation on Etoys in the wiki (start here) and at squeakland.org.
- green "project gallery": Load example science and fun projects
- blue "load project": find a project on disk.

3. Memosono game
This is a memory game for two players. Winner matches the most images and completes his/her ice-cream cone on the right-hand side.
From the Frame, click on the icon that looks like a 3×3 matrix—![]() .
.
Play game by giving each player a turn to click on pairs of blocks to reveal images with corresponding sounds. The object of the game is to make as many matches as possible.
4. TamTam

From the Frame, click on the drum icon—![]() .
.
Each picture on the right-hand side of the screen makes its own distinct sound. Click on the drum icons on the lower-right corner to set a beat for your composition. The far-right slider controls tempo of the drum.
Use the keyboard to play sounds at different pitches.
5. Dual-resolution display
These are instructions for demonstrating both the color and the black-and-white modes of the display from any activity. In black-and-white mode, with the backlight off, the screen is high resolution and viewable in sunlight; it is the most energy-efficient setting.
On the top row of the keyboard is a long button with different-sized solid circles.
The two larger circles control the B&W and color modes on the display.
- Pushing the largest circle (far right) puts the display into B&W mode.
- Pushing the second largest (second from the right) circle puts the display into color mode.
The two smaller circles on the left side of the button control the backlight.
- To turn off the backlight, press the smallest dot (on the far left) 12 to 15 times.
- To turn on the backlight, press the second dot from the left between 12 and 15 times.
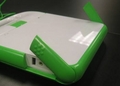
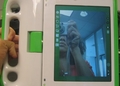
6. Handheld mode (or eBook mode) and camera mode
When in this mode, keyboard and touchpad are covered, so only game controller buttons (which can be used for scrolling), camera, and microphone work.
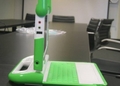
Bring the display up to a 90-degree angle (and put the antennae down).
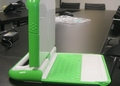
Rotate the display 180 degrees until it is facing backwards.
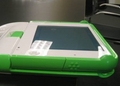
Lay the display down onto the keyboard.
Enjoy!


Using the camera
The camera can be used in ebook mode, but needs to be turned on in laptop mode: from the Frame, click on the eye icon—![]() . Turn off the Frame and then put the laptop into ebook mode.
. Turn off the Frame and then put the laptop into ebook mode.
7. Chat
Prerequisite--sign onto Wireless network—preferably an open network that requires no authentication.
- Go to network view. (
 —Circle with 8 dots: This icon shows you the entire Neighborhood. Brings up all users available on the mesh network;)
 - Add other XO icons as friends by selecting them.
- Open Chat application by clicking on balloon icon—
 .
. - Return to network view
- You should see the XO characters as well as the chat activity
- Click on the chat activity
- Wait a minute
- Start chatting.
8. Write
![]()
9. BlockParty
This is a tetris-like game
10. Paint
This is an activity to make drawings and paintings.
11. Slideshow
12. News Reader
13. Calculadora
This is a simple calculator, it can sum, subtract, divide and multiply.
Other HowTo's
How to see what programs are running
Turn on the Frame and click the circle with one dot in it at the top left hand corner of the frame or push that same button on the top row of the keys on the keyboard.
![]() — Buttons from Left to Right: Neighborhood, Friends/Groups, Home, Back to Activity
— Buttons from Left to Right: Neighborhood, Friends/Groups, Home, Back to Activity

Home screen will come up, but this time, icons that represent the programs running will appear in a circle around the XO logo. This is called the activity ring. When the ring is full you will not be able to start any more activities.
Click the icon to access that activity.
Bugs and or Known Issues
1. Keys that do not work
![]() — Camera/microphone toggle key
— Camera/microphone toggle key
![]() — Grab keys (on either side of the space bar)
— Grab keys (on either side of the space bar)
2. The laptop does not turn on
You must unplug the laptop and remove the battery.
Turn the XO over and move the button on the right side to the right. This will unlock the battery.


Move button on the left side to the left while lifting up the battery. Remove the battery and wait at least 30 seconds. Replace the battery and lock the battery in place. Plug the laptop back in.
Note that if you have completely discharged your battery, you will have to run the laptop without the battery—a bug in the battery-charge circuit prevents the charging of a completely dead battery.
3. The touch pad and keyboard are locked up
This most likely caused by static. Try the "four-finger salute": depress the four keys in the four corners of the keyboard (Fn, Esc, Frame, and Right Arrow). If this does not help, follow the instructions for restarting the laptop by removing the battery.
4. I can’t shut an activity down
If an activity doesn't show up in the frame, try restarting Sugar by typing Ctrl-Alt-Erase. It should take about 30 seconds for Sugar to restart. If that fails, then try power-cycling the machine by pushing the power button. If all else fails, unplug the machine and remove the battery. Wait 30 seconds and then reinsert the battery, plug it back in, and power on.