XO 1.75 11089 Fix: Difference between revisions
Jump to navigation
Jump to search
(verify the symptom message against source code, openfirmware:dev/olpc/spiflash/spiflash.fth) |
(again, i do not wish to support this fix against later versions unless there is clear evidence that it fixes it. i've heard none.) |
||
| Line 2: | Line 2: | ||
Version Q4B05 of [[Open Firmware|OpenFirmware]] for the [[XO 1.75 B1]] laptop had a bug (<trac>11089</trac>) which caused the laptops to boot up with a white screen if it has been ten days since their manufacture, or if the RTC battery is removed. The symptom is a blank white screen on power-up. |
Version Q4B05 of [[Open Firmware|OpenFirmware]] for the [[XO 1.75 B1]] laptop had a bug (<trac>11089</trac>) which caused the laptops to boot up with a white screen if it has been ten days since their manufacture, or if the RTC battery is removed. The symptom is a blank white screen on power-up. |
||
The bug is fixed in Q4B06 of OpenFirmware. ''These instructions have only been formally tested with Q4B06. Later versions might work, but have not been formally tested.'' <!-- if you formally test a later version, please report this to devel@ or techteam@ ... you must test it on a bricked laptop. --> |
|||
The bug is fixed in Q4B06 of OpenFirmware. |
|||
==You Need== |
==You Need== |
||
* the bricked laptop, we call it the ''target'', |
|||
* another computer, we call it the ''host'', |
|||
* a [[Serial_adapters|serial adapter]], |
* a [[Serial_adapters|serial adapter]], |
||
* the coloured serial cable compatible with the adapter, |
* the coloured serial cable compatible with the adapter, |
||
| Line 14: | Line 16: | ||
==The Fix== |
==The Fix== |
||
# Turn off the |
# Turn off the target, unplug the power cable, and remove the battery, |
||
# [[Disassembly_top|Disassemble the laptop]] to access the motherboard. The display does not need to be disconnected; it can be moved slightly out of the way to access the back panel screws (after removing the back panel screws it helps to screw one or two display screws so that the display is not in the way while attaching the serial cable). The heat spreader does not have to be removed. |
# [[Disassembly_top|Disassemble the target laptop]] to access the motherboard. The display does not need to be disconnected; it can be moved slightly out of the way to access the back panel screws (after removing the back panel screws it helps to screw one or two display screws so that the display is not in the way while attaching the serial cable). The heat spreader does not have to be removed. |
||
# Plug |
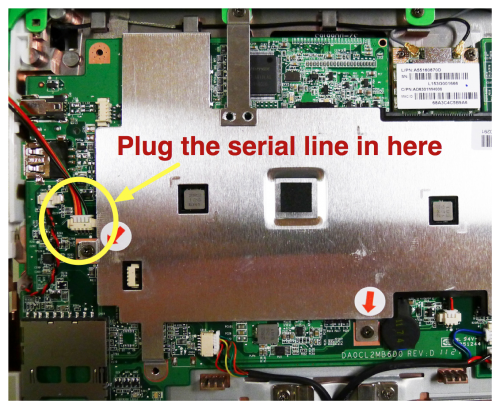
# Plug the white end of the serial cable into the target, see [[#Finding_the_Serial_Port|below]] for where it goes, |
||
# Plug in a USB drive with |
# Plug in a USB drive with q4b06.rom into the target, |
||
# Attach the black end of the serial cable to a [[Serial_adapters|serial adapter]], |
# Attach the black end of the serial cable to a [[Serial_adapters|serial adapter]], |
||
# Attach the serial adapter to |
# Attach the serial adapter to the host, |
||
# Insert the battery, |
# Insert the battery into the target, |
||
# Plug the power cable back in, (use only the provided power adapter, not an older one), |
# Plug the power cable back in to the target, (use only the provided power adapter, not an older one), |
||
# Configure a [[Serial_adapters#Software|terminal emulator]], |
# Configure a [[Serial_adapters#Software|terminal emulator]] on the host, |
||
# Power on the |
# Power on the target. It should print out a boot sequence over the serial port, which will be shown by the terminal emulator on the host. The sequence should end in ''Unsupported SPI FLASH ID''. It should then provide an ''ok'' prompt. If at this point, it stops somewhere else or doesn't provide a prompt (like after ''Releasing'') you have another problem. Please contact [[User:wad|wad]]. |
||
# Type "dir u:" in the terminal emulator to initialize the USB stack. |
# Type "dir u:" in the terminal emulator to initialize the USB stack. |
||
# Type "flash u:\q4b06.rom" in the terminal emulator and the |
# Type "flash u:\q4b06.rom" in the terminal emulator and the target will rewrite the firmware and reboot. |
||
# Turn off the |
# Turn off the target, remove the serial cable (if it is no longer required), and [[Disassembly_top#Replacing_the_back_cover|reassemble]]. |
||
===Finding the Serial Port=== |
===Finding the Serial Port=== |
||
Revision as of 22:23, 29 August 2011
This page is monitored by the OLPC team.
Version Q4B05 of OpenFirmware for the XO 1.75 B1 laptop had a bug (<trac>11089</trac>) which caused the laptops to boot up with a white screen if it has been ten days since their manufacture, or if the RTC battery is removed. The symptom is a blank white screen on power-up.
The bug is fixed in Q4B06 of OpenFirmware. These instructions have only been formally tested with Q4B06. Later versions might work, but have not been formally tested.
You Need
- the bricked laptop, we call it the target,
- another computer, we call it the host,
- a serial adapter,
- the coloured serial cable compatible with the adapter,
- a screwdriver,
- a USB drive,
- between five and fifty minutes depending on your skill.
The Fix
- Turn off the target, unplug the power cable, and remove the battery,
- Disassemble the target laptop to access the motherboard. The display does not need to be disconnected; it can be moved slightly out of the way to access the back panel screws (after removing the back panel screws it helps to screw one or two display screws so that the display is not in the way while attaching the serial cable). The heat spreader does not have to be removed.
- Plug the white end of the serial cable into the target, see below for where it goes,
- Plug in a USB drive with q4b06.rom into the target,
- Attach the black end of the serial cable to a serial adapter,
- Attach the serial adapter to the host,
- Insert the battery into the target,
- Plug the power cable back in to the target, (use only the provided power adapter, not an older one),
- Configure a terminal emulator on the host,
- Power on the target. It should print out a boot sequence over the serial port, which will be shown by the terminal emulator on the host. The sequence should end in Unsupported SPI FLASH ID. It should then provide an ok prompt. If at this point, it stops somewhere else or doesn't provide a prompt (like after Releasing) you have another problem. Please contact wad.
- Type "dir u:" in the terminal emulator to initialize the USB stack.
- Type "flash u:\q4b06.rom" in the terminal emulator and the target will rewrite the firmware and reboot.
- Turn off the target, remove the serial cable (if it is no longer required), and reassemble.
Finding the Serial Port
You will need an XO serial adapter designed for use with XOs. The serial port to use is UART3 (CN8). There is a chart showing the location, and this photo:
