Sugar Instructions
Installing
If you have a real laptop, Sugar is already installed. Otherwise you can either use an emulated laptop which will have Sugar built in, or you can install Python on your desktop PC and run the Sugar application directly on your PC. If you are running Sugar from Python then you can skip most of the stuff in the next section, up to choosing your user name.
First Booting
Whenever you boot an emulated laptop, press SPACE to choose emulated.
The real or emulated laptop will go through the booting steps, saying OK after each one. Don't press or type anything.
Then it will go to a login prompt. You don't have to type anything. Just wait and it will start the GUI. If you don't want to wait for the GUI to load, you can log in with username "root" and no password.
If you wait, the GUI will start. If the GUI fails to start, you may have forgotten to choose emulated when you booted, or you may have encountered the "GUI won't start" bug. The "GUI won't start" bug is fixed by reinstalling the hard disk image. In QEMU, delete the .img file (it has become corrupted), and extract the original .img file from the bz2 file, or download the image file again. Upgrading to a later version isn't necessary.
Choosing a User-name
The first time Sugar starts it will pop up with a box asking for a username. Type in any name you want the computer to call you. Don't leave it blank. Press OK or Enter. It will automatically choose a colour for you.
Sugar Desktop
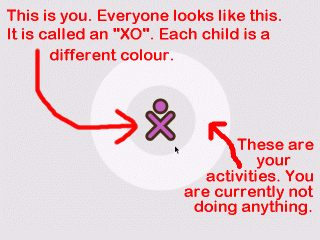
The Sugar desktop starts up in "Home" mode. This shows a picture of you, surrounded by the activities you are currently using.
 If you aren't running any activities, then there isn't much here. You can't actually do much on this screen.
There are three different levels of "zoom", so you can see not just yourself and your activities, but also your friends, or everyone on the local network. If you have a real laptop keyboard, you can use these keys on the top row of the keyboard to change the zoom level:
The first one with lots of dots shows everyone in the "neighbourhood", and what activities they are sharing. The second one with three dots shows just your friends and their activities. The third one with a single dot represents the "home" mode it started in, with just you and your activities. The fourth one with the rectangle, toggles an extra transparent layer on top of the view, where you can add comments and stick items, like an old-fashioned buletin board, that you want to share with everyone in that view.
The Frame
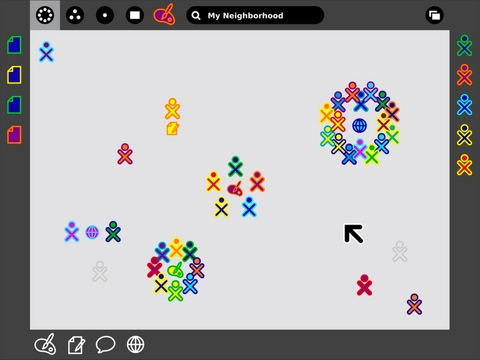
To actually do anything, you need to make the toolbar frame pop in from the sides. Move the cursor to any corner of the screen, or hover it on the edge of the screen, and the frame will pop in like this:
The top of the frame has the icons for "neigbourhood", "friends", "home", and "bulletin board", just like on the keyboard. It also has something like the Windows "task bar" with the icons for the currently running activities. The activities are colour coded with the colours of whoever started the activity. In this case the painting activity was stared by the orange and purple girl, who you can see surrounding the orange and purple activity in the neighbourhood view in the middle of that screen.
The top frame also has a shut-down button which isn't shown above, but which looks like an x. It is used to shut down the computer.
The left frame is the clipboard. You can copy multiple items to the clipboard.
The right frame is your buddy list. It shows your friends that are online.
The bottom frame is like the windows start menu that you use for launching applications. The icons represent different activities that you can start. In the above screenshot, the activities are from left-to-right: painting, word processor, chat, and web browser. You will also have other activities on your laptop. A shooting star icon will represent Squeak e-toys, which is a fun visual programming and drawing application.
