Clean-install procedure for 8.2
Jump to navigation
Jump to search
This page provides parallel instructions for installing both signed builds (official or candidate releases) and unsigned development builds for Friends in Testing.
Note that a clean install will reflash your XO; everything you created will be deleted. See olpc-update for an update mechanism that preserves some data.
Official and Candidate Builds
For the general public
- Download the OS image and its signatures file to your local computer. These are compressed files, but DO NOT open them — in your browser click the right mouse button over the link and choose "Save Link/Target As...".
- Official OS images can be downloaded from http://download.laptop.org/xo-1/os/official/ (older, well-tested images), http://download.laptop.org/xo-1/os/candidate/ (newer, candidate images).
- Copy these files onto a clean (Full, not Quick!, formatted) USB storage device that has at least 500 MB of space. Your USB storage device should now contain two files named something like: en708-1.img and fs.zip.
- Unmount the USB storage device and disconnect it from your computer when it is safe to do so.
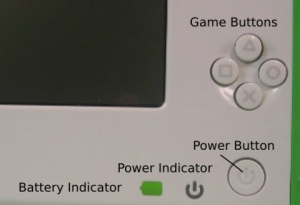
- Shut down your XO laptop. Connect the USB storage device to the XO Laptop and power up while holding all the four game keys. (this is VERY important!)
- Release the game keys when the XO asks you to. The XO will take a few minutes to rewrite its memory.
- Reboot.
- Check that you have the correct build:
- Follow How to check the OS and firmware versions.
- Verify that the build number matches build number of the image file you downloaded, e.g. "Update.1 708, firmware Q2D16" for en708-1.
- You will then need to install the G1G1 Activity pack link here.
Development Builds
For Developers
- Get a developer key for your XO laptop and save it in security/develop.sig on a USB stick.
- Download the OS image (e.g. Template:Official-img-link) and its CRC file (e.g. Template:Official-crc-link) to your local computer. DO NOT open them. Important: If your computer runs on MS Windows, point your cursor on the link, click the right mouse button and choose "Save Link Target As". If you are using a Mac, use Safari for the downloads and hold down the control key when you click on the link and choose "Download linked file as..." and choose the USB memory stick as the target.
- Other development images can be found at places like the joyride build stream (e.g. joyride-2230) and from many other sources.
- Copy these files onto of a clean (Full (not Quick!) formatted) USB memory stick. Your USB memory stick should now contain two files named: for example, osos860.img and osos860.crc.
- Unmount the USB memory stick and disconnect it from your computer when it is safe to do so.
- Shut down your XO laptop. Insert the USB stick into the XO Laptop and power up while holding the escape key (the circled "x" in the upper left corner of the keyboard).
- Release the 'x' key when it asks you to. You should be at the OpenFirmware "ok" prompt.
- Assuming that your disk image is named _____.img, type
probe-usb copy-nand disk:\____.img
- (e.g. os708.img, os2230.img, en708-1.img, ...)
- 8. Press Enter, then wait while your machine reflashes.
- 9. When the "ok" prompt returns, reboot the machine by typing reboot.
