XO 1.5 USB Keyboard
This page describes how to change the keyboard in a XO-1.5 Laptop to a non-membrane USB version.
Scope
These are detailed instructions for installing a non-membrane keyboard into an XO-1.5 laptop. They apply to all pre-production as well as production models. With little change, they also apply to the later model of the XO-1 (with a single capacitive touchpad).
Credit is freely given to the author of the instructions for doing this modification to an XO-1 (part I, II), found on instructables.com.
WARNING
This modification includes permanent modifications of the XO laptop, and cannot be reversed. Even if you are experienced, there is a significant chance of damaging the laptop beyond repair while following these instructions.
Material
You will need:
- An XO-1 (CL1A) or XO-1.5 (CL1B) laptop
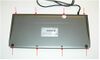
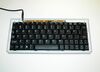
- A micro USB keyboard (such as this one).
- A #1 screwdriver
- Fine pitch soldering equipment
- A magnifier of some sort (lens, loupe, microscope...)
- An X-Acto knife
- A small file and/or fine grade sandpaper
- A way of cutting steel and grinding plastic (such as a Dremel tool)
- cellulose (scotch) or polymide (kapton, preferred) tape
- quick drying epoxy glue or archival double-sided tape

Instructions
Preparing the Keyboard
Test the new USB keyboard by plugging it into the XO and typing on it

Open up the USB keyboard.

Separate the keyboard controller (KBC) from the keyboard by gently pulling on the FPC.


Remove (unsolder) the LEDs and XTAL
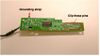

Clip the pins on the board bottom Move the XTAL
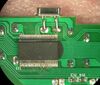

Insulate the XTAL
<photo of modified USB KBC board>
Remove the stress relief and first 25cm of insulation (leave USB A end on cable for testing, for now). Remove the plastic tabs at the top of the keyboard.
<photo of USB keyboard tabs being removed>
Reattach the keyboard to the USB KBC, and retest it for full functionality.