Smalltalk Development on XO
General Introduction
The Etoys activity installed on XO is written in the Squeak Smalltalk system. Namely, it comes with all development tools and class libraries for it. Etoys pretends to be an application for end-users, but it is just a kids' playground guarded by soft fences, so to speak. Once you make a hole on the fences and get outside, you will have access to a full-fledged, general purpose, multimedia ready, integrated development environment. On this page, I'll explain how to disable the fences, write code, save your changes and share it.
Set up Your Files
First, you copy two files from /usr/share/etoys to a location where the user "olpc" can write. Follow the steps described below:
Do either one of following three options (2.1, 2.2, and 2.3 in the contents, respectively). If you are not familiar with the "vi" text editor, or hesitate to change a system installed file do 2.1. You don't mind changing a system file and know how to edit a text file, do 2.2. You're fortunate to have an external USB flash memory, do 2.3.
Copy Files to /media
Open the "Console" activity. and execute following commands:
 % su
 # mkdir -p /media/foo/olpc-dev
 # chown olpc:olpc /media/foo/olpc-dev
 # cd /usr/lib/squeak/3*
 # ln -s ../../../share/etoys/SqueakV3.sources
 # exit
 % cp /usr/share/etoys/etoys.{image,changes} /media/foo/olpc-dev
 % chmod 666 /media/foo/olpc-dev/etoys*
Edit /usr/bin/etoys
- Edit /usr/bin/etoys shell script so that the ALTIMG variable definition in it reads:
ALTIMG=/home/olpc/etoys.image
Then, execute following commands in the "Console" activity.
 # su
 # cd /usr/lib/squeak/3*
 # ln -s ../../../share/etoys/SqueakV3.sources
 # exit
 % cp /usr/share/etoys/etoys.{image,changes} /home/olpc
 % chmod 666 /home/olpc/etoys.*
Use a USB memory
- Plug your USB memory into a slot, start the "Console" activity and execute the following:
 % cd /media/*
 % mkdir olpc-dev
 % cp /usr/share/etoys/etoys.{image,changes} olpc-dev
 % ln -s /usr/share/etoys/SqueakV3.sources olpc-dev
 % chmod 666 olpc-dev/etoys.*
(In the first two cases, you could make the symbolic link to /usr/share/etoys/SqueakV3.sources from the location where your etoys.image will reside. In the future version, we can include the symbolic link from /usr/lib/squeak/3.9-12 or such automatically.)
As you might see, the purpose of this step is to make a copy of etoys.image and etoys.changes and put them at the place where /usr/bin/etoys shell script searches for the alternative .image file. /usr/bin/etoys first looks for the alternative .image file, and when it cannot find it, it uses the default .image file placed at /usr/share/etoys. The idea here is to create alternative .image and companion .changes file that are writable. .image and .changes should always go together. If you would like to rename the base name of them, use the same base name for both of them, and keep them in the same directory.
Start Up Etoys and Change Preferences
Now, bring up the Sugar frame (either going to the donut view or press the frame button), and click on the shooting star to launch Etoys. Since the .image is exact copy of the default one so far, you might not see whether your image is launched or not. First, You need to know how to break in the fences put around Etoys. What we would like to do is to turn off "eToyFriendly" preference and set up a few other things.
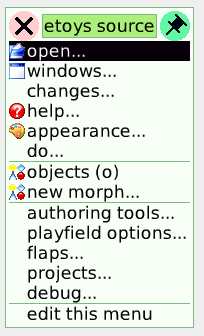
- Press, Alt-, (i.e., hold the Alt key first, and while you are holding it, hit "," key and then release Alt key) or (if we fix a bug) do the "show source" gesture. You'll get a menu that look like Figure "Show Source".
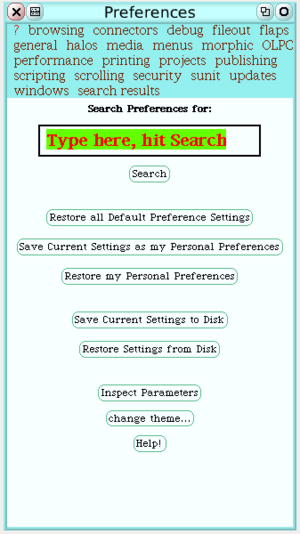
- From the menu, choose 'help...' and 'preferences...'. Depending on the language setting, these menu items may be translated. But you should be able to figure them out. You get a Preference Panel that looks like Figure "Preferences Panel".# In the Preference Panel, click on the button labeled "scripting", and uncheck "eToyFriendly" box. This may take 10 seconds or so; be patient.
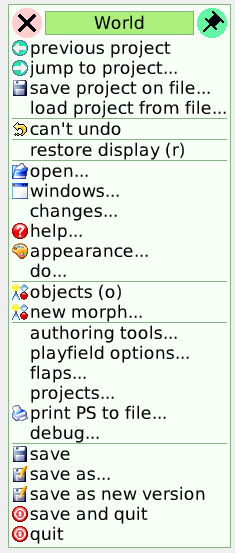
- After it is done, now you can bring up the vital "World menu" by just click on the empty area of screen. The World menu looks like Figure "The World Menu".
- Now, try to choose "save" (fifth from the bottom). If the .image you are on is indeed the writable one, it will update the .image and .changes files on the disk. If you do not see a pink small dialog pops up but the cursor changes a pen-shape momentarily, the files are successfully saved. If you see a pink dialog, go back to the previous section and make sure you are doing it right. (If you know how to get a Workspace, try to evaluate expressions like "Smalltalk imagePath".)
- For what we are going to do (write your own code), having a car running around in front of you may be disturbing (either a virtual car or real car). Get the World menu again, and choose "previous project" at the top. You'll be taken to an empty project, which is more suitable to do the following and more. Save your image again after that.
There are a few other preferences you might want to change. One is "swapControlAndAltKeys"; this is "on" by default so that basic code editing short cut keys use the ctrl key. You could set this to off to be compatible with other platforms, but there is a catch. Sugar intercepts some of the Alt-key combinations so this can be very dangerous. For example, when you press Alt-c to mean to copy text, Sugar interprets it as quit and kill your Squeak session. Another preference is "swapMouseButtons" preference. During development, you would rather use the right mouse button to bring up context menus rather than the halo. (If you turn it on, do Alt-click on a widget to get the halo.)
Here, Let us do "save and quit" from the World menu to save the current Squeak session and have a cup of coffee.
Resuming Session
To resume a previously-saved session, click on the shooting star icon in the Sugar frame. The exact environment you saved will be resumed. (But there is a bug that takes you to the Launcher project. Later version of standard image doesn't do it if eToyFriendly is off.) Yes, Sugar's idea of continuous running activities you only suspend and resume have a root in this Smalltalk's idea. However, beware a difference; Squeak does not save its image automatically upon exit. You even have an option to say "quit", to mean "quit without save".
You can also copy your .image and .changes pair to a non-XO environment (Windows, Mac, Linux or other two dozens of different kinds of platforms) and resume the session on it. The screen extent may be different on a different computer but otherwise the exact state, including all running processes comes back.
From the Console activity, you can launch a Squeak session by executing:
% squeak your-favorite.image
(There are some command line options you might want to to provide. see /usr/bin/etoys if you want to follow what it does.)
You could also write a one-liner shell script to add these options. (Yes, in fact, we should change /usr/bin/etoys so that when an argument .image is specified, it uses that image.)
Basic Programming Tools
Describing full detail of Smalltalk development techniques is not the scope of this page, but I describe some basics.
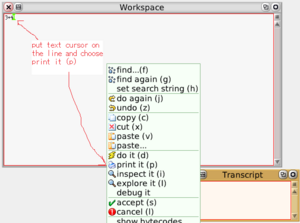
From the 'open...' menu in the World menu, you can access the most important tools. Transcript ('transcript (t)') is always handy. Get one, resize it to a fairly small size (a height enough for 5 lines or such is usually ok). Equally handy is a Workspace. Get one from 'workspace (k)' menu item. In there type "3 + 4", put the text insertion cursor on the line, get the context menu (by right-clicking on the pane, or if swapMouseButtons is not set, click on a square button above the vertical scroll bar), and choose "print it (p)". It executes the expression and print the result. (See Figure "Workspace and Transcript".)
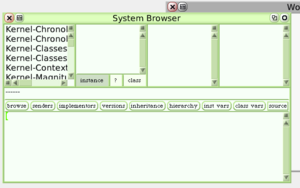
The main programming tool in Squeak is "System Browser", which is available from 'browser (b)' menu item in 'open...'. (You rarely need to instantiate a Browser from menu. Because you have one or any other text pane opened, you can instantiate more from it with keyboard short cuts.) (See Figure "System Browser".)
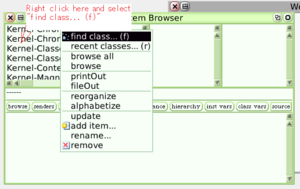
In the Browser, let us define a subclass of "RectangleMorph" called "MyMorph". (Squeak's default GUI framework is called "Morphic". And, graphical entities on screen are subinstances of Morph.) Get a context menu in the top-left pane. From the menu, choose "find class... (f)" and type, "Rectan" or such and hit the enter key. From the list, choose "RectangleMorph" (Figure "Find a class").
You might want to resize the Browser. In the second from bottom pane, you see a text looks like:
BorderedMorph subclass: #RectangleMorph
instanceVariableNames: classVariableNames: poolDictionaries: category: 'Morphic-Basic'
Replace it with
RectangleMorph subclass: #MyMorph
instanceVariableNames: classVariableNames: poolDictionaries: category: 'Morphic-Basic'
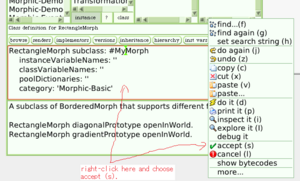
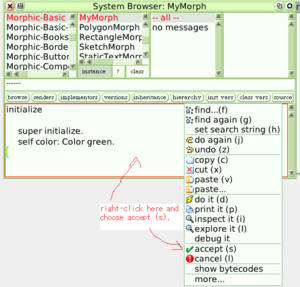
Get the context menu in the pane and choose "accept (s)". (See Figure "Defining a class".)
Notice that the red borders of the pane go away, and an item "MyMorph" shows up in the second pane from the left. You successfully created a class in Squeak.
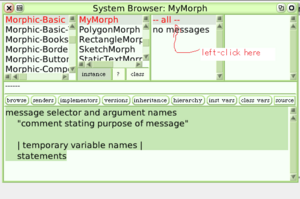
Let us define a method. Click on the "-- all--" line in the third pane. The bottom pane will show the method template (See Figure "Method Template").
   message selector and argument names
       "comment stating purpose of message"

       | temporary variable names |
       statements
Here, you just replace it with something like:
initialize
       super initialize.
       self color: Color green.
and choose "accept (s)" from the context menu. Now, you define the initialize method for a instance of the class. (See Figure "Defining a Method".)
Go to the Workspace you might have already opened, and type:
   m := MyMorph new.
   m openInHand.
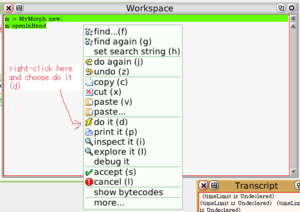
Select these two lines, get the context menu for the workspace and choose "do it (d)" or "print it (p)", you get a green rectangle attached to the mouse cursor. Drop it somewhere visible. (Figure "Evaluation in Workspace".)
In the workspace, the instance on the screen is bound to a workspace variable "m". Evaluate lines like:
   m color: Color red.
   m width: 100.
   m height: 100.
   m borderWidth: 10.
etc. You can select and "do it" each line at a time, or select many lines and execute them like a method.
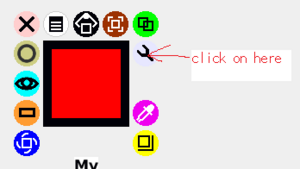
Similar thing can be done from an "inspector". Alt-click on the instance of MyMorph on screen to get halo. With "eToyFriendly" preference off, you have an extra handle looks like a wrench (See Figure "Debug Handle".)
Click on it, and choose "inspect morph" from the menu you get. On the left, there is a list of instance variables including inherited ones. If you select one, the printed representation of the value bound to the instance variable is shown on the right. You can edit there, and accept it. A value created from the string is stored into the instance variable. The bottom pane can be used as a Workspace, except the fact that its "context" is set to the MyMorph instance. Namely, 'self' refers to the instance, and all instance variable names are usable to use the current values in them.
For doing a fun experiment, let's add an instance variable to MyMorph. Go back to Browser, and click on the "instance" button below the second pane. You'll go back to the "class definition" of MyMorph that looks like:
RectangleMorph subclass: #MyMorph
instanceVariableNames: classVariableNames: poolDictionaries: category: 'Morphic-Basic'
Put the text selection cursor in between the single quotes after instanceVariableNames:, and type in "timeLimit", and accept. The red-borders goes away again, and the class definition looks like:
RectangleMorph subclass: #MyMorph
instanceVariableNames: 'timeLimit' classVariableNames: poolDictionaries: category: 'Morphic-Basic'
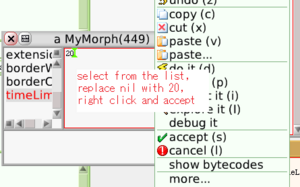
(Figure "Adding an instance variable".) [Image:instVarAdd.png|right|thumb|Adding an instance variable]] Notice also that the instance variable list in the inspector is updated and now you have "timeLimit" variable in the list at the bottom. Choose it and set a value like 20 in the right pane, and accept it. (Figure "Set value to instance variable from inspector".)
Go back to the Browser, click on "-- all --" again. Replace the method template with:
  step
     timeLimit := timeLimit - 1.
     self width: 100 / timeLimit.
"step" is an API to make the method executed at a regular interval. To start it, click on the instance of MyMorph, and drop it again. This triggers the World to recognize the dropped morph expects step to be called. Look at the value in the inspector, and see it decreases by one at every second. Also, the width of MyMorph instance changes.
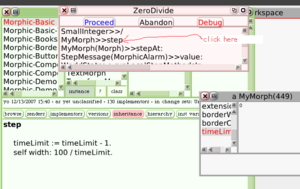
20 seconds later, timeLimit becomes zero, and in the step method, you will get an error because you divide a number by zero. What happens? You will see a small pink window called notifier that shows the list of stack frames that ends up with the error. (Figure "Error Notifier".)
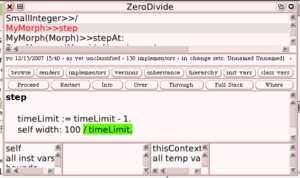
Click on the second from top that reads "MyMorph>>step" and you get a bigger window that looks like Figure "Debugger".
The part "/ timeLimit" is highlighted. That is the message currently executing in the frame.
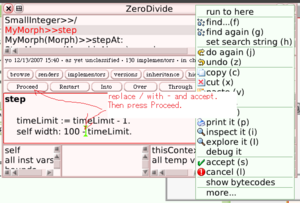
The wonderful thing about Smalltalk is that the debugger and code is "live". An error happened because we are stupid enough to divide a number by zero. Perhaps division is not a right thing. Edit the method shown "in" the debugger, so that it reads:
step
timeLimit := timeLimit - 1. self width: 100 - timeLimit.
and accept it right there. The system keep all the stack frames upto this method invocation and restart the accepted method right from there. Click on the "proceed" button in the debugger, and pick up and drop the rectangle again. The system is fine with such on-the-fly editing. (Figure "Fixing code in the Debugger".)
If you want to look at what you did, go back to to the Browser and while the definition of step is shown, click on the "versions" button. You see all the history of the methods, which is kept in the .changes file.
Save your .image whenever you think it makes sense.
Trouble Shooting
A few life savers are good to know. If you happen to get into an infinite loop and the system seems to be locked up, hit Alt-. (i.e., hold down the Alt-key, and hit the period key). You can interrupt the process.
Inevitably, you may end up with breaking the system, by redefining or removing some crucial method or system object. In that case, the system doesn't respond anymore and you cannot even save the image. Is all your work since last save is lost? Yes and no. At least, all method change, class definition change, and do it are logged into the .changes file, and the tools under "changes..." menu, such as "recent logged changes..." can bring them back.
Submit your changes
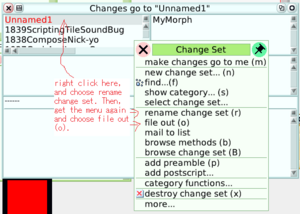
After writing a fun program, you probably would want to share what you wrote. In the "changes..." and "open..." menu, there is a tool called Change Sorter (Figure "Change Sorter".)
Get the context menu for the top-left pane, and choose rename. Give a proper name of your changes (here, let us say it is "myChanges"). Then get the context menu again and click on "file out (o)". The textual representation of your work is written to disk. The file name will be "myChanges.cs". Email myChnages.cs to etoys@lists.laptop.org, or upload it to the trac system (http://dev.laptop.org). The core developers are using the exact same mechanism. The "official" changes are uploaded to http://tinlizzie.org/updates/etoys/updates and all developers can fetch them via "update code from server" in "help..." menu. There are some styles in code, organization of methods and classes, and description (preamble and postscript) of changesets. If you are interested in, browse these files on the web and also fetch the real developers version of image from http://tinlizzie.org/olpc/. The real version has larger .changes file with all of last 5-6 years of history. Also, all changes sets are available in the image.
Final Words
I didn't mentions the all features of Browser that lets you navigate through the inter-related methods in a way you navigate through hyperlinked text. Nor I didn't mention about the profiler, nor all protocols of the Morphic GUI framework, nor various ways of finding a method that would do what you want (try method finder in the "open..." menu.). Please explore and make great and fun applications, enhancements, and share them with us. If you have any questions send it to etoys mailing list.
