The excellent instructions on this page are still valid for 8.2.1, but have not been updated for later releases. Writers are needed to adjust these instructions for XO-1 and XO-1.5 on the new releases.

|
WARNING:
The content of this section is considered
DEPRECATED and OBSOLETE
It is preserved for historical or documenting reasons.
|
For recent instructions, see the Release notes for the release you are installing.
This page provides parallel instructions for installing both signed builds (official or candidate releases) and unsigned development builds for Friends in Testing.
Note that a clean install will reflash your XO; everything you created will be deleted. See olpc-update for an update mechanism that preserves some data.
What version is available?
You need to identify the "build" to which you want to update your system.
The latest stable system software release is
- 13.2.11 || 2020-01-29
Most users should update to that build.
For 2008 G1G1 users, the 8.2.0 release notes offer the most concise instructions for restoring the factory configuration.
All releases currently available are listed on the Release notes page.
Before upgrading to any release, read its release notes carefully.
Other builds
There are later builds in various stages of development, see OS images for more background.
These are likely to be unstable and you will probably need to request a developer key to install them.
Official releases and candidate builds
For the general public
You'll need a USB storage device such as a flash drive, with a capacity of 500 MB or higher. It should be formatted as FAT or FAT32, and only contain one partition. Most ordinary USB flash drives are set up this way, except "U3" flash drives which may not work. Remove U3 with uninstall software from http://www.u3.com/uninstall or http://u3uninstall.s3.amazonaws.com/U3Uninstall.exe
- Attach the USB storage device to your local (NOT the XO!) computer.
- Perform a clean (Full, not Quick!) format of the USB storage device.
- Download the OS image named someversion.img (e.g. gg-802-1.img) and the signature file fs.zip to the USB storage device. These are compressed files, but DO NOT open them — in your browser click the right mouse button over the link and choose "Save Link/Target As...".
- Your USB storage device should now contain two files (in the root) named something like: gg-802-1.img and fs.zip.
- Unmount the USB storage device and disconnect it from your computer when it is safe to do so.
- Plug your XO laptop into an electrical outlet and make sure the battery is locked in place.
- Shutdown the XO.
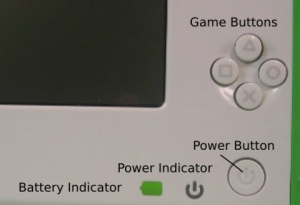 Power & Game buttons for B2 and older XOs. B3 and newer have "O" at the top and "✓" (check) at the right. - Release the game keys when the XO asks you to. The XO will take a few minutes to rewrite its memory with the new OS image.
- Reboot the XO. If the new build includes newer firmware, then your XO will reboot twice. When the XO restarts the update will be complete.
- Check that the XO has the correct build loaded:
- You may then need to install activities.
Development builds
- Read OS images and its table of releases to choose an appropriate build.
- Download the OS image (e.g. Template:Official-img-link) and its CRC file (e.g. Template:Official-crc-link) to your local computer.
- Important: DO NOT open these links just by clicking on them.
- If your computer runs MS Windows, click your right mouse button on the link and choose "Save Link Target As".
- If you are using a Mac, use Safari for the downloads and hold down the control key when you click on the link and choose "Download linked file as..."
- Firefox will also work, use "Save Link As...").
- Prepare a clean (Full (not Quick!) formatted) USB flash drive.
- Get a developer key for your XO laptop and save it as develop.sig in a folder security on the USB flash drive.
- Copy the OS image files onto the USB flash drive,
- the files should be next to the security folder and not in it.
- your USB flash drive should now contain two files named, for example, osos860.img and osos860.crc (and possibly the /security directory).
- Unmount the USB flash drive and disconnect it from your computer when it is safe to do so.
- Shutdown the XO laptop.
- Insert the USB flash drive into the XO laptop and power up to the "ok" prompt, (see Ok for how),
- Install the image by typing
probe-usb copy-nand disk:\osNNN.img
where osNNN.img is the file you downloaded (e.g. os2230.img, or en708-1.img).
- Press Enter, then wait while your machine reflashes.
- When the "ok" prompt returns, reboot the machine by typing:
bye
Note: This procedure can be used for builds signed with the OLPC key. If it is used for builds signed with other keys, it is necessary to disable security otherwise the developer key will need to be in the USB for every boot.
|


