Demo notes/lang-es
- This is an on-going translation
Esta página describe instrucciones de demostración, errores comunes y sus soluciones para las laptops B1 y B2.
- Ver también: Notas de Hardware, Notas de Software, Notas de Biblioteca
Contents
- 1 IMPORTANTE
- 2 Vista panorámica de la máquina
- 3 Comenzando
- 4 El Marco y los íconos
- 5 El Teclado
- 6 Instrucciones de Demo
- 6.1 Vista del Hogar
- 6.2 1. Navegador de Red
- 6.3 2. Etoys
- 6.4 3. Juego Memosono
- 6.5 4. TamTam
- 6.6 5. Pantalla de resolución dual
- 6.7 6. Modo consola (o eBook) y modo de cámara
- 6.8 7. Chat
- 6.9 8. Escriba
- 6.10 9. BlockParty
- 6.11 10. Pintar
- 6.12 11. Diaporama
- 6.13 12. Lector de Noticias
- 6.14 13. Calculadora
- 7 Otros HowTo's
- 8 Errores y otros problemas conocidos
IMPORTANTE
Por favor noten que esta es una unidad Beta con software Alfa cargado. Hay errores (bugs) sobre los que se esta trabajando y no todos los componentes estan operacionales, ej: algunas teclas no funcionan. Haremos lo posible para documentarlos y corregirlos cuanto antes.
- El touchpad es sensible y puede ser dificil de usar hasta que uno se acostumbre. (Necesita ajustes.)
- Cuando un hace clic en un icono, por favor, hágalo solamente UNA VEZ o la actividad será cargada varias veces. A veces las actividades tardan en cargar. SEA PACIENTE.
- Las descargas estáticas son un problema con estas unidades, por favor use medidas apropiadas cuando haga demostraciones a fin de reducir la estatica. (ej: evitar alfombras o disponer de dispositivos para descargarse).
- Todavía falta instrumentar el manejo de energía, por lo cual mantenga la unidad enchufada de ser posible.
Más detalles se pueden encontrar en Notas de Software BTest.
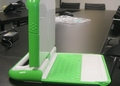
Vista panorámica de la máquina

Comenzando
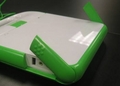
Abriendo la laptop
Oriente la laptop de manera tal que la manija se encuentre alejada de uno y levante ambas antenas hacia arriba y hacia uno hasta que la laptop haga clic. Levante la pantalla alejándola del teclado; probablemente tenga que retener el teclado mientras levanta la pantalla.
levantando las 'orejas'

laptop 'cliqueando' abierta


Prendiendola

El Botón de Encendido se encuentra en la parte inferior derecha del borde de la pantalla. Note que lleva casi dos minutos para que la máquina bootee. Aunque el LED testigo verde se ilumina inmediatamente. Si por alguna razón, no apareciera ningún texto en la pantalla dentro de unos 15 segundos, o si la máquina no encendiese para nada, por favor vea la sección de Errores y Problemas Conocidos hacia el final de este documento. (Note que a veces el botón de encendido puede quedar trabado en la tapa).
Apagandola
Novedad
Ya no hay un modo de apagado, simplemente apague la unidad por medio del botón de encendido cuando se la quiera apagar.
El Marco y los íconos
Invoque el Marco usando la tecla ![]() (un "rectángulo vacío") en la esquina superior derecha del teclado... o moviendo el cursor hacia alguna de las esquinas en la pantalla (o 'esquinas activas/calientes').
(un "rectángulo vacío") en la esquina superior derecha del teclado... o moviendo el cursor hacia alguna de las esquinas en la pantalla (o 'esquinas activas/calientes').

Iconos arriba-izquierda (lugares)
- Círculo con 8 puntos — este icono muestra la totalidad del Vecindario. Muestra a todos los usuarios disponibles en la red de malla;
- Círculo con 3 puntos — este icono muestra tus Amigos/Grupos. Muestra a todos los usuarios en la red de malla que hayan sido identificados como amigos;
- Círculo con 1 punto — este icono muestra la vista del Hogar;
- Círculo con rectángulo — este icono muestra la Actividad sobre la que se estaba trabajando.
Iconos arriba-derecha (estado)
Novedad: A partir del Build 303+ solo el icono de la Cartelera se encuentra en la esquina superior derecha del Marco.
Iconos abajo-izquierda (acciones)

Cada build puede tener diferentes colecciones de actividaes. Se deberia ver algo simliar a lo siguiente:
- Globo: este icono arranca el navegador de red;
- Estrella fugaz: la actividad Etoys;
- Globo de texto: la actividad de chat;
- A abstracta: la actividad de (editor) de texto;
- Pingüino frente a TV: la actividad lectora de noticias RSS;
- Grilla 3 x 3: el juego Memosono;
- Ojo: la actividad de la cámara;
- Tambor: la actividad TamTam.
Otras actividades incluyen BlockParty, un lector de eLibrs (eBooks), un visor de diaporamas (slideshow viewer)...
El Teclado


La parte central del touchpad puede ser usada como dispositivo para señalar. Toda la superficie puede ser usada con un puntero.
Instrucciones de Demo
Paciencia es fundamental: la interfaz por el momento no avisa si se encuentra ocupada, y recien comienzan los trabajos sobre rendimiento. Estas usando software alfa de pruebas.
Conjunto de la demo:
- Navegador de red
- Etoys
- Juego Memosono
- TamTam
- Pantalla de resolución dual
- eBook y cámara
- Chat
Vista del Hogar

Una vez que se haya encendido la laptop, se irá directamente a la pantalla Hogar.
Para comenzar, invoque al Marco apretando la tecla 'Marco' ![]() arriba a la izquierda del teclado.
arriba a la izquierda del teclado.
La Red
Como muchas de las demos utilizan la red (navegador, noticias RSS, demos de la malla), antes de comenzar, la laptop debe estar asociada a alguna red. La laptop deberia ser capaz de conectarse a cualquier red inalámbrica en el area.
Haga clic en el icono de red (las cinco barras arriba a la izquierda del Marco). Una lista con las redes inalámbrica disponibles serán mostradas en un menú drop-down.
Si no se ve ninguna red, es posible que sea porque el controlador embarcado no logró inicializar los puertos USB (el controlador de red es un dispositivo USB)—deberá rebootear.
Cambiando entre actividades
Se pueden tener varias actividades ejecutándose al mismo tiempo—uno se mueve entre ellas volviendo al Hogar (la tecla con un único punto—![]() ) y haciendo clic en la actividad que uno quiera activar.
) y haciendo clic en la actividad que uno quiera activar.
Abandonando Actividades
Para abandonar (cerrar) una actividad, invoque al Marco (con la tecla ![]() o moviendo el cursor a una esquina).
o moviendo el cursor a una esquina).
Posicione el cursor sobre el icono de la actividad que se encuentra arriba al centro del marco, y despues haga clic en la X en un círculo.


Para arrancar el navegador de red, haga clic en el icono con un "globo" ![]() en la parte inferior izquierda del Marco; haga clic con el botón izquierdo bajo el touchpad UNA VEZ.
en la parte inferior izquierda del Marco; haga clic con el botón izquierdo bajo el touchpad UNA VEZ.
Escriba los terminos de búsqueda en el campo de la página de Google o escriba el URL en la barra arriba.
Por favor note que actualmente el navegador no soporta Flash, Java o caracteres chinos.
2. Etoys

Desde el Marco, haga clic en el icono con la estrella fugaz ![]() , UNA VEZ. La actividad Etoys arrancará y mostrara su pantalla de lanzamiento:
, UNA VEZ. La actividad Etoys arrancará y mostrara su pantalla de lanzamiento:
- "demo" amarillo — muestra una "demo" de bienvenida que corre sin fin. Se puede salir de la demo haciendo clic en el botón "PREV" de la barra de Navegación anaranjada abajo a la izquierda.
- "juego/tutorial" anaranjado — un buen tutorial para aprender sobre los handles (manijas) de eToys.
- "nuevo proyecto" violeta: crea un nuevo proyecto. Integración con el Diario está pendiente, sin embargo se puede grabar el trabajo realizado al directorio/carpeta MyEtoys apretando el botón "PUBLISH" en la barra de navegación anaranjada. Existe una amplia documentación sobre Etoys en el wiki (comience por acá) y en squeakland.org.
- "galería de proyectos" verde: carga o abre proyectos de ejemplos, ciencia o divertidos
- "carga proyectos" azul: permite la busqueda y carga de proyectos en el disco.

3. Juego Memosono
Este es un juego de memoria para dos jugadores. El ganador es aquel que obtiene la mayor cantidad de pares y completa su helado en el lado derecho.
Desde el Marco, haga clic en el icono que es una grilla de 3 x 3—![]() .
.
Juegue el juego haciendo un clic por turno por jugador en un par de bloques para mostrar las imagenes y sonidos correspondientes. El objetivo del juego es conseguir la mayor cantidad de pares como sea posible.
4. TamTam

Desde el Marco, haga clic en el icono del tambor—![]() .
.
Cada imagen a la derecha de la pantalla tiene su propio sonido. Haga clic en los iconos con el tambor abajo a la derecha para darle ritmo a la composición. El slider más a la derecha determina el tempo del tambor.
Utilice el teclado para reproducir un sonido en tonos diferentes.
5. Pantalla de resolución dual
Estas son las instrucciones para demostrar tanto el modo color como el blanco-y-negro de la pantalla desde cualquier actividad. En el modo blanco-y-negro, sin iluminación, la pantalla es de alta resolucion y legible con luz solar directa; es la configuración más eficiente en cuanto al consumo de energía.
En la parte superior del teclado hay un botón largo con una serie de círculos sólidos de tamaño creciente.
Los dos círculos más grandes controlan el modo B&N o color de la pantalla.
- Presionando el círculo más grande (último a la derecha) pone a la pantalla en modo B&N
- Presionando el segundo círculo más grande (penúltimo a la derecha) pone a la pantalla en modo color.
Los dos círculos menores a la izquierda en el boton controlan la iluminación.
- Para bajar/apagar la iluminación de fondo, presione el círculo más pequeño (primero de la izquierda) unas 12 a 15 veces.
- Para prender/subir la iluminacion de fondo, presione el segundo círculo más pequeño (segundo de la izquierda) unas 12 a 15 veces.
6. Modo consola (o eBook) y modo de cámara
En este modo, tanto el teclado como el touchpad se encuentran cubiertos, con lo cual sólo los botones de la consola (que puede ser usados para desplazar), la cámara y micrófono funcionan.
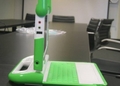
Posicione la pantalla en un ángulo de 90 grados (y baje las antenas).
Gire la pantalla 180 grados hasta que mire hacia atras.
Acueste a la pantalla sobre el teclado.
Disfrute!


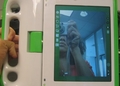
Usando la cámara
La cámara puede ser usada en modo eBook, pero necesita seer activada en el modo laptop: desde el Marco, haga clic en el icono con el ojo—![]() . Desactive el Marco, y proceda a poner a la laptop en modo eBook.
. Desactive el Marco, y proceda a poner a la laptop en modo eBook.
7. Chat
Prerequisito — estar conectado a una red inalámbrica—preferentemente una abierta sin autentificación.
- Ir a la vista del Vecindario (
 —Círculo con 8 puntos: este icono muestra a todo el Vecindario y los usuarios disponibles en la red de malla);
 - Seleccione y agregue a otros iconos XO como amigos.
- Habra la actividad de Chat haciendo clic en el icono con el globo de texto—

- Vuelva a la vista del Vecindario
- Tanto los XOs como la actividad de chat deben ser visibles
- Haga clic en la actividad de chat
- Espere un momento
- Comienze a chatear
8. Escriba
![]()
9. BlockParty
Este es un juego similar a Tetris.
10. Pintar
Esta es una actividad para hacer dibujos y pintar.
11. Diaporama
12. Lector de Noticias
13. Calculadora
Esta es una simple calculadora capaz de sumar, restar, dividir y multiplicar.
Otros HowTo's
Como ver que programas estan ejecutándose
Active el Marco y haga clic en el círculo con un solo punto en la parte superior izquierda del Marco o presione la tecla con el mismo diseño en la fila superior del teclado.
![]() — Los botones de Izquierda a Derecha: Vecindario, Amigos/Grupos, Hogar, retornar a la Actividad
— Los botones de Izquierda a Derecha: Vecindario, Amigos/Grupos, Hogar, retornar a la Actividad

La vista del Hogar aparecerá, pero esta vez, los iconos que representan a las actividades ejecutándose aparecen en el círculo que rodea al logo XO. Se lo llama el anillo de actividades (activity ring). Cuando el anillo se llena ya no se pueden lanzar otras actividades.
Haga clic en el icono de una actividad en el anillo para activarla.
Errores y otros problemas conocidos
1. Teclas que no funcionan
![]() — Tecla de control de cámara/micrófono
— Tecla de control de cámara/micrófono
![]() — Teclas de 'agarrado' (grab) en ambos lados de la barra espaciadora.
— Teclas de 'agarrado' (grab) en ambos lados de la barra espaciadora.
2. La laptop no enciende
Se debe desenchufar la laptop y retirarle la batería.
Ponga la XO boca abajo y mueva el botón a la derecha hacia la derecha. Esto destraba la batería.


Mueva el botón a la izquierda hacia la izquierda al mismo tiempo que levanta la batería. Retire la batería y espere por lo menos 30 segundos. Reinserte la batería y vuelva a trabarla en su lugar. Enchufe la laptop.
Note que si la batería ha sido descargada completamente, deberá utilizar la laptop sin batería por un error en la lógica en el circuito de recarga previene su recarga cuando ha sido descargada completamente.
3. El touchpad y teclado estan bloqueados
Lo más probable es que haya sido a causa de la estática. Pruebe con el "saludo de cuatro dedos": presione las cuatro teclas en las esquinas del teclado (Fn, Esc, Marco, y Flecha Derecha). Si esto no resulta, siga las instrucciones para restaurar la máquina sacándole la batería.
4. No puedo finalizar una actividad porque el icono no figura en el Marco
Intente relanzar Sugar apretando Ctrl-Alt-Borrar(Erase). Debería tomar unos 30 segundos para que Sugar se reinicie. Si esto falla, pruebe haciendo el ciclo de apagado/prendido apretando el botón de encendido. Si todo esto falla, desenchufe la máquina, y retire la batería. Espere 30 segundos y despues reintroduzca la batería, enchúfela, y enciéndala.