Emulating the XO/lang-es
| Traducción de OS images for emulation | original |
| english | español | 日本語 | 한국어 | português | русский +/- | cambios |

Estas son las opciones básicas de emulación. Para la emulación bajo Windows, vea Usando QEMU en Windows XP.
Basic emulation options are listed here. For Windows emulation, see Using QEMU on Windows XP. You can find the latest stable build here.
Contents
Rendimiento del SO OLPC simulado
Cabe destacar que la imágenes OLPC corriendo bajo QEMU sufren de una importante degradación de rendimiento. Una comparación lado-a-lado de las imágenes OLPC corriendo bajo QEMU resultan mucho más lentas, sin embargo, Sugar funciona mucho más ágil bajo el hardware real.
Si el rendimiento resulta tan bajo que las actividades no cargan recomendamos ver Tolerando lo Lento en busca de posibles soluciones.
It should be noted that running the OLPC images under qemu and related emulators are significantly less responsive. A side by side of OLPC OS under qemu and other OS (such as Linux or Windows), will present Sugar as very unresponsive. However, Sugar responds far better on the A-Test development board. See User Feedback on Images. If performance is so poor activities fail to load see Coping with Slowness for a possible work-around.
Opcion de arranque GRUB del Simulador OLPC Simulator
Cuando se arranca con una imagen del SO en el emulador, es necesario asegurarse que se esté cargando el núcleo con las opciones apropiadas. En el arranque se podrá observar la pantalla verde de GRUB que dice One Laptop per Child en su parte inferior: en este menú de arranque, asegúrese de seleccionar la opción OLPC Simulator. Caso contrario, se supondrá el arranque sobre un hardware OLPC, y dado que el emulador no soporta fielmente ese hardware, el arranque fallará.
When booting an OS image within an emulator, you need to make sure you boot the kernel with the correct options. When booting, you'll see the green screen of GRUB with One Laptop Per Child along the bottom: in this boot menu, make sure you select OLPC Simulator. Otherwise, bootup on real OLPC hardware will be assumed, and since the emulator does not emulate the OLPC hardware exactly, bootup will fail.
QEMU
La forma más fácil de probar las imágenes es usar QEMU, o un emulador similar, que se encuentra disponible para varios sistemas:
The easiest way to test the images is to use qemu or some similar emulator. It is available for various host systems:
QEMU en Linux
En Fedora Core 5, QEMU se encuentra incluído como un extra y es muy fácil de instalar. Como root ejecute yum install qemu # instala qemu service qemu start # una vez instalado, arranca el servicio En Debian/Ubuntu, QEMU se encuentra en el repositorio. apt-get install qemu
Una vez que QEMU instalado y despues de haber bajado la imagen, lanzar el ambiente OLPC es muy sencillo: qemu -soundhw es1370 -serial `tty` -hda olpc-stream-development-7-20060609_1600-ext3.img Si QEMU protesta sobre la falta de espacio en /dev/shm entonces haga mount -t tmpfs -o remount,size=144m none /dev/shm Si se desea usar el acelerador kqemu, entonces haga: modprobe kqemu major=0 y agregue la opción -kernel-kqemu
On Fedora Core 5, QEMU is included in extras and is very easy to install. As root just type
yum install qemu
and it should be installed. You may have to start the service for it. As root run:
service qemu start
On Debian/Ubuntu, QEMU is included in the repository.
apt-get install qemu
Once you have an image downloaded, it is very easy to use qemu to launch the OLPC environment:
qemu -soundhw es1370 -serial `tty` -hda \ olpc-stream-development-7-20060609_1600-ext3.img
If qemu complains about insufficient space in /dev/shm then
mount -t tmpfs -o remount,size=144m none /dev/shm
If you want to use kqemu to speed up the emulation then
modprobe kqemu major=0
and add the -kernel-kqemu option.
Varias personas han reportado que QEMU no funciona con estas imágenes en las distribuciones derivadas de Debian. El síntoma es que el kernel se cuelga durante el booteo. Hay un problema con la versión 2.2 de bochsbios, la versión 2.3 funciona bien. A modo de parche, se puede agregar apm=off en los argumentos del kernel OLPC. (Para más información, vea Talk:OS images for emulation#Boot hangs on Debian-derived distros.)
Si se tiene problemas con la red, pruebe acá.
We have heard multiple people say that QEMU doesn't work with these images on the debian-derived distributions. The symptom is that the kernel hangs during boot. There's a problem with
bochsbiosversion 2.2, version 2.3 works. As a quick fix,apm=offcan be added to OLPC kernel arguments. (For more info, see the discussion.) If you have network problems through Qemu and OLPC, try this.
Estrategias de Desarrollo bajo QEMU
Para aquellos que deseen usar QEMU para el desarrollo de software en Python para la OLPC, se recomienda hacer una conexión entre el host y la imagen de la laptop. En QEMU, la imagen de la laptop puede ver al host en la dirección IP 10.0.2.2. Si se crea un servidor SSH en el host y se instala la llave (key) en la imagen de la laptop para que tenga derechos de logon en el servidor se puede hacer un ssh> desde la OLPC al host.
For those who would like to use QEMU for developing Python software (Sugar software) for the OLPC, it's convenient to set up a connection between the host and the Laptop image. Under QEMU the Laptop image can see the host as IP address 10.0.2.2 . If you create an SSH server on your host and install a key on your Laptop image that has logon rights for that server, you can ssh from the OLPC to your host.
QEMU en FreeBSD
Se puede instalar una versión portada o como paquete:
cd /usr/ports/emulators/qemu && make install clean        # como port
pkg_add -r qemu                                           # como package
Una vez instalado, cargue los modulos kqemu y aio del kernel:
kldload kqemu
kldload aio
y ejecute la imagen que se desea:
qemu -hda olpc-stream-development-7-20060609_1600-ext3.img
Install qemu from ports:
cd /usr/ports/emulators/qemu && make install clean
or as a package
pkg_add -r qemu
Once installed, load kqemu and aio kernel modules:
kldload kqemu kldload aio
and launch the image you want:
qemu -hda olpc-stream-development-7-20060609_1600-ext3.img
QEMU en Windows
QEMU en Mac OS X
- Descargue e instale Q.app (kju-app.org (los builds se pueden econtrar en kberg.ch/q/builds)
- Descargue una imagen, descompáctela (Nota: vea el punto (1) de la sección Habilitando SSH antes de elegir una imagen)
- Inicie Q.app
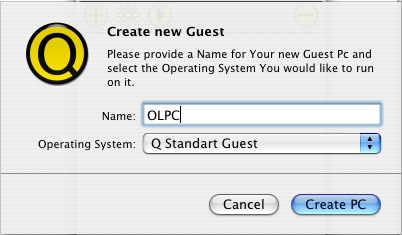
- Cliquee en (+) para agregar una nueva PC
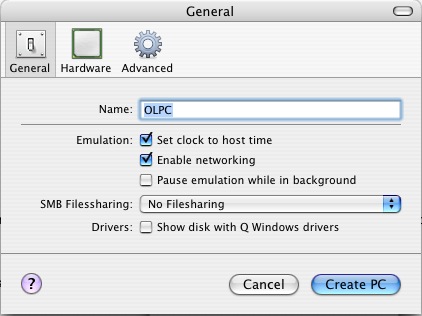
- Name: OLPC
- Operating System: Q Standard Guest
- Cliquee en [Create PC]
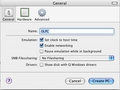
- Configuración de seteos:
- General: No file sharing (no compartir archivos)
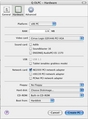
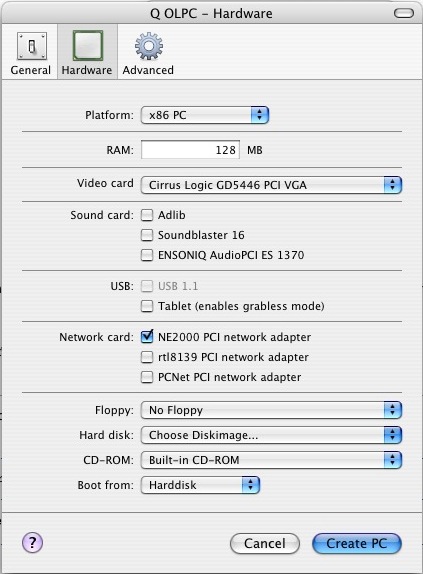
- Hardware - Hard disk: Seleccione la imagen descompactada
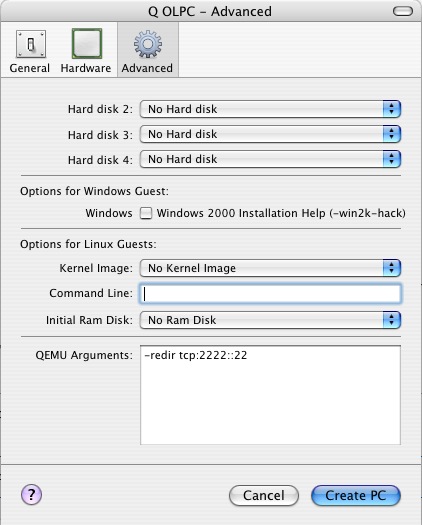
- Advanced - QEMU Arguments: escriba "-redir tcp:2222::22" (sin comillas)
- Cliquee en [Create PC]
- Haga doble-clic en OLPC para ejecutar:
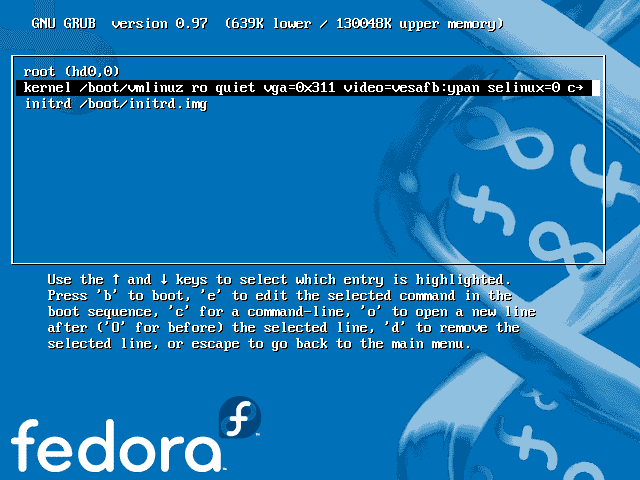
- Presione la barra espaciadora para entrar en GRUB
- Elija "OLPC for Qemu Target"
- Presione "e" para editar los comandos
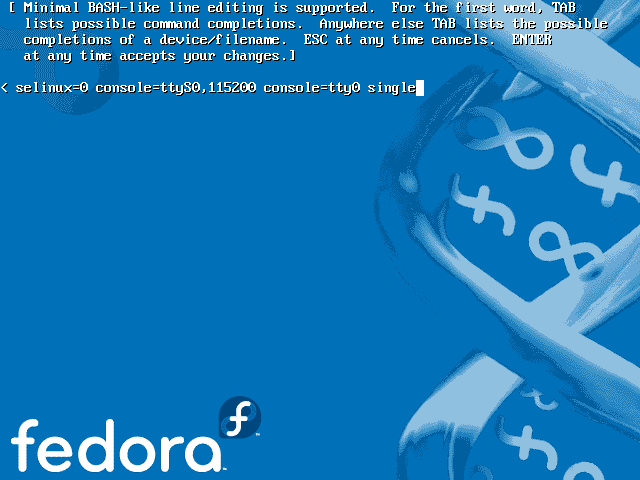
- Seleccione la linea que dice kernel, y presione "e"
- Agregue la opción "single" al final de la línea
- Presione "Enter", y después "b" para bootear
- Ponga una contraseña para el root (necesaria para SSH), sync (Nota: vea el punto (2) de la sección Habilitando SSH abajo)
- re-bootee (ya sea con el botón de encendido o ejecutando "init 6")
- Una vez booteada, desde una terminal, haga un login a la OLPC usando "ssh -p 2222 root@localhost" (Nota: vea el punto (3) en la sección Habilitando SSH abajo)

Inicio Q.app

Agregar PC
General
Hardware

Advanced

GRUB

GRUB & QEMU

Kernel

Single option


Bert: I successfully ran OLPC on OS X using the following method on a Powerbook G4 (867 MHz), albeit very slowly.
Justin: Likewise, I successfully ran the latest disk image (Build 385) through QEMU on OS X (10.4) on and Intel Apple using the instructions below.
- Download and install Q.app (kju-app.org , I got 0.8.1a35, the builds are here: kberg.ch/q/builds/ (previous link broken / server down))
- Download a disk image (build 59 worked, 73 did not), double-click to unzip. (Note: See point (1) in Section "Enabling SSH" below before choosing an image.)
- Double-click Q.app Example
- Click (+) to add a new PC Example
- Name: OLPC
- Operating System: Q Standard Guest
- Click (Create PC)
- Configure Settings:
- Double-click "OLPC" to run:
- press space to get into GRUB, Example
- choose "OLPC for Qemu Target", Example
- press "e" to edit commands,
- select "kernel" line, and press "e", Example
- add "single" option at the end of the line, Example
- hit return, then "b" to boot
- set some root password (necessary for SSH), sync (Note: See point (2) in Section "Enabling SSH" below)
- reboot (power-off button or run "init 6")
- once it's up, from a terminal, log into OLPC using "ssh -p 2222 root@localhost" (Note: See point (3) in Section "Enabling SSH" below)
Jonb: I had trouble running this using Q.app. I guess Q.app doesn't have USB 1.1 support for "real" USB devices yet http://www.kju-app.org/proj/wiki/KjuUSBSupport. Their documentation says something about using the USB Tablet to emulate the mouse, no idea what this is about. The result is that I do not get a keyboard in OLPC on my G4 Mac (USB Keyboard, obviously). I assume User:bert got it to work using his PowerBook because PCMCIA emulation works?
Shekay: I was able to run Q.app from the command line. for example:
$ /Applications/Q.app/Contents/MacOS/i386-softmmu.app/Contents/MacOS/i386-softmmu -hda olpc/olpc-redhat-stream-development-devel_ext3.img -serial stdio
Enviando combinaciones Ctrl-Alt en Qemu (o Q.app)
Según las Instrucciones de Sugar es necesario hacer "Ctrl+Alt+F1" para salir de la pantalla de Sugar y llegar a la consola, pudiendo volver haciendo "Ctrl+Alt+F7". Desafortunadamante algunos usuarios reportan que la secuencia "Ctrl+Alt" es interceptada por Q.app para liberar el mouse.
Bajo Linux, ésto sería manejado por el servidor X corriendo en la computadora, y no por la que está corriendo en el emulador, terminando en la terminal de su computadora.
Otro(s) método sugerido para obtener la actividad de terminal es que Q.app de hecho tiene su propio "monitor" que se accede via "Ctrl+Alt+2". En dicho monitor se pueden enviar eventos de teclado directamente a la OLPC emulada usando el comando "sendkey". Por ejemplo para cambiar a la consola basta con escribir "sendkey ctrl-Alt-f1" y "sendkey ctrl-alt-f7" para volver.
- Notas
- - se debe salir del monitor y volver a la máquina emulada haciendo "Ctrl+Alt+1" una vez ingresados los comandos mencionados.
- - se debe escribir el nombre de las teclas, no presionarlas.
According to Sugar Instructions you need to "hold down Ctrl+Alt+F1 to leave the Sugar screen and return to the login prompt" and then "you can return to Sugar with Ctrl+Alt+F7". Unfortunately for me the "Ctrl+Alt" action seems to be grabbed by the Q.app "mouse pointer ungrab" functionality.
Under Linux, this will be grabbed by the X server running on your computer, and not the one running in the emulator, and will switch your own computer to a terminal.
The other method(s) suggested for opening a terminal activity didn't work for me either (OLPC build 239). I eventually discovered that Q.app actually has a "Monitor" accessible by "ctrl-alt-2". When in this monitor mode you can send key-presses directly to the OLPC emulation by using the "sendkey" command.
e.g. to switch to the shell:
sendkey ctrl-alt-f1
to return to Sugar:
sendkey ctrl-alt-f7
Note: you will need to exit the monitor mode and return to the emulated machine by pressing "ctrl-alt-1" once you type either of the above commands.
Note: you type the name of the keys to send, you don't actually press the keys.
Habilitando SSH
- Asegurese de disponer de una imagen de desarrollo (*-devel*.img, ya que las generales no incluyen sshd.
- Conjuntamente con la creación de la clave del root, es oportuno configurar para que la red se active automáticamente. La alternativa #1 ha sido usada con éxito.
- Para evitar una alerta de un ataque Man-in-the-middle (mitm) se puede utilizar
ssh -o NoHostAuthenticationForLocalhost=yes -p 2222 root@localhost
Follower needed to perform the following additional steps to successfully enable the use of SSH (with build 239):
- Ensure you have a "*-devel*.img" image, as the standard (non-devel) images appear to not include sshd.
- At the same time as enabling the root password you will probably also want to enable the network to start automatically. I followed the instructions from Alternative #1 here.
- To avoid a "man in the middle attack" warning you might want to use:
ssh -o NoHostAuthenticationForLocalhost=yes -p 2222 root@localhost
VMware Player
Linux / Windows
- Atención
- Por cuestiones de conveniencia es recomendable que use QEMU, ya que se sabe que funciona bien en Linux, Win32 y Mac. La mayoría de los builds no soportan VMWare por falta de pilotos (drivers) pcnet32 de red (ver ticket). Hay imágenes para desarrolladores disponibles que están armadas a partir de ambientes de escritorio y que básicamente proveen todos los pilotos así como un ambiente de desarrollo razonable, a costo de volumen (>900 MiB).
VMWare Player es otra forma cómoda de probar una imagen en una máquina Linux / Windows. Se puede convertir la imagen a un archivo de disco virtual VMWare con el comando qemu-img de la distribución QEMU.
$ qemu-img convert olpc-stream-development-59-20060808_1153-rpm-ext3.img -O vmdk olpc.vmdk
Adicionalmente se necesita un archivo config para poder ejecutar el disco virtual. He aquí una muestra (grábela como olpc.vmx).
#!/usr/bin/vmware
config.version = "8"
virtualHW.version = "3"
memsize = "128"
ide0:0.present = "TRUE"
ide0:0.fileName = "olpc.vmdk"
ide1:0.present = "TRUE"
ide1:0.fileName = "/dev/cdrom"
ide1:0.deviceType = "atapi-cdrom"
floppy0.fileName = "A:"
ethernet0.present = "TRUE"
ethernet0.connectionType = "nat"
usb.present = "TRUE"
sound.present = "TRUE"
sound.virtualDev = "es1371"
displayName = "OLPC"
guestOS = "other26xlinux"

ethernet0.addressType = "generated"
uuid.location = "56 4d d1 99 5c 64 a3 6f-ef c7 aa 86 a8 cc ed 46"
uuid.bios = "56 4d d1 99 5c 64 a3 6f-ef c7 aa 86 a8 cc ed 46"
tools.remindInstall = "TRUE"
ethernet0.generatedAddress = "00:0c:29:cc:ed:46"
ethernet0.generatedAddressOffset = "0"

checkpoint.vmState = "olpc.vmss"

ide0:0.redo = ""
Inicie VMWare Player, abra este archivo .vmx, permitiendo a VMWare crear un nuevo UUID.
Nota: Asegurese que el emulador inicie el "OLPC for qemu target".
Warning
For easy-to-use operation, you probably want to use Qemu, which is known to work on all of Linux, Win32 and Mac. Most recent builds do not support VMWare due to the lack of a pcnet32 network driver. See [[1]]. There are Developer Images available which are built on top of regular desktop environments and provide basically all drivers as well as a reasonable development environment, but in a much larger download (900MB+).
VMware Player is another convenient way to test the image on your Linux / Windows machine. You can convert an image to a VMware virtual disk file with the qemu-img command from the QEMU distribution.
$ qemu-img convert olpc-stream-development-59-20060808_1153-rpm-ext3.img -O vmdk olpc.vmdk
Additionally, you need a config file to run the virtual disk. Here is an example (save it as olpc.vmx).
#!/usr/bin/vmware config.version = "8" virtualHW.version = "3" memsize = "128" ide0:0.present = "TRUE" ide0:0.fileName = "olpc.vmdk" ide1:0.present = "TRUE" ide1:0.fileName = "/dev/cdrom" ide1:0.deviceType = "atapi-cdrom" floppy0.fileName = "A:" ethernet0.present = "TRUE" ethernet0.connectionType = "nat" usb.present = "TRUE" sound.present = "TRUE" sound.virtualDev = "es1371" displayName = "OLPC" guestOS = "other26xlinux"
ethernet0.addressType = "generated" uuid.location = "56 4d d1 99 5c 64 a3 6f-ef c7 aa 86 a8 cc ed 46" uuid.bios = "56 4d d1 99 5c 64 a3 6f-ef c7 aa 86 a8 cc ed 46" tools.remindInstall = "TRUE" ethernet0.generatedAddress = "00:0c:29:cc:ed:46" ethernet0.generatedAddressOffset = "0"
checkpoint.vmState = "olpc.vmss"
ide0:0.redo = ""
Start VMWare Player, open this .vmx file. Allow VMWare to create a new UUID.
Note: Make sure the emulator starts the 'OLPC for qemu target'.
Mac OSX
Descompacte el archivo y haga doble-clic en OLPC.VDMK... (Más información en edgargonzalez.com
También se puede utilizar el Live CD.
* Unzip the package and double click OLPC.VDMK
This package seems to be gone. Suggestions?
- It should worked with the livecd sdk. Download it from the downloads section. No need for the OLPC.VDMK if you run the livecd.
Windows
Ver Tuttle on VMWare on Windows (link roto)
Parallels en Mac OS X
- Nota: Hay varios editores colaborando en esta sección. Esto es un resumen/traducción de OS images for emulation#Parallels Desktop on Mac OS X.
- Lanzar Parallels, crear una nueva VM (other Linux)
- Configurar el tamaño del disco en 512MB, darle OK cuando diga que ya existe
- Nota: el nombre del archivo usado fue /Users/bruce/Library/Parallels/otherlin/otherlin.hdd
- Descargar la imagen (con una terminación *ext3.img.bz2)
- Entrar en la terminal de Apple y escribir (remplazando "..." por el nombre apropiado del archivo bajado)
- bzcat ~/Desktop/olpc...ext3.img.bz2 | dd of=/Users/.../Library/Parallels/otherlin/otherlin.hdd
- Relanzar Parallels y ejecutar.
El comando dd puede achicar al archivo, en cuyo caso se puede volver a su tamaño de 512MB usando el utilitario de imagenes de Parallels. O haciendo
bzcat ...ext3.img.bz2 | dd of=...otherlin.hdd bs=1024 conv=notrunc,noerror,sync
Bert: First, install a regular Linux in Parallels - I used Fedora Core 5. To use an OS image directly, add a second hard disk (size 512 MB) to the VM. Boot the VM, download an OS image (ending in ext3.img.bz2), then copy it to the second hard disk (hdc for me, hdb is the CD):
bzcat ...ext3.img.bz2 | dd of=/dev/hdc bs=1M sync Then shut down that Linux, and change the VM (or make another one) to boot from the second hard disk image. Start that VM - should work :) I have not yet made sound work, though, please let me know if you find out anything.
BruceB: It can be a bit easier than that, no need to load a Linux system if you don't already happen to have one. This worked for me, though it may be simplified further still.
- Launch Parallels, create a new VM (I user "other Linux"
- Set the hard drive to be 512MB, OK when it says it already exists.
- Note the Hard drive file name, for me it was:
/Users/bruce/Library/Parallels/otherlin/otherlin.hdd
- Download the image (as bert says, ending in ext3.img.bz2) from this page:
http://olpc.download.redhat.com/olpc/streams/development/latest/devel_ext3/
- Drop into the Apple Terminal and type: (replacing "..." with the right file name you downloaded and your username. Check to see if "otherlin.hdd" is what you are using too.)
bzcat ~/Desktop/olpc...ext3.img.bz2 | dd of=/Users/.../Library/Parallels/otherlin/otherlin.hdd
- Re-launch Parallels and run!
Bert: Oh, so Parallel's hdd is nothing more than a plain disk image? How interesting! Thanks, that's a lot easier!
Wooky: The dd-ing worked allright under OS X, but with a caveat: both images I tried (206 and 193) were only 480MB after dd, even though they originally had 512MB. I used Parallel's image utility to resize them back to 512MB and all went fine (almost, couldn't start GUI. Guess it is something between fbdev and Parallel's video).
MartinDolphin: I managed to get this working following the shorter method suggested by BruceB - the OLPC software starts with the initial screen, I can enter my name, but can't get any further.
George: I have the same problem with MartinDolphin
ScottSwanson: To avoid the 480MB "autoshrink" when running dd in Terminal.app, try using the following (remember to explicitly enter the correct paths for your system instead of "..."): bzcat ...ext3.img.bz2 | dd of=...otherlin.hdd bs=1024 conv=notrunc,noerror,sync
I was informed on #Sugar that there was a known issue with the file selection dialog box where you had to type in the filename with full path by hand. The newest build (298 as I write this) obviates this need. (This addresses MartinDolphin and George's issue.)
StarKruzr: I get so far as the Sugar splash screen. Never get to type in a name, it crashes shortly after telling Grub to boot from the QEMU target.
SRiggins: Parallels Build 3188 now stores vm hard disk images in /Users/{USERNAME}/Documents/Parallels/{VMNAME}/
Virtual PC en Mac OS X (PowerPC)
- Nota: Hay varios editores colaborando en esta sección. Esto es un resumen/traducción de OS images for emulation#Virtual PC on Mac OS X (PowerPC).
Las instrucciones arriba mencionadas para prepara un disco de booteo de 512 MiB basadas en un ...img.bz2 son aplicables. Sin embargo, haga una imagen de disco de 1GiB, ya que no se puede crear uno de exactamente 512 MiB.
Si el ratón no responde, puede probar agregar los siguiente a /etc/X11/qemu-Xorg.conf y después copiar qemu-Xorg.conf como Xorg.conf:
Section "InputDevice"
        Identifier  "Mouse0"
        Driver      "mouse"
        Option      "Protocol" "IMPS/2"
        Option      "Device" "/dev/input/mice"
        Option      "ZAxisMapping" "4 5"
        Option      "Emulate3Buttons" "yes"
EndSection
Akauppi: The instructions above on preparing a 512MB boot disk, based on ...img.bz2 file apply. However, create a 1GB disk image in VPC, since it does not allow precisely 512MB.
TODO: system boots nicely, but the mouse remains unresponsive. Ideas???
John Palmieri advised:
Add this to /etc/X11/qemu-Xorg.conf and then copy qemu-Xorg.conf to Xorg.conf:
Section "InputDevice" Identifier "Mouse0" Driver "mouse" Option "Protocol" "IMPS/2" Option "Device" "/dev/input/mice" Option "ZAxisMapping" "4 5" Option "Emulate3Buttons" "yes"
EndSection
Falla en arranque
Virtual PC 7.0.1 (041022) en un Quad G5 (PowerMac11,2) no arranca del CD-en-Vivo (LiveCD), ni como disco ni del imágen. Lo siguiente fue copiado de la pantalla (virtual) después del carga-arranques (bootloader)...
  Booting 'OLPC Operating System SDK'

root (cd)
 Filesystem type is iso9660, using whole disk
kernel /boot/vmlinuz ro quiet root=CDLABEL=OLPCRoot_build385_CD rootfstype=iso9
660 fastboot livecd selinux=0
   [Linux-bzImage, setup=0x1e00, size=0x1e2474]
initrd /boot/initrd
   [Linux-initrd @ 0x1fd37000, 0x2a888d bytes]

Uncompressing Linux... Ok, booting the kernel.
...13 líneas en blanco, después...
Int 14: CR2 ffffbe47  err 00000002  EIP c0427b06  CS 00000060  flags 00000047
Stack: c0745fdc 00000000 00000000 00000000 00000000 00000000 00000000 00000000
...al fondo de la pantalla. ▪ NeoAmsterdamTalkEdits 23:07, 18 May 2007 (EDT)
Instrucciones
Vea las instrucciones de Sugar.
See Sugar Instructions.
Limitaciones
La XO ha sido diseñada con específicamente para un dado tipo de hardware—algunos únicos. Esto quiere decir que es imposible obtener una emulación al 100% de la laptop. Vea limitaciones de la emulación para más detalles.
The XO system is designed specifically to run on 'foo'. Some of the components are unlike any off the shelf product (example, the camera) so you won't be able to get 100% emulation of the OLPC. See Emulation Limitations for details .
Tolerando lo Lento
Es posible que una imagen OLPC pueda ser booteada con éxito y llegar a la interfaz Sugar, pero que resulta demasiado pesada para abrir cualqueir actividad.
Por ejemplo, entre los builds 239 y el 303, algunos usuarios reportaron dicho problema y cuyos síntomas incluían el siguiente tipo de registro en /home/olpc/.sugar/default/logs/shell.log
DEBUG - Shell.start_activity
DEBUG - Activity f4a9f5322b49dcc3364a4eca9b13633c0ce1868e (org.laptop.ChatActivity) launching...
DEBUG - Activity f4a9f5322b49dcc3364a4eca9b13633c0ce1868e (org.laptop.ChatActivity) launch timed out
STDERR - Introspect error: Did not receive a reply. Possible causes include: the remote application did not send a reply, the message bus security policy blocked the reply, the reply timeout expired, or the network connection was broken.

DEBUG - Couldn't create activity f4a9f5322b49dcc3364a4eca9b13633c0ce1868e (org.laptop.ChatActivity): Did not receive a reply. Possible causes include: the remote application did not send a reply, the message bus security policy blocked the reply, the reply timeout expired, or the network connection was broken.
ERROR - Model for activity id f4a9f5322b49dcc3364a4eca9b13633c0ce1868e does not exist.
DEBUG - Activity f4a9f5322b49dcc3364a4eca9b13633c0ce1868e (org.laptop.ChatActivity) launching...
DEBUG - Activity f4a9f5322b49dcc3364a4eca9b13633c0ce1868e (org.laptop.ChatActivity) finished launching
It is possible for the OLPC image to boot successfully and load the Sugar UI in the emulator but then be too slow to successfully load any activities.
For example, between build 239 and build 303 activity loading slowed enough for me (Qemu / 1.6GHz G4 PPC / OS X) that no activities loaded successfully. Symptons include messages in /home/olpc/.sugar/default/logs/shell.log like this:
DEBUG - Shell.start_activity
DEBUG - Activity f4a9f5322b49dcc3364a4eca9b13633c0ce1868e (org.laptop.ChatActivity) launching...
DEBUG - Activity f4a9f5322b49dcc3364a4eca9b13633c0ce1868e (org.laptop.ChatActivity) launch timed out
STDERR - Introspect error: Did not receive a reply. Possible causes include: the remote application did not send a reply, the message bus security policy blocked the reply, the reply timeout expired, or the network connection was broken.

DEBUG - Couldn't create activity f4a9f5322b49dcc3364a4eca9b13633c0ce1868e (org.laptop.ChatActivity): Did not receive a reply. Possible causes include: the remote application did not send a reply, the message bus security policy blocked the reply, the reply timeout expired, or the network connection was broken.
ERROR - Model for activity id f4a9f5322b49dcc3364a4eca9b13633c0ce1868e does not exist.
DEBUG - Activity f4a9f5322b49dcc3364a4eca9b13633c0ce1868e (org.laptop.ChatActivity) launching...
DEBUG - Activity f4a9f5322b49dcc3364a4eca9b13633c0ce1868e (org.laptop.ChatActivity) finished launching
Otro síntoma puede ser un icono de actividad parpadeante en el anillo de lanzamiento durante un tiempo y luego desaparecer sin que la actividad sea cargada. (Aunque ello también se puede deber a excepciones no-atrapadas dentro de la actividad en sí—bugs).
Estos fallos se deben a dos valores de timeouts configurados en el sistema, uno en Sugar y el otro en el D-Bus. Si se tiene mas paciencia que la OLPC/Sugar entonces es posible modificar estos valores para lograr cargar las actividades:
Another sympton is the flashing activity load icon appearing in the donut for a length of time and then disappearing without the activity loading. (Although this can also be caused by other issues such as uncaught programming errors.) These failures are due to two timeouts values configured in the system, one in Sugar and one in D-Bus. If you're more patient than OLPC/Sugar is by default then it's possible to tweak these values to enable activities to eventually load:
D-Bus
Inserte la siguiente linea en /etc/dbus-1/session.conf después de </policy>:
<limit name="service_start_timeout">120000</limit>
Esto quiere decir que D-Bus va a esperar como máximo 120 segundos antes de abandonar—el icono desaparece igual del anillo pero eventualmente la actividad será cargada. (Técnicamente este parámetro debería estar en session-local.conf, vea man dbus-daemon).
Insert the following line in /etc/dbus-1/session.conf below the </policy> tag:
<limit name="service_start_timeout">120000</limit>This means D-Bus will wait 120 seconds before giving up--the icon will still disappear from the donut but eventually the activity will load. (Strictly speaking this setting might really need to be in session-local.conf. See man dbus-daemon.)
Sugar
Para lograr que el icono parpadeante durante la carga de una actividad permanezca en el anillo durante más tiempo el siguiente cambio no-probado debería funcionar:
En shell/model/homeactivity.py cambie:
self._launch_timeout_id = gobject.timeout_add(20000, self._launch_timeout_cb)
por (por ejemplo)
self._launch_timeout_id = gobject.timeout_add(120000, self._launch_timeout_cb)
Hasta donde fue posible comprobar, este cambio solo tiene un impacto cosmético y las actividades aún deberían ser cargadas sin el.
To ensure the flashing activity load icon appears in the donut longer the following untested change should work:
In shell/model/homeactivity.py replace:
self._launch_timeout_id = gobject.timeout_add(20000, self._launch_timeout_cb)with (for example) this:
self._launch_timeout_id = gobject.timeout_add(120000, self._launch_timeout_cb)As far as I can tell this only has a cosmetic impact and activities should still load without it.