Firmware/Remote
Contents
Firmware Remote Diagnosis
How to allow an expert to help you with a firmware problem.
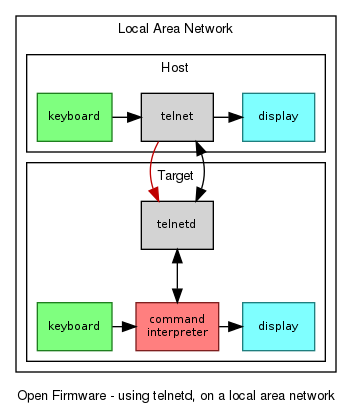
Using telnetd
On the target system:
- start the telnet server:
ok telnetd
- note the IP address shown,
- wait for connection to arrive.
On the host system:
- start the telnet client and connect to the IP address,
ok telnet IP
Once connected, the host keyboard and display will be using the command interpreter of the target.
To disconnect, type exit-telnet in the target command interpreter, or use ^] to exit the telnet client.
This method is ineffective if the target system is behind a NAT router with respect to the host, since the IP address is not routable.
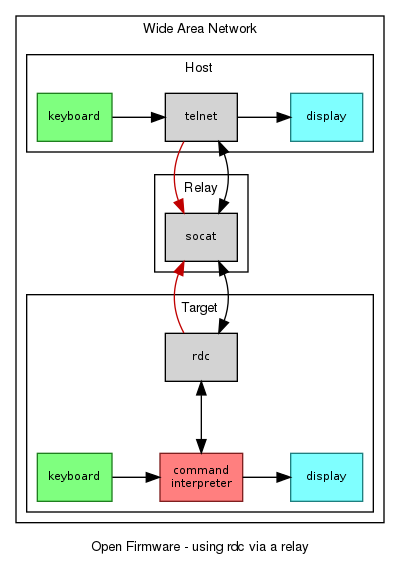
Using rdc via a relay
Scenario: need to connect to a user laptop that is behind a NAT router. You are at the host.
On a relay server that is accessible to the user over the internet:
- set up a TCP relay that listens on ports 8024 and 8023:
% socat \
  TCP-LISTEN:8024,fork,reuseaddr,nodelay,bind=127.0.0.1 \
  TCP-LISTEN:8023,reuseaddr,nodelay
On the host system:
- start a telnet client and connect to port 8024 on the relay server:
ok telnet IP 8024
- (or, on a Linux client, type:
% telnet -- 127.0.0.1 -8024
- the odd arguments are to force automatic initiation of TELNET options which would otherwise be omitted due to the non-standard port number).
On the target system, ask the user to start rdc:
ok rdc IP
- where IP is the IP address of the relay server.
Once connected, the host keyboard and display will be using the command interpreter of the target.
To disconnect, type exit-rdc in the target command interpreter, or use ^] to exit the telnet program on the host.
The port number can be changed by mutual agreement. The default is 8023. For instance, to use port 9023 you must (a) change the socat command from 8023 to 9023, and (b) add 9023 to the end of the rdc command:
ok rdc IP 9023
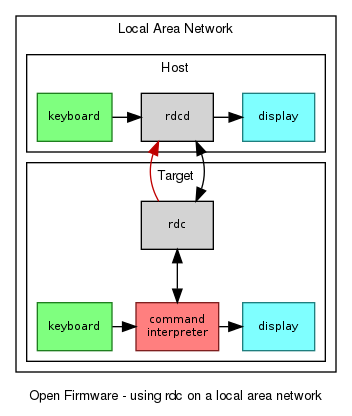
Using rdc on a local area network
On the host system:
- start
rdcdto listen for connections, and note the IP address shown,
ok rdcd
On the target system:
- type
rdc IP,
ok rdc IP
Once connected, the host keyboard and display will be using the command interpreter of the target.
To disconnect, type exit-rdc in the target command interpreter, or use ^] to exit the rdcd program on the host.
This method is ineffective if the host system is behind a NAT router with respect to the target, since the IP address is not routable.
Combining with serial terminal
Use of rdc, rdcd, telnet and telnetd on the target should be avoided if the problem being diagnosed is networking. In that case, the target firmware system must be accessed via serial.
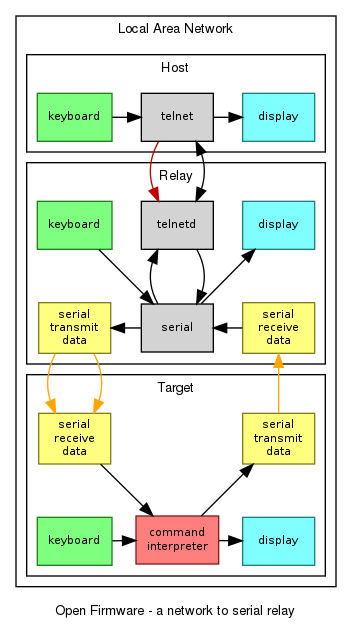
Therefore, use another system as a relay, and start the serial program.
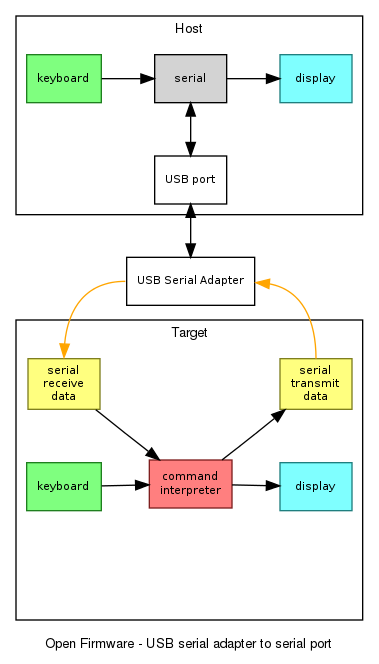
The diagram on the right shows the relay connected to the target by back to back serial port. The setup sequence is:
- start
telnetdon the relay, - start
telneton the host, - start
serialon the relay, - connect or power up the target.
Start the serial program before making the electrical connection or powering the target, so as to avoid a data loop.
The disconnection sequence is:
- power down or disconnect the target,
- exit
serialusing^a^k, - exit
telnetusing^].
How it works
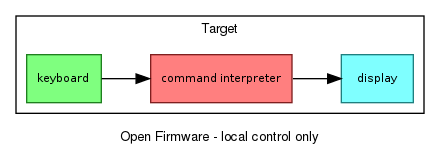
The command interpreter Ok normally relies on keyboard input, and sends output to the display:
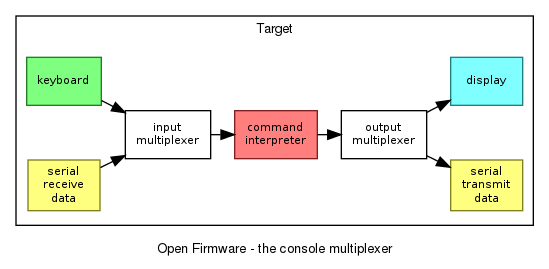
But it also uses an internal serial port, behind two multiplexers. Input can come from the keyboard or serial port. Output is delivered to both the display and the serial port.
These multiplexers are used by telnetd and rdc as well.
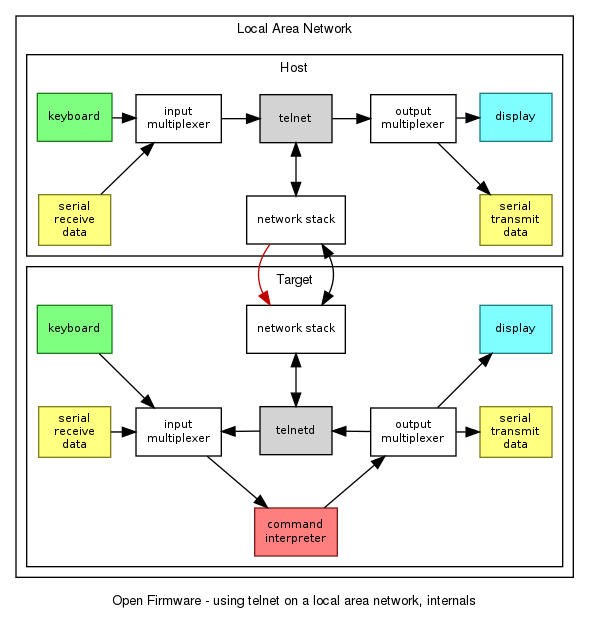
In this next diagram, the use of telnet and telnetd can be seen in more detail. On the host, the keyboard and serial receive data are captured by the input multiplexer and given to the telnet client. The data is then forwarded over the network to the telnetd server on the target. The data is then injected into the input multiplexer of the target, and then reaches the command interpreter.
Serial
When a USB serial adapter is plugged in, and the serial program started, then keyboard input is passed by the program to the USB serial adapter, and thence to the target. Data from the target is received and displayed.
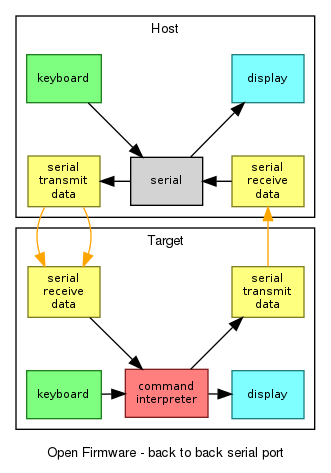
This diagram shows when serial ports are connected back to back, with the serial program already started. Keyboard input on either the host or the target eventually reaches the target command interpreter.
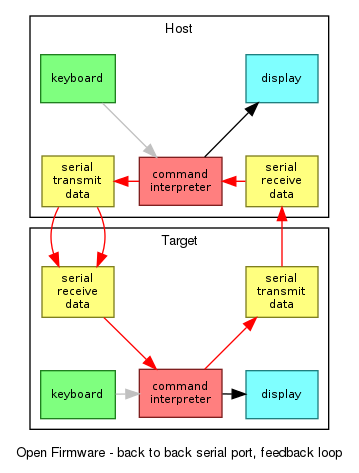
This final diagram shows a pathological data loop. The serial program has not been started, so the Ok prompt from one host is sent as if it is keyboard input into the other host, which sends it back to the first host, and so on.
To avoid this:
- use a USB serial adapter, or
- keep the target power off until the
serialprogram has been started.
Glossary
- telnet - a plain telnet client,
- telnetd - a telnet server that binds the console to the accepted connection,
- rdc - a telnetd that makes rather than accepting a connection.
- rdcd - a telnet that accepts rather than making a connection.
