Help Activity refresh/Chapter/FotoToon
Contents
About FotoToon 12
The FotoToon Activity will allow you to create everything from a simple "comic" strip to a long elaborate illustrated document. You will be able to import many kinds of images into the panes of your project and add text bubbles to help tell the story. You can use photo images taken with the XO or imported from a camera, drawings made with Activities such as Paint, and images of all kinds downloaded from the web. This could include photos, charts and graphs, maps, and the like.
This introduction to FotoToon will show you how to get started with a simple 4 panel project. If you want to learn to do more, you can watch the videos about using FotoToon that are available for viewing here (INSERT LINK WHEN AVAILABLE).
Where to get FotoToon 12
FotoToon is not included on the basic 11.3.0 (.883) release of Sugar. To use it, you must download it from the Sugar Labs Activity library at: http://activities.sugarlabs.org/es-ES/sugar/addon/4253 You will find instructions for downloading this and other Activities here: (INSERT LINK WHEN AVAILABLE)
You will notice that the description of the Activity and other information are in Spanish. That is because FotoToon was developed in Argentina. However, don't worry! FotoToon works in other languages as well!
FotoToon, like many other Sugar Activities, is often updated to fix "bugs" that users report. There was one update, from version 11 to version 12 during the time this instruction chapter was written. By the time you use it, there may be others. The changes are usually minor and should not interfere with the usefulness of this information. Always try to be sure you are using the latest version.
Using FotoToon 12
The Toolbars
The Main FotoToon 12 Toolbar
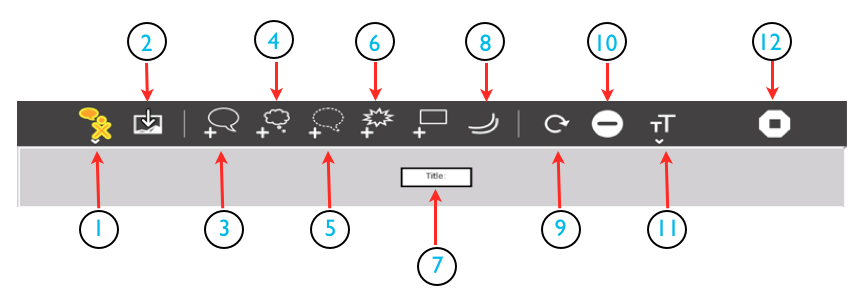
The FotoToon Toolbar has 13 icons including 2 with pulldown menus. The main FotoToon toolbar allows you to access many features of the Activity. Here is a description of what each of the icons will allow you to do:
- 1. The FotoToon icon. When you hover your cursor over this icon you will open a small pulldown that allows you to export your work as an image. See below for more details.
- 2. The Add Image icon. This icon allows you to add an image to your project. It can be a photo you take with the XO or digital camera, or import from the web. It can also be a picture, page, or project you create in another Sugar Activity.
The next four icons allow you to add text to your drawings and photos. They include:
- 3. A normal dialogue Globe
- 4. A cloud shape to tell what a character is silently Thinking
- 5. A dotted globe which indicates a character is talking in a Whisper
- 6. An exclamation bubble to add things like "Pow!" "Bang!" and "Wham!"
- 7. Is a box where you can put the Title of your project. Just above it is a box icon that allows you to add more rectangular text boxes to your project.
- 8. The Movement icon allows you to add little curves to indicate motion, highlight an object with a sunburst, add some parallel lines to show horizontal or vertical motion, or add a little light bulb to show that someone had a bright idea.
- 9. The circular arrow allows you to click on an object, then on this icon and rotate it clockwise 1/4 turn with each click.
- 10. This icon allows you to delete something you have added.
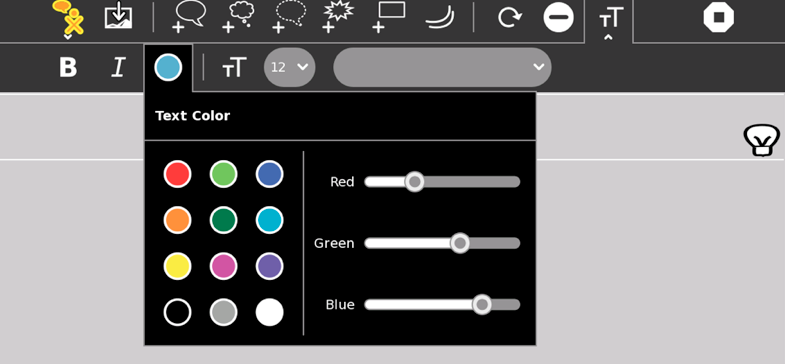
- 11. This icon opens the Text pulldown where you can select the font and size of your text as well as select bold, italics, or other colors for your words. Click it to open, and when finished, click again to close. See below for more details.
- 12. The familiar stop-sign icon is one way to stop the FotoToon Activity. You can also use the keyboard shortcut: ctrl-Q.
The Export Pulldown
The Text Pulldown
The Color Pallete Pulldown
Learning with FotoToon 12
Plan Ahead
FotoToon can be used for a wide variety of learning activities, but the general process is always similar. For the sample project in this section, we will make a 4 panel page using 4 photos. This is a good way to get started since the page can be printed on a single page.
Here are the general steps you need to complete before you build your first FotoToon project:
- Step One: Decide what your project will be about. You can tell a story about anything. For example, it could be about your pets, your home, your family, your town, or, even some photos you took at a party. Any topic is fine for our first project. The sample project will be about "Healthy Snacks" and the photos will be pictures of food.
- Step Two: Make a plan. Before you begin you should make a plan that will guide you through the construction of your project. Some people like to draw a little sketch of each pane showing what will be in the picture and a suggestion for what words will be added. If you like the panes can each be on a separate small piece of paper so you can re-arrange them easily This is called a Story Board. You may have another way you would like to make your plan, just be sure to include information about what pictures you will use, where you will get them, and what text you plan to add.
- Step Three: Gather your images. For starters, we will use images that were taken either with a camera, or using the Record Activity on the XO. Any image that can be imported to the Journal on your XO and viewed in Image Viewer can be used. It is a good idea to rename each of the photos you will be using in the Journal. The name can include the number of the pane you plan to use it in so it is easy to find when you begin putting things together.
Place Your Images
- Open the Journal and check to be sure your images are there and can be viewed in the Image Viewer (click on the file to open it and check). Be sure the images have names that include the number of the pane you plan to place them (1,2,3, or 4).
- Open FotoToon and find the "Add Photo" icon (number 2 in the FotoToon main toolbar shown above). A list of available images will appear. Click on the one you want to put in the first pane. When it has loaded, you can either leave it or remove it with the minus sign icon (number 10). Warning: You can only remove the last image entered. That is why it is important to number the images according to the panes you wish to place them in. After the first image has been placed, continue adding images until all four for your first project have been placed. If you decide later that you want to change their order after they have been placed, you will need to delete them and replace them in the new order. It is best to get your final placement before adding any text.


