Memorize
see more templates or propose new |
Contents
Description & Goals
Summary
The game memorize is about finding matching pairs. A pair can consist of any multimedia object. At the moment these are images, sounds and text but this could be extended to animations or movie snippets as well. Which pairs do match is up to the creator of the game. Memorize is actually more than just a predefined game you can play, it allows you to create new games yourself as well.
Goals
- memorization
- combine objects in a different context
- dealing with multimedia objects
- way of exploring the mesh
- creating new games
- activity that will use captured sounds and images to create new games
Collaboration
Memorize does feature collaborative playing at the moment. Another goal is to add collaboration for editing a game as well.
Screenshots
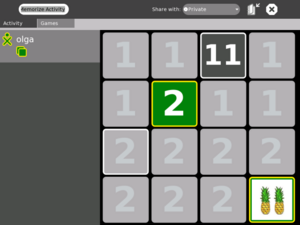
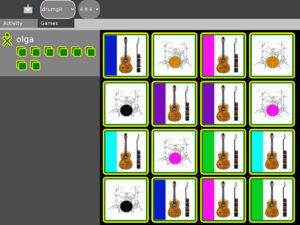
The following screenshot shows the single player mode. Player olga has found one matching pair which is reflected by the tiles in the players color and the updated points next to the player icon. The current game is called 'numbers' and its pairs consist of a character and an image.Instructions
Semi-tutorial
- At the top of your screen there is a button that should show "4x4". If it shows anything else, click on it and choose "4x4" from the pull-down menu.
- Click on "Load demo games" and select 'addition' from the pull-down menu. You will get a grid of 16 squares. Each square in the top two rows will be marked with the number 1; the squares in the bottom two rows will each have the number 2.
- Move the cursor over the top two rows. Notice that each square is highlighted as the cursor passes it.
- Now move the cursor over the bottom two rows. Notice that it has no effect whatever. YOU HAVE TO START THE GAME IN THE TOP TWO ROWS.
- Each square in the top row hides a simple addition problem which you can view by clicking on it. (So click, already!)
- The answer to the addition problem is hidden under one of the squares in the bottom two rows. There is no way to know under which square, you must simply guess. Move the cursor down to your selected guess, and notice that the bottom two rows are now 'live'--each square is highlighted as you cross it.
- Click on your chosen guess. You will probably be wrong. In this case, the game will 'freeze' for a short period and your entries will then disappear. But if you guessed correctly, the two squares you chose will change color and remain on the screen.
- Go back to the top two rows and repeat the process. The object is to match each square on top with its corresponding square on the bottom.
- So where does memory come into this? Well you need to remember all those wrong answers you hit on the bottom two rows, and where they were. Each of them will be a right answer to one of the problems. NO FAIR WRITING THEM DOWN WITH PAPER AND PENCIL!
- To make a harder game go back to the pull-down menu at the top of the screen and choose "5x5" instead of "4x4". Reload the demo games and notice that you don't really have a five by five grid--there are only 24 squares, and the the problem squares don't line up neatly over the answer squares. Each group is still marked by '1' or '2', however, and the play is otherwise the same.
To create an audio spelling word list
(NOTE: This list of instructions is under development KayTi 16:27, 3 February 2008 (EST))
- Launch Memorize
- Launch Record
- Choose the Audio tab of Record
- Make sure Duration (upper right corner of the Record interface) is set to 15 seconds. #These will be short clips.
- Click the Record button (bottom left of the video feed - a white dot with a circle around it.)
- Say the first word of your spelling list
- Click the Record button again (it goes red while recording)
- Wait while the Record activity saves your clip
- Click the Record button
- Say the next word on your list
- Click the Record button to save your clip
- Record and save the rest of the spelling words on your list
- Go to Memorize (choose "home" by clicking the black circle with white dot 5th from the left on the top row of the US English keyboard, then choose the Memorize Activity from the wheel and hover on it, click Resume)
- Click the Create tab at the top of the screen
How to create your own memory game
- Select the Memorize Activity icon among the activities at the bottom of the screen
- Click on “Create” and give a name to your game in the window at the top of the screen.
- Organization of the game:
- You have several options:
- You want identical pairs like in the classical memory: Tick Equal pair (the word, picture or sound you will include will be automatically repeated twice)
- You want to make pairs matching 2 different items but in a special order (for example pictures in a row and the corresponding word in another row): click on the icon “Grouped game”.
- You want to make pairs matching 2 different items but distributed at random: just don’t click on the previous icon.
- You have several options:
- Items displayed on the cards :
- You also have several options:
- You can enter a text : Type the text in the field
- You can insert a picture: Click on the eye icon and select a picture from the journal
- You can insert a sound : Click on the mouth icon and select a sound that you have recorded in the journal
- You can insert a picture and a text: insert the picture first then type the text in the text field.
- NB: if you want to include pictures from an USB memory stick, save them first to the journal. Make sure that the pictures are not bigger than 100kb otherwise the game will be too long to load.
- You also have several options:
- When you have prepared your first pair, click on “Add as new pair”. Your pair will be displayed on the right part of the screen. Proceed the same way for the following pairs. You can add a maximum of 18 many pairs.
- If you are not satisfied with the pair you have created, click on it, it will be highlighted, and displayed in the original boxes on the left. You can delete it by clicking on the X on the right part of your screen or if you want to do some modification click on “update selected pair”, the content of your pair will disappear from the left boxes and you can now choose a new content
- When you are done, be sure that you have given a name to your game then save it by clicking on the "save game" icon.
- You can now play your game.
How to play a memory game you created?
- Select the Memorize Activity icon among the activities at the bottom of the screen
- Click on “Load game” at the top of your screen
- Select your game in the journal
- You can play
How to modify a memory game you created?
- Select the Memorize Activity icon among the activities at the bottom of the screen
- Click on “Create”
- Click on “Load game” at the top of your screen
- Proceed like in 6) above
- Save your game
Development
Upcoming Features
None planned at the moment.


