OS images for emulation
Basic emulation options are listed here. For Windows emulation, see Using QEMU on Windows XP.
You can find the latest stable build here.
Contents
OLPC OS performance under emulation
It should be noted that running the OLPC images under qemu and related emulators are significantly less responsive. A side by side of OLPC OS under qemu and other OS (such as Linux or Windows), will present Sugar as very unresponsive. However, Sugar responds far better on the Atest development board. See User Feedback on Images.
OLPC Simulator GRUB boot option
When booting an OS image within an emulator, you need to make sure you boot the kernel with the correct options. When booting, you'll see the green screen of GRUB with One Laptop Per Child along the bottom: in this boot menu, make sure you select OLPC Simulator. Otherwise, bootup on real OLPC hardware will be assumed, and since the emulator does not emulate the OLPC hardware exactly, bootup will fail.
QEMU
The easiest way to test the images is to use qemu or some similar emulator. It is available for various host systems:
QEMU on Linux
On Fedora Core 5, QEMU is included in extras and is very easy to install. As root just type
yum install qemu
and it should be installed. You may have to start the service for it. As root run:
service qemu start
On Debian/Ubuntu, QEMU is included in the repository.
apt-get install qemu
Once you have an image downloaded, it is very easy to use qemu to launch the OLPC environment:
qemu -soundhw es1370 -serial `tty` -hda \
  olpc-stream-development-7-20060609_1600-ext3.img
If qemu complains about insufficient space in /dev/shm then
mount -t tmpfs -o remount,size=144m none /dev/shm
If you want to use kqemu to speed up the emulation then
modprobe kqemu major=0
and add the -kernel-kqemu option.
We have heard multiple people say that QEMU doesn't work with these images on the debian-derived distributions. The symptom is that the kernel hangs during boot. There's a problem with bochsbios version 2.2, version 2.3 works. As a quick fix, apm=off can be added to OLPC kernel arguments. (For more info, see the discussion.)
If you have network problems through Qemu and OLPC, try this.
QEMU Development Strategies
For those who would like to use QEMU for developing Python software (Sugar software) for the OLPC, it's convenient to set up a connection between the host and the Laptop image. Under QEMU the Laptop image can see the host as IP address 10.0.2.2 . If you create an SSH server on your host and install a key on your Laptop image that has logon rights for that server.
QEMU on FreeBSD
Install qemu from ports:
cd /usr/ports/emulators/qemu && make install clean
or as a package
pkg_add -r qemu
Once installed, load kqemu and aio kernel modules:
kldload kqemu
kldload aio
and launch the image you want:
qemu -hda olpc-stream-development-7-20060609_1600-ext3.img
QEMU on Windows
QEMU on Mac OS X
Bert: I successfully ran OLPC on OS X using the following method on a Powerbook G4 (867 MHz), albeit very slowly
- Download and install Q.app (kju-app.org , I got 0.8.1a35, the builds are here: kberg.ch/q/builds/ (previous link broken / server down))
- Download a disk image (build 59 worked, 73 did not), double-click to unzip. (Note: See point (1) in Section "Enabling SSH" below before choosing an image.)
- Double-click Q.app Example
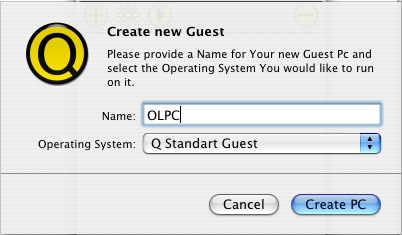
- Click (+) to add a new PC Example
- Name: OLPC
- Operating System: Q Standard Guest
- Click (Create PC)
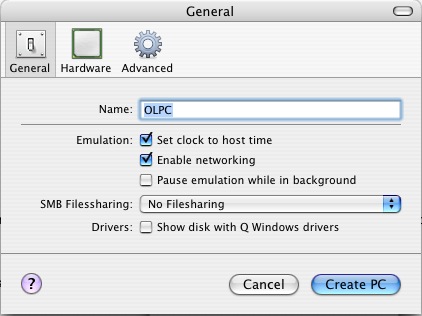
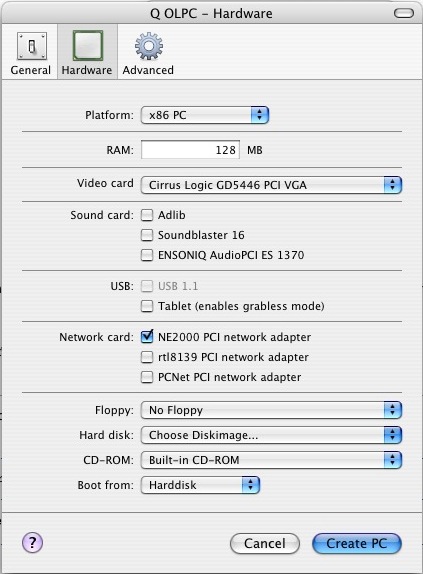
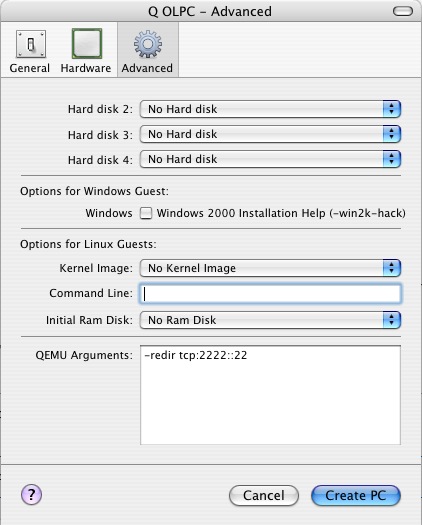
- Configure Settings:
- Double-click "OLPC" to run:
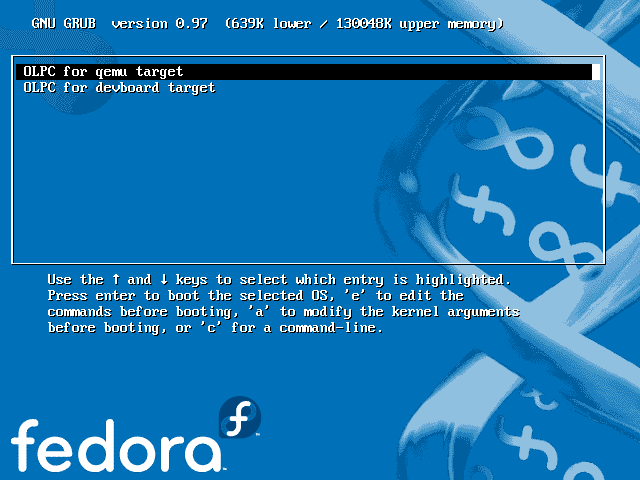
- press space to get into GRUB, Example
- choose "OLPC for Qemu Target", Example
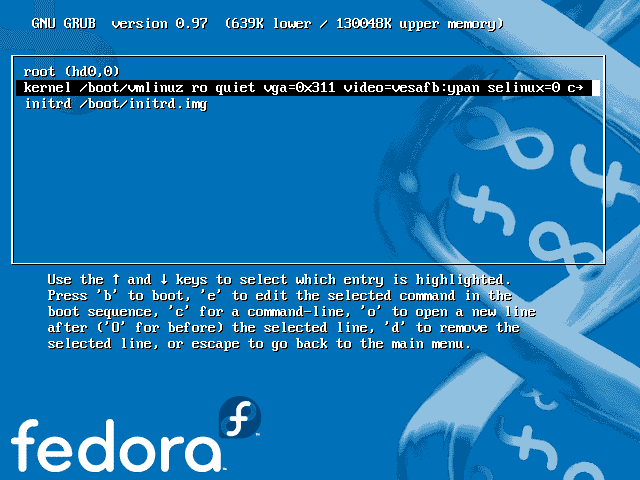
- press "e" to edit commands,
- select "kernel" line, and press "e", Example
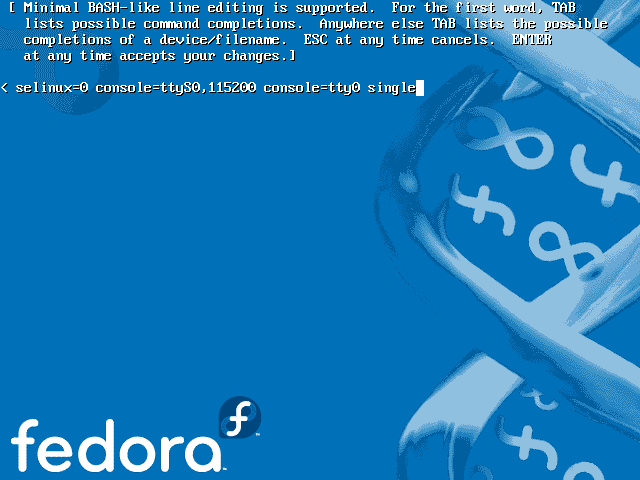
- add "single" option at the end of the line, Example
- hit return, then "b" to boot
- set some root password (necessary for SSH), sync (Note: See point (2) in Section "Enabling SSH" below)
- reboot (power-off button or run "init 6")
- once it's up, from a terminal, log into OLPC using "ssh -p 2222 root@localhost" (Note: See point (3) in Section "Enabling SSH" below)
Jonb: I had trouble running this using Q.app. I guess Q.app doesn't have USB 1.1 support for "real" USB devices yet http://www.kju-app.org/proj/wiki/KjuUSBSupport. Their documentation says something about using the USB Tablet to emulate the mouse, no idea what this is about. The result is that I do not get a keyboard in OLPC on my G4 Mac (USB Keyboard, obviously). I assume User:bert got it to work using his PowerBook because PCMCIA emulation works?
Sending Ctrl-Alt combos in Qemu (or Q.app)
According to Sugar Instructions you need to "hold down Ctrl+Alt+F1 to leave the Sugar screen and return to the login prompt" and then "you can return to Sugar with Ctrl+Alt+F7". Unfortunately for me the "Ctrl+Alt" action seems to be grabbed by the Q.app "mouse pointer ungrab" functionality.
Under Linux, this will be grabbed by the X server running on your computer, and not the one running in the emulator, and will switch your own computer to a terminal.
The other method(s) suggested for opening a terminal activity didn't work for me either (OLPC build 239). I eventually discovered that Q.app actually has a "Monitor" accessible by "ctrl-alt-2". When in this monitor mode you can send key-presses directly to the OLPC emulation by using the "sendkey" command.
e.g. to switch to the shell:
sendkey ctrl-alt-f1
to return to Sugar:
sendkey ctrl-alt-f7
Note: you will need to exit the monitor mode and return to the emulated machine by pressing "ctrl-alt-1" once you type either of the above commands.
Note: you type the name of the keys to send, you don't actually press the keys.
Enabling SSH
Follower needed to perform the following additional steps to successfully enable the use of SSH (with build 239):
- Ensure you have a "*-devel*.img" image, as the standard (non-devel) images appear to not include sshd.
- At the same time as enabling the root password you will probably also want to enable the network to start automatically. I followed the instructions from Alternative #1 here.
- To avoid a "man in the middle attack" warning you might want to use:
ssh -o NoHostAuthenticationForLocalhost=yes -p 2222 root@localhost
VMware Player
Linux / Windows
Warning
For easy-to-use operation, you probably want to use Qemu, which is known to work on all of Linux, Win32 and Mac. Most recent builds do not support VMWare due to the lack of a pcnet32 network driver. See [[1]]
VMware Player is another convenient way to test the image on your Linux / Windows machine. You can convert an image to a VMware virtual disk file with the qemu-img command from the QEMU distribution.
$ qemu-img convert olpc-stream-development-59-20060808_1153-rpm-ext3.img -O vmdk olpc.vmdk
Additionally, you need a config file to run the virtual disk. Here is an example (save it as olpc.vmx).
#!/usr/bin/vmware
config.version = "8"
virtualHW.version = "3"
memsize = "128"
ide0:0.present = "TRUE"
ide0:0.fileName = "olpc.vmdk"
ide1:0.present = "TRUE"
ide1:0.fileName = "/dev/cdrom"
ide1:0.deviceType = "atapi-cdrom"
floppy0.fileName = "A:"
ethernet0.present = "TRUE"
ethernet0.connectionType = "nat"
usb.present = "TRUE"
sound.present = "TRUE"
sound.virtualDev = "es1371"
displayName = "OLPC"
guestOS = "other26xlinux"

ethernet0.addressType = "generated"
uuid.location = "56 4d d1 99 5c 64 a3 6f-ef c7 aa 86 a8 cc ed 46"
uuid.bios = "56 4d d1 99 5c 64 a3 6f-ef c7 aa 86 a8 cc ed 46"
tools.remindInstall = "TRUE"
ethernet0.generatedAddress = "00:0c:29:cc:ed:46"
ethernet0.generatedAddressOffset = "0"

checkpoint.vmState = "olpc.vmss"

ide0:0.redo = ""
Start VMWare Player, open this .vmx file. Allow VMWare to create a new UUID.
Note: Make sure the emulator starts the 'OLPC for qemu target'.
Mac OSX
- Unzip the package and double click OLPC.VDMK
Windows
Parallels Desktop on Mac OS X
Bert: First, install a regular Linux in Parallels - I used Fedora Core 5. To use an OS image directly, add a second hard disk (size 512 MB) to the VM. Boot the VM, download an OS image (ending in ext3.img.bz2), then copy it to the second hard disk (hdc for me, hdb is the CD):
bzcat ...ext3.img.bz2 | dd of=/dev/hdc bs=1M
sync
Then shut down that Linux, and change the VM (or make another one) to boot from the second hard disk image. Start that VM - should work :) I have not yet made sound work, though, please let me know if you find out anything.
BruceB: It can be a bit easier than that, no need to load a Linux system if you don't already happen to have one. This worked for me, though it may be simplified further still.
- Launch Parallels, create a new VM (I user "other Linux"
- Set the hard drive to be 512MB, OK when it says it already exists.
- Note the Hard drive file name, for me it was:
/Users/bruce/Library/Parallels/otherlin/otherlin.hdd
- Download the image (as bert says, ending in ext3.img.bz2) from this page:
http://olpc.download.redhat.com/olpc/streams/development/latest/devel_ext3/
- Drop into the Apple Terminal and type: (replacing "..." with the right file name you downloaded and your username. Check to see if "otherlin.hdd" is what you are using too.)
bzcat ~/Desktop/olpc...ext3.img.bz2 | dd of=/Users/.../Library/Parallels/otherlin/otherlin.hdd
- Re-launch Parallels and run!
Bert: Oh, so Parallel's hdd is nothing more than a plain disk image? How interesting! Thanks, that's a lot easier!
Wooky: The dd-ing worked allright under OS X, but with a caveat: both images I tried (206 and 193) were only 480MB after dd, even though they originally had 512MB. I used Parallel's image utility to resize them back to 512MB and all went fine (almost, couldn't start GUI. Guess it is something between fbdev and Parallel's video).
Virtual PC on Mac OS X (PowerPC)
Akauppi: The instructions above on preparing a 512MB boot disk, based on ...img.bz2 file apply. However, create a 1GB disk image in VPC, since it does not allow precisely 512MB.
TODO: system boots nicely, but the mouse remains unresponsive. Ideas???
John Palmieri advised:
Add this to /etc/X11/qemu-Xorg.conf and then copy qemu-Xorg.conf to Xorg.conf:
Section "InputDevice"
        Identifier  "Mouse0"
        Driver      "mouse"
        Option      "Protocol" "IMPS/2"
        Option      "Device" "/dev/input/mice"
        Option      "ZAxisMapping" "4 5"
        Option      "Emulate3Buttons" "yes"
EndSection
Instructions
See Sugar Instructions.
Limitations
The XO system is designed specifically to run on 'foo'. Some of the components are unlike any off the shelf product (example, the camera) so you won't be able to get 100% emulation of the OLPC. See Emulation Limitations for details .