Ubuntu On OLPC XO

This How-To was originally published on Free Like GNU blog by Francisco Athens.
His disclaimer: I take no responsibility for trashing your flash drive, XO or your relationship with your S.O.
You may also be interested in installing the alpha-quality Ubuntu Mobile, very much at your own risk.
- These instructions were primarily written for Ubuntu Gutsy 7.10. TODO: Update instructions for Ubuntu Hardy 8.04.
Contents
- 1 Requirements
- 2 Install QEmu and the Ubuntu network installer
- 3 Download Ubuntu image you want to install on your OLPC
- 4 Install Ubuntu onto your QEmu image
- 5 Boot From Image and Install sysvinit, Xorg, XFCE, etc.
- 6 Move the Image to flash USB or SD
- 7 Get Boot Folder and other Files (Kernel and Modules) from XO
- 8 NETWORKING
- 9 Accelerating Video with Modified Debian Drivers
- 10 References:
- 11 TODO
- 12 See Also
Requirements
- You will need an SD card or USB flash drive of at least 2GB (1GB might work, it might be a very tight fit if you want a GUI plus apps). And if you choose SD card, you'll naturally need an SD card reader to be able to write to it from your non-XO computer.
- For this to work you will need to have a developer key for your OLPC!
- You should be comfortable messing with Ubuntu at the command line level. If you are in an Ubuntu or GNU/Linux User Group, you will have the best experience ;-)
- PLEASE ask questions using the talk page tab, I am officially discouraging you from asking me questions about this tutorial on IRC ;-)
Install QEmu and the Ubuntu network installer
You will need QEmu to boot the ISO you want to install on your OLPC and also make sure it is set up for networking.
We'll be assuming you're running Ubuntu for these instructions. Install QEMU on it:
$ sudo aptitude install qemu qemu-launcher qemuctl
If you are running Gutsy (Ubuntu 7.10) or earlier, you may need to use a newer qemu bochs firmware to work properly:
$ wget http://archive.ubuntu.com/ubuntu/pool/universe/b/bochs/bochsbios_2.3.6-2ubuntu1_all.deb
$ sudo dpkg -i bochsbios_2.3.6-2ubuntu1_all.deb
If you are running Hardy (Ubuntu 8.04) or newer, you're already up-to-date.
Download Ubuntu image you want to install on your OLPC
You probably don’t like to download a whole CD only to have to spend another hour waiting for updates to download after install. Get the mini.iso instead: (Need to test Hardy!)
For Gutsy: mini.iso For Hardy: mini.iso (untested) For Intrepid: mini.iso (unstable!)
NOTE: Instead of using the mini.iso, it is actually easier to use the alternate install CD for Xubuntu (www.xubuntu.org). This includes xfce and pretty much everything else you will need and fits nicely on a 2G SDHC card. If you choose this option, you still follow the instructions below, but you will use the graphical installer. You do not have to retrieve any additional packages - the only exception is that you should install the sysvinit package (that can be done with the Synaptic Package Manager once your ISO has installed and booted with Qemu).
Install Ubuntu onto your QEmu image
- Run qemu-launcher. In qemu-launcher:
- Disable "Snapshot mode" and enable "Use CD-ROM".
- Select "CD-ROM" from the Boot Disk drop-down menu.
- In the "CD-ROM" field, select the mini.iso file you downloaded.
- For Hard Disk 0, click New and choose create a RAW disk image (at least 1.5 GB in size -- but not larger than your flash/usb device!) in some location.
- On the Network tab, use 1 card. For "Card 0", select Use the user mode network stack, remove any redirects, ignore the IP address, and use the MAC address of the network card that is currently connected to the internet (make sure letters are lower case!). You can get the MAC address by running ifconfig in a terminal.
- Click Launch to boot from your image.
- After QEmu boots the ISO, you'll see an Ubuntu grub splash. Type cli to proceed with CLI installation. Each of these steps will take a while.
- You will go through the text based Ubuntu install. It should find QEmu’s virtual network card and configure it. If not you will have to stop here, go back and fix QEmu's networking.
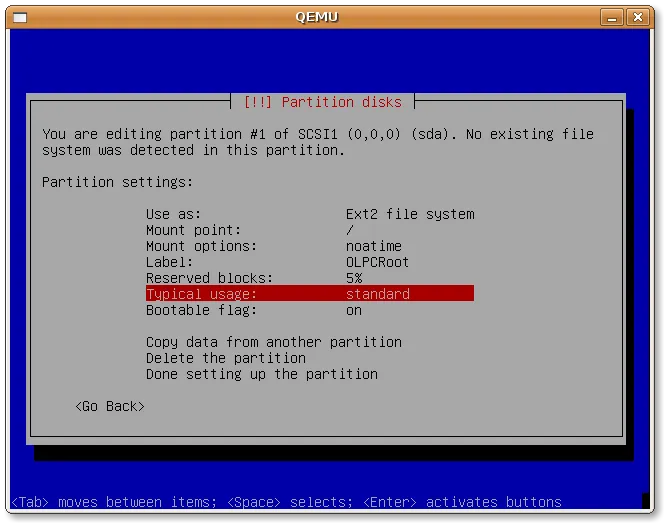
- When prompted, partition the the image manually with just one large partition formatted with the ext2 filesystem, and with a mountpoint at "/" (root). Set the noatime flag and mark the partition as bootable. The label should be OLPCRoot (if you use a different label, be sure to change subsequent instructions accordingly). Ignore the suggestion for swap as it will only eat the flash card. screenshot
- The netboot install will get all of the latest packages from the repository and install a complete x86 based OS (minus a GUI).
Boot From Image and Install sysvinit, Xorg, XFCE, etc.
Now we'll boot from the OS we just installed in order to install some other programs.
- Start qemu-launcher again. Use all the same settings as before, but boot from the hard disk (using the RAW image you create in the previous section) instead of from the CD-ROM.
- Boot Ubuntu (ignore the ATA errors -- it is a harmless bug, really!) Install sysvinit. This is necessary because upstart will not work on the XO:
$ sudo apt-get install sysvinit
Thanks to Jeff Waugh for the tip: (see LP: #160150)
<jdub> freelikegnu: upstart doesn’t like not being pid 1
- If you want xorg and xfce4, now is a good time:
$ sudo apt-get install xfce4 xserver-xorg xfonts-base xfce4-terminal firefox
- That will install a minimal XFCE desktop and Firefox. If you like gdm and don't mind its dependencies, add it (and probably feisty-gdm-themes too with gutsy - no that's not a typo) to the list above; otherwise use startxfce4 to start X.
You can search for all the tasty XFCE related packages with
$ apt-cache search xfce | more
There are other, more lightweight Desktop Environments like Fluxbox, but my heart is for the little mouse of the desert...
- Caveats with the Ubuntu installation:
- Some things you may be used to in Ubuntu like FUSE may not work as these are not configured in the OLPC kernel we will be using. You might have better luck with a Debian or custom kernel.
- If you don't use the Debian xserver-xorg-video-amd driver (see #Accelerating Video with Modified Debian Drivers) you may not have accelerated 3D (or even very fast 2D), so avoid apps that need OpenGL. Audio, wireless and the webcam seem to work though.
- Once everything is setup and your qemu install of Ubuntu is happy, shut it down:
$ sudo halt
You can safely close the QEmu window once the system is halted.
Move the Image to flash USB or SD
- You will now need a USB flash drive or SD card at least as big as your virtual disk image. It will be wiped COMPLETELY!! Be sure that after you insert the drive that it is not mounted! Note that U3 usb flash drives must have the virtual cdrom drive removed (via software that only runs on windows), or the below will not work (anyone know of a better workaround for those who want to keep the U3 cruft?):
$ sudo dd if=<the path to your disk image> of=<device name e.g. /dev/sdb> bs=1M
$ sudo sync
this will do a nice raw write to your flash. Whatever space is left over you can add a handy extra partition with fdisk too!
- IMPORTANT Reminder:
- Again after the above is done, make sure the drive is unmounted and remove it. Plug it again to check that all is well. If the drive does not have the right label, OLPCRoot, you can use tune2fs, just be sure to unmount it before doing so!
- find out where the drive is mounted:
$mount
$sudo umount /media/<name of mounted sd/usb flash>
- Assuming your flash is /dev/sdb and the mounted partition was from /dev/sdb1
$ sudo tune2fs /dev/sdb1 -L OLPCRoot
Get Boot Folder and other Files (Kernel and Modules) from XO
- Plug your flash device into the XO, it should automount and you will now have access to the filesystem of that drive. If you are in XFCE on the XO you will find using a root file manager handy (but be careful!)
$ su
# thunar
- If not you can do the following from the terminal in Sugar or TTY:
$ su
- (Assuming you labeled your flash drive OLPCRoot, I’m spreading the commands out for clarity, feel free to optimize, but be careful!)
# cp -ra /boot /media/OLPCRoot/
# cp -ra /lib/modules /media/OLPCRoot/lib/
# cp -ra /lib/firmware /media/OLPCRoot/lib/
# cp -ra /security /media/OLPCRoot/
- Make sure your develop.sig is in that security folder!
- You should rename the /media/OLPCRoot/etc/modprobe.d to modprobe.old or similar
# cd /media/OLPCRoot/etc
# mv modprobe.d modprobe.old
- Copy your olpc’s modprobe.d to the flash drive (this will load and blacklist the proper modules)
# cp -ra /etc/modprobe.d /media/OLPCRoot/etc/modprobe.d
- Rename the existing fstab to something like fstab.old
# mv fstab fstab.old
- Use the fstab from the olpc -- NOTE fstab will contain the wrong root device (mtd0), which won't hurt anything but can be confusing -- edit it if you want to fix this.
# cp -ar /etc/fstab /media/OLPCRoot/etc/fstab
- Then make a new /etc/X11/xorg.conf from http://dev.laptop.org/~cscott/xorg.conf (cscott’s debian archive)
# wget http://dev.laptop.org/~cscott/xorg.conf -O /media/OLPCRoot/etc/X11/xorg.conf
- notice that it is not using the AMD Geode xorg driver…
- Then rename (cause it will be handy for internal installs) and create a new olpc.fth in /media/OLPCRoot/boot/
# cd /media/OLPCRoot/boot
# mv olpc.fth olpc.fth.nand
- Use one of these olpc.fth files depending on how you want boot:
- FOR USB BOOT see: USB_Boot_olpc.fth
- FOR SD BOOT: SD_Boot_olpc.fth
Or see how to make your own Custom bootloader (for advanced users)
- Make sure that whatever you use is named olpc.fth. You should now be able to boot. Use the Rightmost game button to view the boot messages for debugging…
- If your XO freezes when booting ubuntu, try holding down the 'tick' button (the right most game key) as you switch it on. That turns off pretty boot. This is not necessary if 'unfreeze' appears in your olpc.fth.
- If you get an error message from the firmware saying "unrecognized program format", make sure the very first line of your olpc.fth file begins with "\ ", a backslash followed by a space. This indicates to the firmware that the file is a Forth script, and not a binary executable.
NETWORKING
- If you have a WPA network try the following. Check to see if you have a wireless card:
$ iwconfig
- Assuming your wireless is eth1:
$ sudo wpa_passphrase <ESSID> <s3kr1t password> >> /etc/wpa_supplicant.conf
$ sudo wpa_supplicant -Dwext -ieth1 -c/etc/wpa_supplicant.conf -B
$ sudo dhclient eth1
- If all goes well you can edit your /etc/network/interfaces and add the following under the eth1 entry (you can edit the existing eth0)
pre-up wpa_supplicant -ieth1 -Dwext -c/etc/wpasupplicant.conf -Bw
post-down killall wpa_supplicant
- Then restart networking (it should JustWork on next boot)
$ sudo /etc/init.d/networking restart
NOTE: If you installed Xubuntu, you can skip all this and just use the Network option under the System menu to configure your network settings. The default wireless management software isn't the best - if you have problems, use WICD instead (wicd.sourceforge.net).
Accelerating Video with Modified Debian Drivers
- Someone who knows how things work better than I needs to update this section. The xserver-xorg-video-amd package was renamed xserver-xorg-video-geode in early April 2008, and its version was bumped from 2.7 to 2.8 in Hardy. Levsen's changes might already be merged.
- There are modified xorg AMD Geode video drivers that will give improved video playback performance and rudimentary (read: slow) OpenGL functionality. These drivers, as of January 2008, work only in the OLPC XO's Geode LX processor and not on other AMD graphic based computers!!
- Also as of January 2008, Holger Levsen has backported the xorg AMD Geode drivers from Dilingers SID to ETCH and made a little repository for them. What this means for Ubuntu Gutsy on the XO is having snappy 2D acceleration (no, GLX gears still runs at about 60fps, and thats not likely to change much due to hardware abilities). Games like Frozen Bubble and playing Xvid videos will see a great improvement however! If you already have Gutsy setup on your XO, and are missing accelerated 2D read on:
- Assuming you are in Ubuntu (with Xfce or some other DE) on your OLPC paste the following into a new file: /etc/apt/sources.list.d/layer-acht.list
deb http://layer-acht.org/debian etch olpc xorg
deb-src http://layer-acht.org/debian etch olpc xorg
- then
$ sudo apt-get update
$ sudo apt-get install xserver-xorg-video-amd
- It will remove a bunch of xorg packages, upgrade others and install Holger’s backported video driver.
- You will then have to grab the OLPC’s original /etc/xorg.conf and add the mouse driver back in or use the Free Like GNU file:
$ cd /etc/X11
$ mv xorg.conf xorg.bak
$ wget http://www.freelikegnu.org/wp-content/uploads/2008/01/xorg.conf
- if x is already running, restart x with ctrl-alt-erase
NOTE: If you have installed Xubuntu (Hardy Heron), then you already have the latest video drivers and you can skip the above. Just set your video driver to "geode" in your xorg.conf.
References:
- howto debian on olpc (wiki.debian.org)
- How can I boot OLPC by SD card (lists.laptop.org)
- Bochs Bios Bug (bugs.launchad.net/ubuntu)
- Holger Levsen Backports
Thanks to everyone for their help and advice!
TODO
- Make Ubuntu Kernel, Modules and Video drivers packages instructions
- XFCE hotkeys setup (should be on its own page)
See Also
- Customizing Ubuntu for XO
- Xfce keybindings
- Sugar on Ubuntu Linux
- Installing Ubuntu using Compressed Files - An installation method that should be easier for those new to Linux