XS Configuration Management
This page describes how the software packages comprising an XS School server are configured for different school sizes and needs.
This page is still growing
Contents
Server Configuration
The basic configuration of software on the server is currently provided through the Fedora yum and RPM package managers. We provide the entire Fedora 7 suite of software in our repositories, and you can easily install any supported software.
The lists of repositories searched (specified in /etc/yum.conf) is kept in /etc/yum.repos.olpc.d/.
Local Software Repositories
Please add instructions for extending a software install here
School Specific Configuration
We are working on a better configuration interface. Suggestions are welcome in the discussion page.
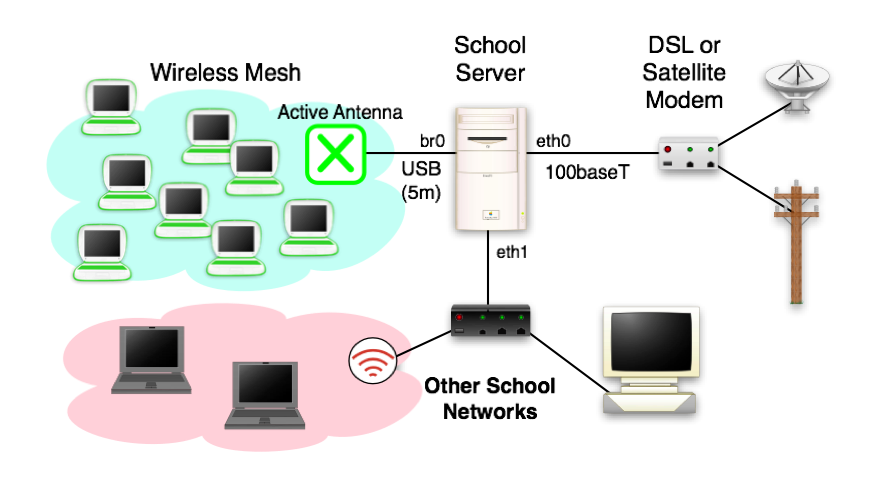
The default server setup is to connect to the Internet on the first wired ethernet network interface, using IPv4 DHCP. Laptops connect to the server over the wireless mesh using one or more Active Antenna, connected through USB interfaces. Optional second (and additional) ethernet interfaces are configured by default to provide an internal LAN within the school. Traditional WiFi access points, if used, should be located on this internal LAN.

User Access
For now, any network configuration and debugging is done through a terminal interface. See Troubleshooting School Servers for help determining if something is wrong.
Access to the school server is via console login, or ssh. Console login must be used to establish accounts for ssh access. Root access via ssh is disabled by default, and accounts must use an SSH key for authentication. See setting up user accounts.
Networking
The school specific network configuration is done mostly using the network_config script (located at /etc/sysconfig/olpc-scripts/network_config) which reconfigures the network interfaces and associated files for a particular server identity (number). This script always assumes that a school server is a principal server, either the sole server in a school or the Internet gateway in a multi-server school. Associated auxiliary_config (located at /etc/sysconfig/olpc-scripts/auxiliary_config) and principal_config (located at /etc/sysconfig/olpc-scripts/principal_config) scripts are provided to change a server's role in the school network. All these scripts generate normal Fedora network configuration files (ifcfg-eth0, ifcfg-br0, etc...) in /etc/sysconfig/network-scripts/, as well as /etc/network, /etc/dhcpd.conf, /etc/resolv.conf, and others.
The networking configuration is performed at first boot of a software system, by a script which runs on every boot: /etc/init.d/olpc-network-config. On the first boot, this script runs the /etc/sysconfig/olpc-scripts/network_config script, configuring the network interfaces for the server assuming it is server number one.
There are two main usage scenarios: a single server providing access to a small school, and a set of servers cooperating to provide access to a larger school.
Small School Scenario
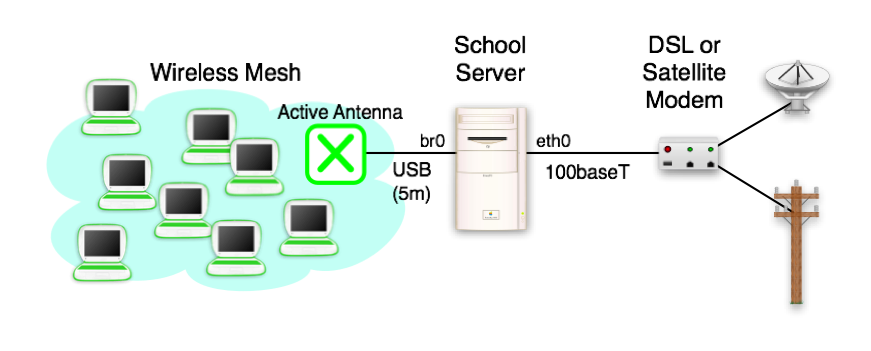
The default configuration supported by the software is that of a single School server supporting between one and one hundred and fifty students. Such a school server is equipped with one to three Active Antenna, which provide connectivity with the laptops over the wireless mesh. If the school server has a single wired networking interface, it is dedicated to obtaining internet access (a WAN port).

The network_config script may be run manually to reconfigure a system in response to a change in the wired interfaces, such as the addition of a second wired network interface.
Large School Scenario
The more common scenario is that a school server will be one of many in a school. As each school server provides additional network access and storage, the school infrastructure automatically scales with the number of servers installed. One school server typically provides the connection to the internet, and is designated the 'principal' school server. The other servers in a school are peers, and are designated 'auxiliary' school servers.

For purposes of backup, each laptop is associated with a single school server. Other services, including internet access, are provided either by the closest server or the principal school server. At installation time, each server is given a unique number (currently 1 through 8, soon higher). These numbers do not have to be sequential, but should be viewed as fixed --- if the server number changes, all kids data stored on that server will currently be lost...
When a server first boots, it currently configures itself to support the common usage scenario shown above. It assumes that it is both a principal server and server #1. On auxiliary servers, it is necessary to immediately manually re-run the network_config script (located at /etc/sysconfig/olpc-scripts/network_config) with a unique server number for the school, and also make it an auxiliary server by manually running the auxiliary_config script (located at /etc/sysconfig/olpc-scripts/auxiliary_config).
Upon failure of a principal school server, any remaining school server may take its place. Simply run the principal_config script (located at /etc/sysconfig/olpc-scripts/principal_config). This school server will retain its existing number, but will be now provide the services provided only by the principal school server, and will reconfigure its networking to act as the school's internet gateway.
Internet Connection
The internet (WAN) connection is currently the eth0 interface by default. The file which configures this interface is /etc/sysconfig/network-scripts/ifcfg-eth0. The current default is to use DHCP to assign an IP address to this interface, and obtain DNS server info.
IPv6
To enable external IPv6 you will have to configure the global address of the machine and setup an IPv6 tunnel. Unfortunately, you are not currently able to use IPv6 in school with multiple servers. We are working on this ASAP.
Instructions coming
Name Service
The hostname is set in /etc/sysconfig/network. Do not change this after starting ejabberd!!!
The Domain Name Service is configured mainly by /etc/named.conf.
Configuration
There is a script for manually changing the domain name:
/etc/sysconfig/olpc-scripts/domain_config <new_domain_name>
Do not change this after starting ejabberd !!
Manual Configuration
This name currently set to random.xs.laptop.org is unfortunately embedded in a number of files:
/etc/named.conf
/var/named/school.zone.inaddr.db
/var/named/school.zone.16.inaddr.db
/var/named/school.zone.32.inaddr.db
/var/named/school.zone.48.inaddr.db
/etc/resolv.conf
/etc/sysconfig/olpc-scripts/resolv.conf
/etc/dhcpd.conf
/etc/ejabberd/ejabberd.cfg
/etc/idmgr.conf
The state of the reverse address resolution is admittedly horrible (Trac ticket #6039).
Web Caching
The school server is currently using Squid for web caching. This is not enabled by default, but may easily be turned on. As root, type:
/etc/sysconfig/olpc-scripts/TURN_SQUID_ON
To disable web caching, type:
/etc/sysconfig/olpc-scripts/TURN_SQUID_OFF
This disables caching, but doesn't free up any disk space used by existing cached data. You can manually delete the cache, located at /library/cache to free this disk space.
The configuration files for squid are found in /etc/squid/. OLPC provides a custom configuration file /etc/squid/squid.conf through the xs-config package.
User Accounts
When a school server is installed, it has no user accounts, remote (SSH) login to the root account is disabled, and remote logins must be authenticated using a public/private key pair. If exploring or developing with a school server, as root from the console you will need to add a new account (username wad in the example):
adduser wad
passwd wad
wget http://dev.laptop.org/~wad/dsa_public_key
mkdir /home/wad/.ssh
mv dsa_public_key /home/wad/.ssh/authorized_keys
chown -R wad:wad /home/wad/.ssh
chmod -R g-w /home/wad/.ssh
The public key, downloaded from http://dev.laptop.org/~wad/dsa_public_key in the above example, can be generated on any Linux system using the ssh-keygen command (which leaves your new public/private key pair in .ssh). You want to copy the id_rsa.pub or id_dsa.pub file to other machines to allow logins.
Changing the Root Password
When logged in as root, type:
passwd
you will be prompted for a new root passwd. You can also use this command to change other (non-XO) user's passwords:
passwd username
Example Configurations
Small School/Home School
This is the step-by-step process used to install the XS software onto a server for schools with a single server.
The school domain name used in this example is example.org.
- Download and install a new build onto a USB key or CD.
- Boot up the server from the USB key or CD. Select "Run from Image", indicate your keyboard type, time zone, and enter a root password. When the install has finished, click "Reboot".
- Now log in as root and reboot (trac #6678, removing the installation media (key or CD) so the system now boots from the disk drive.
- Log in as root, and set a root passwd (until trac #6677 is fixed).
- Set the server domain name using:
/etc/sysconfig/olpc-scripts/domain_config example.org
- If outside access is to be supported, change the schoolserver public IP address supplied by /var/named/school.external.zone.db to be the public IP of the principal school server. At present time, we don't support public access to school servers using DHCP to obtain their WAN IP address --- but this should be correctable with a script or so (Trac ticket 6138)...
- Enable ejabberd on startup, and start it using:
chkconfig --level 345 ejabberd on
service ejabberd start
- Create an account on ejabber for the administrator:
ejabberdctl ejabberd register admin schoolserver.example.org admin
- Go to the web-based administration interface for ejabberd at http://schoolserver.example.org:5280/admin/, or http://172.18.0.1:5280/admin/ if using an XO connected through the mesh.
- Login as "admin@schoolserver.example.org" with the password you set when registering (admin).
- Click on "Virtual Hosts", then your hostname, then "Shared Roster Groups". Type "Online" and click Add New.
- Click on "Online" and enter "Online" for Name, "@online@" for Members, and "Online" for Displayed Groups. Click Submit.
Optional
- Setup and start web caching by typing:
/etc/sysconfig/olpc-scripts/TURN_SQUID_ON
- Create an account for yourself (this is a test of basic network connectivity as well):
/etc/sysconfig/olpc-scripts/mkaccount wad http://dev.laptop.org/~wad/dsa_public_key
passwd wad
- Add yourself to the wheel group, so that you have sudo priviledges
Large School
This is a step-by-step guide of what is needed to install in a large school (up to 150 laptops), using XS build 150 (or later). Schools larger than this will need to consider wired infrastructure. More information coming soon....
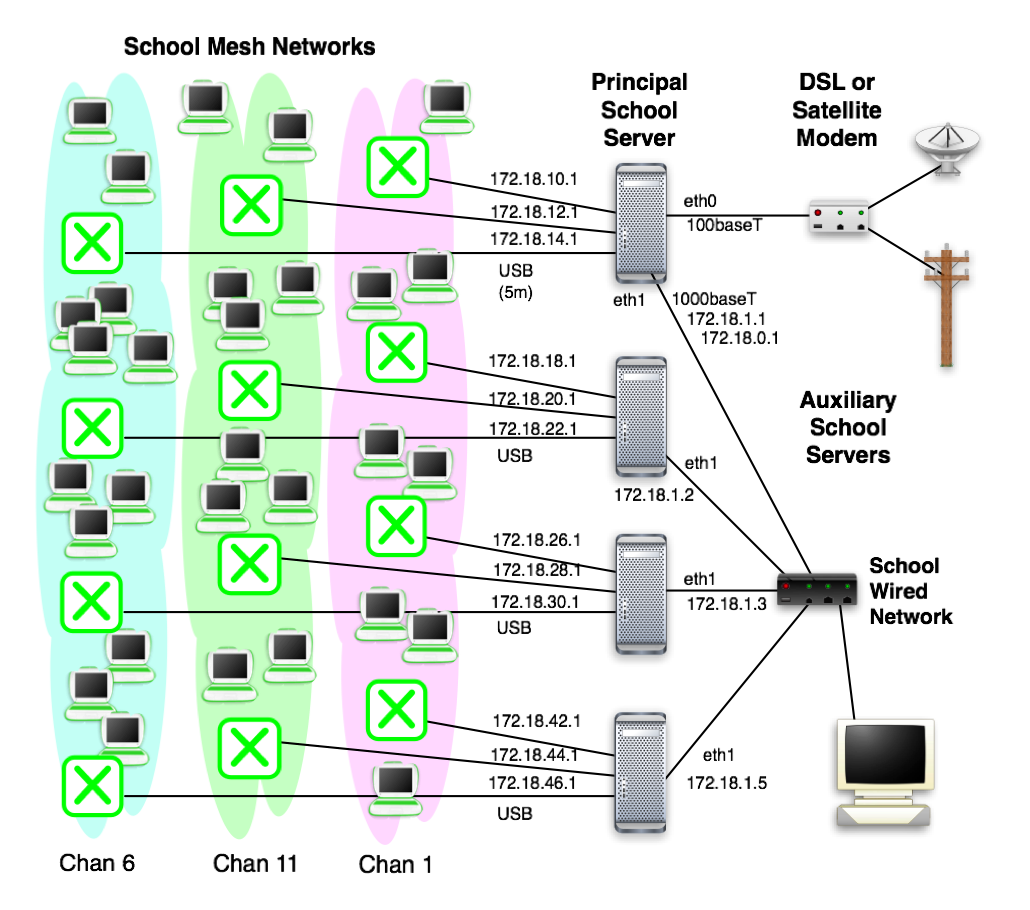
Here is a diagram of the networking. Just for illustration, the principal school server is not school server one in this case:

On a server with a single wired networking interface, it is considered the WAN port (eth0). If multiple wired network interfaces are provided, one is assigned to be the WAN port and the others LAN ports (eth1, eth2, ...) when network_config is run (manually, or at first boot). The WAN ports of the two auxiliary servers are connected to a switch along with the LAN port of the principal server.
The school domain name (served by the principal school server) used in this example is school.pinewood.net. The domain name used for the school only needs to be "real" (discoverable from the root DNS servers) if access to the presence service from outside the school will be allowed. We recommend that this be allowed, which also requires that the school server IP address be publicly accessible.
Principal Server
- Download and install a new build onto a USB key or CD.
- Boot up the server from the USB key or CD. Select "Run from Image", indicate your keyboard type, time zone, and enter a root password. When the install has finished, click "Reboot".
- Now log in as root and reboot (trac #6678, removing the installation media (key or CD) so the system now boots from the disk drive.
- Log in as root, and set a root passwd (until trac #6677 is fixed).
- Set the server domain name using:
/etc/sysconfig/olpc-scripts/domain_config school.pinewood.net
- If outside access is to be supported, change the schoolserver public IP address supplied by /var/named/school.external.zone.db to be the public IP of the principal school server. At present time, we don't support public access to school servers using DHCP to obtain their WAN IP address --- but this should be correctable with a script or so (Trac ticket 6138)...
- Enable ejabberd on startup, and start it using:
chkconfig --level 345 ejabberd on
service ejabberd start
- Create an account on ejabber for the administrator:
ejabberdctl ejabberd register admin schoolserver.school.pinewood.net admin
- Go to the web-based administration interface for ejabberd at http://schoolserver.school.pinewood.net:5280/admin/, or http://school:5280/admin/ if using an XO connected through the mesh.
- Login as "admin@schoolserver.school.pinewood.net" with the password you set when registering (admin).
- Click on "Virtual Hosts", then your hostname, then "Shared Roster Groups". Type "Online" and click Add New.
- Click on "Online" and enter "Online" for Name, "@online@" for Members, and "Online" for Displayed Groups. Click Submit.
- Setup and start web caching by typing:
/etc/sysconfig/olpc-scripts/TURN_SQUID_ON
- Create an account for yourself (this is a test of basic network connectivity as well):
/etc/sysconfig/olpc-scripts/mkaccount wad http://dev.laptop.org/~wad/dsa_public_key
passwd wad
- This time, carry it further and make yourself a new private key for this school. This will allow you to securely access auxiliary servers hidden behind NAT! Log in as yourself and type:
ssh-keygen
sudo cp ~/.ssh/id_rsa.pub /var/www/html/my_name_pub_key
Auxiliary Servers
- Install new build from USB key. Reboot (manually, removing key), and log in as root
- Set the server number to two and set the role to auxiliary by running:
/etc/sysconfig/olpc-scripts/network_config 2
/etc/sysconfig/olpc-scripts/auxiliary_config
- Set the server domain name using:
/etc/sysconfig/olpc-scripts/domain_config school.pinewood.net
- Create an account for yourself, using the key on the principal server:
/etc/sysconfig/olpc-scripts/mkaccount wad http://172.18.0.1/my_name_pub_key
passwd wad
At this point, you should be able to perform basic testing of the school servers.