XS Server Installation
This is a quick guide for installing an XS school server for a small school.
Contents
Recommended Hardware Specifications
A number of computers may act as a school server, but it must be a Fedora-capable computer. Recommended minimum specifications for a school server are as follows:
| Server | Laptops Supported | Processor | RAM | Storage |
|---|---|---|---|---|
| Small | <20-25 | 466 MHz | 1 GB | 40-120 GB |
| Large | <150 | 1 GHz | 1 GB | 320-750 GB |
See XS Recommended Hardware for more information.
Access Points
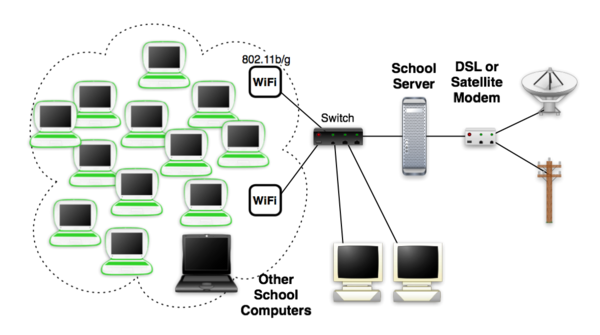
Most access points are compatible with the XO. For a list of ones which have been shown to work see Wireless Access Point Compatibility. Unless a single access point is being used (not recommended for more than forty to fifty laptops), a network switch of some sort will also be needed.
Active Antennae
If you have active antenna(e) to use, simply plug them in and reboot the XS. It will detect them and allocate them to br0, br1 and br2. It should just work and XOs will see "School server mesh" when they connect to the mesh served by the XS. You may need to manually allocate different frequencies per antenna.
AP Configuration
The steps for setting up a wireless router access point vary based on the wireless router being using, but this serves as a rough guide for installation. These steps were run using a Zoom Wireless-G model 4400 router.
- Press the reset button on the wireless router to reset it and connect it to any computer. It's possible to do this setup with an XO or any other machine with linux installed.
- Open terminal and type
ifconfig eth0 IPaddress
Where IPaddress is in the same subnet as the default IP for the access point
- Connect to the access point by typing in the IP address in a web browser.
- Login to the access point using the default password (or skip entering a password if none is provided)
- Set the wireless channel to 1, 6 or 11 to minimize interference
- Set a unique name for the wireless network
- Make sure that the access point is NOT running as a DHCP server
Obtaining and installing Server Software
For more information, see XS Installing Software.
Optional
Proxy Servers
In some implementations you may have to use an existing proxy server to both presence bandwidth or to even access the internet. If you need to make any modifications to the default Squid configuration make sure you make the modifications to the XS squid.conf file (called squid-xs.conf?) not the default squid.conf file. To point to an external proxy server simply add the following line, inserting the appropriate proxy name:
- cache_peer parentcache.foo.com parent 3128 0 no-query default
- acl all src 0.0.0.0/0.0.0.0
- never_direct allow all
Then restart Squid (or the server) and test.
Note: If user authentication is required for the network through a pop-up browser you may need to use Firefox rather than the default browse activity as it doesn't support popups. Also, if you have a PAC file you need to use you can distribute it by DHCP.
More documentation to come on this section
Caching
- Setup and start web caching by typing:
/etc/sysconfig/olpc-scripts/TURN_SQUID_ON
