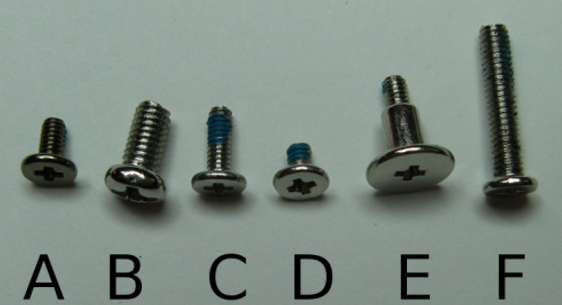
Screws
Jump to navigation
Jump to search
This page is monitored by the OLPC team.
These are the screws used in the XO laptops, and their locations. This is part of the Disassembly and Repair guides.
- (A) M2x.4 x 4mm - The common blackened ones. There are a lot of these - use anywhere a specific type of screw is not specified.
- (B) M3x.5 x 5mm - There are 4 of these. These attach the hinge to the bottom half of the laptop.
- (C) M2x.4 x 6mm - The long shiny ones. There are 6 of them. Four are used to attach the back cover (over the motherboard), and are accessed behind the screen. Two are used to hold the hinge cover together, one on each side.
- (D) M2x.4 x 2mm or 3mm - The short shiny ones. There may be 4 of them, all under the keyboard. 2 of these hold the keyboard controller circuit board in place, the other two help screw the keyboard to the keyboard bezel. Holes for these screws are marked with this symbol:
 .
. - (E) fat M2x.4 x 7.62mm (0.3in) - The screen screws. These are cushioned by 4 black rubber ring bumpers and hold the screen in place.
- (F) M2.5x.45 x 12.7mm (0.5in) - The antenna ear screws. Four of these hold the antenna ear clamps in place.
The screws are metric (ISO). The number immediately after the M is the rough diameter (in mm), followed by the pitch (in mm) after the first 'x'. The length is indicated after the second 'x'. Two of the screws have a precise length in English units, but not metric units.
Tip: There are a few spare screws (at least one of each type) inside the handle.
