User:NeoAmsterdam/10.1.2/Bootable SD
Unlike the XO-1's built-in storage, there is no cheat code or OpenFirmware command for installing an OS image to an SD card. More's the pity, as this procedure takes significantly longer than a clean install (as depicted). The instructions on this page show how to install Release 10.1.2 (Build 852) to an SD card on an XO-1.
When you are finished, you will be able to run the OS from the SD card while leaving the OS stored in the XO's internal memory virtually intact. Moreover, given the continuously increasing capacities of SD cards, you can have as much storage space as your heart desires (and your wallet allows).
Please read this document thoroughly before proceeding - many a trouble can be prevented this way. Also, children should get permission from a parent, guardian, teacher, and/or Linux guru before attempting this procedure (adult supervision is not required, but is highly recommended).
Before you Begin
Warnings
- This procedure will erase any data stored on the XO.
- This procedure will erase any data stored on the SD card.
- This procedure will erase any data stored on the USB drive.
- This procedure requires the SD card to be partitioned: fdisk skill is required.
- You may refer to the See the Linux Partition HOWTO by The Linux Documentation Project for more information.
- This procedure takes a long time to execute; do not execute these instructions on battery power.
Caveats
- The SD card will be partitioned for Linux and have an ext3 filesystem. This is not an optimal arrangement for SD cards, but it works.
- /boot/olpc.fth will have to be edited if volume label of the ext3 partition on the SD card is different than "OLPCRoot"
- This can be done in OpenFirmware using µemacs if necessary.
- yum will not work because /var/cache/yum and temp are mounted in /etc/fstab
- This can be edited post-install, but we'll do it as part of the install's optional phase
- The second install phase takes forever. (That's the price you have to pay for having GNOME)
Requirements
- An XO
- I suspect, but cannot confirm, that this procedure will work on an XO-1.5. Anyone with an XO-1.5 who has tried this method of creating a bootable SD is encouraged to document their results on the discussion page.
- A USB drive with at least 1GB of storage capacity formatted using FAT-32
- A 1GB USB drive will do, but you will need more space if you intend to install activities from the USB key.
- I recommend a 2GB USB drive. Larger is always better.
- An SD card with at least 1GB of storage capacity
- Use an SD card whose capacity exceeds the XO's (otherwise you will defeat the purpose of installing 10.1.2 to the SD card).
- Build 852 and its associated filesystem information
- While you can download these files to the USB drive from your XO, I highly recommend downloading these files on a different computer.
Optional Files
- Developer's key ("Dev Key")
- If you don't know what this is, don't worry; if you do, make sure you have a copy of it.
- Activities
- I prefer to have my activites on the USB drive instead of having to download them post-install.
Procedure
Pre-Installation
Back Up Your Data
This may seem obvious, but it warrants repeating: this procedure will erase all the data on your XO and SD card, and possibly your USB key as well. Back up your data!
Create Installation Drive
- If your USB drive is not formatted as a FAT-32 drive, do so now.Note: Windows 7 appears to format USB drives using exFAT by default. The XO cannot read exFAT - You must use FAT-32.
- Download build 852 and its associated filesystem information:
- os852.img (604MB)
- os852.img.fs.zip (398KB)
- Copy os852.img and os852.img.fs.zip to the root directory of the USB drive
- Rename os852.img.fs.zip to fs.zip
Optional
- If you have a Dev Key, copy it to the root directory of your USB drive.
- If you downloaded activities:
- Make a directory named Activities in the root directory of your USB drive.
- Copy the activities into the Activities directory.
First Installation
This phase of the procedure will install release 10.1.2 to the XO's built-in storage. The process takes less than 10 minutes.

- This is your last chance to back up your data. If you haven't done so, do so now.
- Shut down the XO.
- Eject SD card.
- Insert the USB drive.
- Hold down all four game keys (✓ + ◻ + O + ×)
- Press the power button.
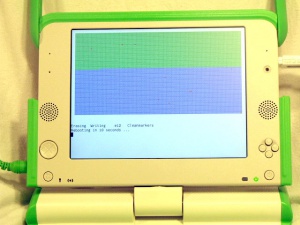
- Keep all four game keys depressed until the XO prompts you otherwise (see illustration)
You may now leave the XO unattended while it installs release 10.1.2 to the built-in storage.
Second Installation
This phase of the procedure will copy the 10.1.2 installation from the XO's built-in storage to a freshly-formatted SD card. The process can take as long as three hours.

- When you see the "Name:" screen (see illustration), drop into a console.
- Press ♦ ctrl + ♢ alt +
 f1.
f1.
- Press ♦ ctrl + ♢ alt +
- Drop the runlevel.
- /sbin/init 3
- Insert SD card into its slot.
fdisk
This will prepare the SD card for formatting.
- Parition the SD card for Linux.
- fdisk /dev/mmcblk0
- Print out the partition table.
- p
- This information will determine your next step.
- If one parition is shown and it isn't Linux-style, change the partition type:
- T
- 83
- If no partitions are shown, create one:
- n
- p
- 1
- Accept the defaults from this point on.
- If the partition is not flagged as active, activte it:
- a
- 1
- Confirm the partition arrangement.
- p
- There should be only one partition listed, beginning with /dev/mmcblk0p1 * 1 and ending with 83 Linux. If you see something different, or if more than one parition is shown, do not proceed any further.
- Once confirmed, write the partition arrangement.
- w
mkfs.ext3
This will create a clean filesystem on the SD card.
- Create an ext3 filesystem. Unless you are compelled otherwise, set the volume label to OLPCRoot.Note: The volume label can be anything you like, but it will require some additional intervention in order to make the SD card bootable.
- mkfs.ext3 -L OLPCRoot /dev/mmcblk0p1
mount
This will make the SD card accessible.
- Create a mount point for the SD card.
- mkdir /mnt/sd
- Mount the SD card.
- mount -t ext3 /dev/mmcblk0p1 /mnt/sd
cp
This will copy the 10.1.2 installation from the XO's built-in storage to the SD card.
- Copy the files from the pristine build directory to the SD card.
- cp -pr /versions/pristine/852/* /mnt/sd/.
- If you want to make sure the XO is copying, use cp -pvr /versions/pristine/852/* /mnt/sd/.. Beware that this will slow down the copying speed somewhat.
mkdir
This will create your home directory. The XO will be somewhat dysfunctional without it.
- Create the home directory.
- mkdir -p /mnt/sd/home/olpc
Optional Installations
The instructions in this section are optional. The "must do" installation procedure resumes at "Installation Cleanup"
- If you have removed the USB drive, reinsert it now.
- Create a mount point for the USB drive.
- mkdir /mnt/usb
- Mount the USB drive.Note: Although sda1 is the most likely device idenfier, it is not guaranteed to be the correct one.
- mount -t vfat /dev/sda1 /mnt/usb
Dev Key
- Copy the Dev Key from the USB drive to the SD card.
- cp /mnt/usb/develop.sig /mnt/sd/security/develop.sig
Activities
- Copy the activities directory from the USB drive to the user's home folder.
- cp -r /mnt/usb/Activities /mnt/sd/home/olpc/.
- Change to the newly-installed activities directory.
- cd /mnt/sd/home/olpc/Activities
- Unzip the activities.
- ls -1 | while read i ; do unzip $i ; done
- Remove the activity packages
- rm *.xo *xol
Adjusting the Volume Label
If you chose a volume label other than "OLPCRoot", edit olpc.fth.
- nano /mnt/sd/boot/olpc.fth
- Scroll towards the end of the document.
- Replace the volume label from OLPCRoot to the volume label you chose.
- Save and quit.
Unblocking yum
Release 10.1.2 has a feature that prevents yum from functioning. To reenable yum, edit fstab.
- nano /mnt/sd/etc/fstab
- Comment out the following mount points:
- /temp
- varcacheyum
- vartmp
- varlog
- Save and quit.
Optional Install Cleanup
These must be executed before resuming the required instructions.
- Unmount the USB drive
- umount /mnt/usb
- Remove the USB drive's mount point
- rmdir /mnt/usb
Installation Cleanup
This section contains the last set instructions required to complete the installation procedure.
- Change ownership of the user's home folder.
- chown -R olpc:olpc /mnt/sd/home/olpc
- Unmount the SD card
- umount /mnt/sd
- Remove the SD card's mount point
- rmdir /mnt/sd
- Restart the XO
- shutdown -r now
- Note: You will probably want to restart in verbose mode. To do that, hold down the ✓ key at startup.
- Once you've restarted, drop into a console (press ♦ ctrl + ♢ alt + f1) and run df: its output will indicate whether you booted from SD card or the NAND. The best indicator is if you see /dev/mmcblk0p1 mounted as /.
Post-Installation Troubleshooting
Failure to Start
If the system fails to boot after the above steps, try turning it off, holding down the checkmark button, and turning it back on. Let go of the checkmark button when it tells you to. This will show the details of what is happening as it tries to boot up. If you see the message dracut: FATAL: No or empty root= argument a few lines before it stops, then you will need to put your developer key on the SD card. This is covered in the optional steps above.
Stalling on Startup
Occasionally the XO will seem to stall during the boot animation sequence, even though it has booted fully. A workaround that seems to fix this problem is to disable 0-boot-anim-start.
- Drop into a console
- Press ♦ ctrl + ♢ alt + f1
- For some reason (probably a $PATH issue), neither the Sugar Terminal nor GNOME's Terminal can find chkconfig.
- Press ♦ ctrl + ♢ alt +
- Disable 0-boot-anim-start.
- chkconfig 0-boot-anim-start --levels 0123456 off
If you also disable z-boot-anim-stop, you may find that the cursor from the OpenFirmware console will remain onscreen post-boot. Therefore, you may leave z-boot-anim-stop as is.
You can reset the boot animation to its default settings by running chkconfig 0-boot-anim-start --levels 5 on.