Deployment Guide/imaging, activating, and registering laptops
VII. Imaging, Activating, and Registering
Every laptop needs to have the proper software and content image installed and it has to be activated as part of the deployment process. If a School Server is being used as part of the deployment, the laptop should be registered as well.
The image is a combination of an operating system build provided by OLPC and a collection of activity and content bundles assembled in country. (OLPC will help with the bundling process, but the responsibility for testing the bundle rests with the in-country deployment team.)
Once a final image is agreed upon, that image needs to be put onto the laptops themselves. The process to do so varies from deployment to deployment and is also mitigated by manufacturing and shipping schedules. (Obviously, if the image is prepared after the laptops have left the factory, it cannot be put on the laptops in the factory.)
A somewhat tedious-but-reliable way to install an image is via USB key. (Other mechanisms for imaging are being developed at OLPC, but are not currently recommended for large-scale reimaging.) Imaging can be done centrally, regionally, or at the schools by the children and teachers.
The reimaging process involves:
- unpacking the laptop;
- plugging it in to external power;
- inserting a USB key;
- powering it on with the four right-hand game keys depressed;
- waiting approximately five minutes for the reimaging and bundle installation to complete; and
- repackaging the laptop.
(Step 6 may not be necessary if the laptop is to be immediately activated and given to a child.)
The activation process can likewise be accomplished by USB; it can also be done over the network from a School Server. An activation key must be distributed to the point of activation, either by USB or download to the School Server. (Activation keys are stored in a file called lease.sig, which should appear in the “root” (top-level) directory of the USB key.)
To activate a laptop:
- power it on;
- insert the USB activation key or wait for network activation from the School Server;
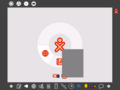
- once the laptop begins to boot (the “arms” of the XO graphic in the center of the screen begin to rotate) the USB key can be removed and the laptop can be powered off.
Ideally, activation should occur at the time that the laptops are given to the children.
Registration must occur after the laptops have been given to the children, as it is dependent upon the assignment of a nickname and the generation of a public key, which are part of the initial startup process that every child engages in when they first turn on their laptop.
To register a laptop:
- select Register from the hover menu that appears on XO graphic found in the center of the Home View;
- wait for the registration process to complete—it may take a minute or two;
- when complete, Register will no longer be listed as a menu option.
Note that reimaging must occur before activation, as it erases the activation key. Subsequent software updates, such as installing patches or bundles, do not impact activation or registration.

- 1) An activated laptop will begin to animate
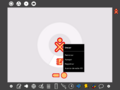
- 2) Preparing to register
- 3) Registering
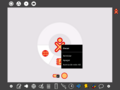
- 4) Registered


