Demo notes/lang-ko: Difference between revisions
m (Demo Notes/lang-kr moved to Demo Notes/lang-ko: According to ISO 639, Korean uses the code 'ko', not 'kr') |
m (Fix Etoys spelling) |
||
| (7 intermediate revisions by 4 users not shown) | |||
| Line 1: | Line 1: | ||
{{Translation | lang = |
{{Translation | lang = ko | source = Demo notes | version = 32352}} |
||
{{Ongoing Translation}} |
{{Ongoing Translation}} |
||
<!-- áé íó úü ñÑ |
<!-- áé íó úü ñÑ |
||
| Line 7: | Line 7: | ||
이 페이지는 데모 안내와 B1과 B2 노트북의 버그와 수정을 다룹니다. |
이 페이지는 데모 안내와 B1과 B2 노트북의 버그와 수정을 다룹니다. |
||
{{ Translated text | |
|||
<font size="-1"><blockquote>This page describes demonstration instructions and common bugs and fixes for B1 and B2 laptops. |
|||
This page describes demonstration instructions and common bugs and fixes for B1 and B2 laptops. |
|||
:''참조: [[Hardware release notes|하드웨어 릴리즈 노트]], [[Software Release Notes|소프트웨어 릴리즈 노트]], [[Library Release Notes|라이브러리 릴리즈노트]]'' |
:''참조: [[Hardware release notes|하드웨어 릴리즈 노트]], [[Software Release Notes|소프트웨어 릴리즈 노트]], [[Library Release Notes|라이브러리 릴리즈노트]]'' |
||
:''See also: [[Hardware release notes]], [[Software Release Notes]], [[Library Release Notes]]'' |
:''See also: [[Hardware release notes]], [[Software Release Notes]], [[Library Release Notes]]'' |
||
| display = block }} |
|||
{{anchor|IMPORTANT}} |
|||
<div id="IMPORTANT"/> |
|||
==중요함== |
==중요함== |
||
{{ Translated text | |
|||
<font size="-1"><blockquote>Please note that this is a Beta unit with an Alpha software load. There are bugs that are currently being worked on and not all components are operational, e.g., some keys do not work. We will do our best to document these and get them fixed in a timely manner. |
|||
Please note that this is a Beta unit with an Alpha software load. There are bugs that are currently being worked on and not all components are operational, e.g., some keys do not work. We will do our best to document these and get them fixed in a timely manner. |
|||
# The touch pad is sensitive and can be hard to maneuver until you get used to it. (It needs tuning.) |
# The touch pad is sensitive and can be hard to maneuver until you get used to it. (It needs tuning.) |
||
| Line 22: | Line 24: | ||
# We have yet to implement power management, so keep the machine plugged in as much as possible. |
# We have yet to implement power management, so keep the machine plugged in as much as possible. |
||
More detail is available online at [[BTest Software Notes|http://wiki.laptop.org/go/BTest_Software_Notes]]. |
More detail is available online at [[BTest Software Notes|http://wiki.laptop.org/go/BTest_Software_Notes]]. |
||
| display = block }} |
|||
{{anchor|An overview of the machine}} |
|||
==노트북 개관== |
==노트북 개관== |
||
[[Image:Drawing75c1.jpg|thumb|300px|center|클릭하면 확대됩니다]] |
[[Image:Drawing75c1.jpg|thumb|300px|center|클릭하면 확대됩니다]] |
||
{{anchor|Getting Started}} |
|||
==시작하기== |
==시작하기== |
||
{{anchor|Opening the laptop}} |
|||
===노트북 열기=== |
===노트북 열기=== |
||
| Line 39: | Line 42: | ||
Image:Opening-2.jpg|노트북 '클릭' 오픈 |
Image:Opening-2.jpg|노트북 '클릭' 오픈 |
||
</gallery> |
</gallery> |
||
{{ Translated text | |
|||
Position the handle away from you and lift both antennae up and toward you until the laptop clicks open. Lift the screen up from the keyboard; you may have to hold the keyboard down as you lift up on the display. |
|||
| display = block }} |
|||
{{anchor|Power on}} |
|||
<font size="-1"><blockquote>Position the handle away from you and lift both antennae up and toward you until the laptop clicks open. Lift the screen up from the keyboard; you may have to hold the keyboard down as you lift up on the display.</blockquote></font> |
|||
<div id="Power on"/> |
|||
===켜기=== |
===켜기=== |
||
[[Image:Power-button.jpg|thumb|right|파워 버튼]] |
[[Image:Power-button.jpg|thumb|right|파워 버튼]] |
||
{{ Translated text | |
|||
<font size="-1"><blockquote>The Power Button is located in the bottom right-hand corner of the bezel surrounding the screen. Note that it takes approximately two minutes for the machine to boot. However, the green power LED should come on immediately. If, for some reason, you do not see text appear on the screen within 15 seconds, or if the machine does not power on at all, please see the [[#Bugs and or Known Issues]] Section at the end of this document. (Note that sometimes the power button gets caught under the bezel.)</blockquote></font> |
|||
The Power Button is located in the bottom right-hand corner of the bezel surrounding the screen. Note that it takes approximately two minutes for the machine to boot. However, the green power LED should come on immediately. If, for some reason, you do not see text appear on the screen within 15 seconds, or if the machine does not power on at all, please see the [[#Bugs and or Known Issues]] Section at the end of this document. (Note that sometimes the power button gets caught under the bezel.) |
|||
| display = block }} |
|||
{{anchor|Power off}} |
|||
===끄기=== |
===끄기=== |
||
{{ Translated text | |
|||
<font size="-1"><blockquote>'''Update ''' |
|||
'''Update ''' |
|||
There is no longer a shut down mode, just power the device off by using the power button when you want to turn it off. |
There is no longer a shut down mode, just power the device off by using the power button when you want to turn it off. |
||
| display = block }} |
|||
{{anchor|The Frame and the icons}} |
|||
==프레임과 아이콘== |
==프레임과 아이콘== |
||
[[Image:Frame-photo.jpg|center|프레임이 조직되는 방식과 스크린 캡처]] |
[[Image:Frame-photo.jpg|center|프레임이 조직되는 방식과 스크린 캡처]] |
||
{{ Translated text | |
|||
Bring up the [[OLPC Human Interface Guidelines/The Laptop Experience/The Frame|Frame]] onto the screen by pushing the [[Image:Key_frame.jpg]] key (an “empty rectangle” on it) on the upper right-hand corner of the keyboard or by moving the cursor to any corner of the screen ([[OLPC Human Interface Guidelines/The Laptop Experience/The Frame#Hot Corners|aka 'Hot Corners']]). |
|||
[[Image:Frame-photo.jpg|center|Here is how the frame is organized and a screen capture of the frame.]] |
[[Image:Frame-photo.jpg|center|Here is how the frame is organized and a screen capture of the frame.]] |
||
| display = block }} |
|||
</blockquote></font> |
|||
{{anchor|Top-left icons (places)}} |
|||
===상단 좌측 아이콘(장소)=== |
===상단 좌측 아이콘(장소)=== |
||
[[Image:Zoom icons.png|thumb|left|상단 좌측 아이콘]] |
[[Image:Zoom icons.png|thumb|left|상단 좌측 아이콘]] |
||
{{ Translated text | |
|||
<font size="-1"><blockquote> |
|||
*Circle with 8 dots: This icon shows you the entire [[OLPC Human Interface Guidelines/The Laptop Experience/Zoom Metaphor#Neighborhood|Neighborhood]]. Brings up all users available on the mesh network; |
*Circle with 8 dots: This icon shows you the entire [[OLPC Human Interface Guidelines/The Laptop Experience/Zoom Metaphor#Neighborhood|Neighborhood]]. Brings up all users available on the mesh network; |
||
*Circle with 3 dots: This icon takes you to your [[OLPC Human Interface Guidelines/The Laptop Experience/Zoom Metaphor#Groups|Friends/Groups]] view. Shows all users on mesh network that you have identified as friends; |
*Circle with 3 dots: This icon takes you to your [[OLPC Human Interface Guidelines/The Laptop Experience/Zoom Metaphor#Groups|Friends/Groups]] view. Shows all users on mesh network that you have identified as friends; |
||
*Circle with 1 dot: This icon takes you to your [[OLPC Human Interface Guidelines/The Laptop Experience/Zoom Metaphor#Home|Home]] screen; |
*Circle with 1 dot: This icon takes you to your [[OLPC Human Interface Guidelines/The Laptop Experience/Zoom Metaphor#Home|Home]] screen; |
||
*Circle with rectangle: This icon takes you back to the [[OLPC Human Interface Guidelines/The Laptop Experience/Zoom Metaphor#Activity|Activity]] you were working on. |
*Circle with rectangle: This icon takes you back to the [[OLPC Human Interface Guidelines/The Laptop Experience/Zoom Metaphor#Activity|Activity]] you were working on. |
||
| display = block }} |
|||
<br clear='all'> |
<br clear='all'> |
||
{{anchor|Top-right icons (status)}} |
|||
===상단 우측 아이콘 (상태)=== |
===상단 우측 아이콘 (상태)=== |
||
{{ Translated text | |
|||
<font size="-1"><blockquote>'''Update:''' On Build 303+ only the bulletin-board icon is in the upper-right of the frame.</blockquote></font> |
|||
'''Update:''' On Build 303+ only the bulletin-board icon is in the upper-right of the frame. |
|||
| display = block }} |
|||
<br clear='all'> |
<br clear='all'> |
||
{{anchor|Bottom-left icons (actions)}} |
|||
===하단 좌측 아이콘 (액션)=== |
===하단 좌측 아이콘 (액션)=== |
||
[[Image:Actions.jpg|thumb|200px|left|하단 좌측 아이콘]] |
[[Image:Actions.jpg|thumb|200px|left|하단 좌측 아이콘]] |
||
{{ Translated text | |
|||
Different builds have different collections of activities. You should see something along the lines of the following: |
|||
*'''Globe''': This icon starts the web browser; |
*'''Globe''': This icon starts the web browser; |
||
*'''Shooting Star''': This icon starts the Etoys activity; |
*'''Shooting Star''': This icon starts the Etoys activity; |
||
| Line 97: | Line 107: | ||
*'''Eye''': This icon starts the camera; |
*'''Eye''': This icon starts the camera; |
||
*'''Drum''': This icon start the Tam Tam activity. |
*'''Drum''': This icon start the Tam Tam activity. |
||
Other activities include BlockParty, an ebook reader, a slideshow viewer... |
Other activities include BlockParty, an ebook reader, a slideshow viewer... |
||
| display = block }} |
|||
<br clear='all'> |
<br clear='all'> |
||
{{anchor|The Keyboard}} |
|||
==키보드== |
==키보드== |
||
[[Image:keyboard-touchpad.jpg|thumb|left|키보드]] |
[[Image:keyboard-touchpad.jpg|thumb|left|키보드]] |
||
[[Image:Trackpad.png|thumb|right|''터치패드'']] |
[[Image:Trackpad.png|thumb|right|''터치패드'']] |
||
{{ Translated text | |
|||
The center part of the touchpad can be used as a pointing device. The entire surface can be used with a stylus. |
|||
| display = block }} |
|||
<font size="-1"><blockquote>The center part of the touchpad can be used as a pointing device. The entire surface can be used with a stylus.</blockquote></font> |
|||
<br clear='all'> |
<br clear='all'> |
||
{{anchor|Demo instructions}} |
|||
==데모 안내== |
==데모 안내== |
||
{{ Translated text | |
|||
<font size="-1"><blockquote>'''Patience''' is very important: the user interface does not yet tell you that it is busy starting activities, and we have just begun performance work. You are using ''alpha'' test software. |
|||
'''Patience''' is very important: the user interface does not yet tell you that it is busy starting activities, and we have just begun performance work. You are using ''alpha'' test software. |
|||
Demo Suite: |
Demo Suite: |
||
#Web Browsing |
#Web Browsing |
||
#Etoys |
|||
#eToys |
|||
#Memosono Game |
#Memosono Game |
||
#Tam Tam |
#Tam Tam |
||
#Dual resolution monitor |
#Dual resolution monitor |
||
#eBook and Camera |
#eBook and Camera |
||
#Chat |
|||
#Chat</blockquote></font> |
|||
| display = block }} |
|||
{{anchor|Home screen}} |
|||
===[[OLPC Human Interface Guidelines/The Laptop Experience/Zoom Metaphor/lang- |
===[[OLPC Human Interface Guidelines/The Laptop Experience/Zoom Metaphor/lang-ko#Home|홈]] 스크린=== |
||
{{ Translated text | |
|||
<font size="-1"><blockquote>After you turn on the laptop you will come directly to the [[OLPC Human Interface Guidelines/The Laptop Experience/Zoom Metaphor#Home|Home]] screen. |
|||
After you turn on the laptop you will come directly to the [[OLPC Human Interface Guidelines/The Laptop Experience/Zoom Metaphor#Home|Home]] screen. |
|||
((Image:Hone-screen.jpg|none)) |
((Image:Hone-screen.jpg|none)) |
||
| Line 133: | Line 147: | ||
To begin, bring up the [[OLPC Human Interface Guidelines/The Laptop Experience/The Frame|Frame]] by pushing the “Frame” [[Image:Key_frame.jpg]] key on the upper-right corner of the keyboard. |
To begin, bring up the [[OLPC Human Interface Guidelines/The Laptop Experience/The Frame|Frame]] by pushing the “Frame” [[Image:Key_frame.jpg]] key on the upper-right corner of the keyboard. |
||
((Image:Key_frame.jpg|none)) |
((Image:Key_frame.jpg|none)) |
||
| display = block }} |
|||
{{anchor|The Network}} |
|||
====네트워크==== |
====네트워크==== |
||
{{ Translated text | |
|||
<font size="-1"><blockquote>As many demos use the network (browser, RSS feed, mesh demos), before you begin, the laptop should be associated with a network. The laptop should be able to access any wireless networks in the area. |
|||
As many demos use the network (browser, RSS feed, mesh demos), before you begin, the laptop should be associated with a network. The laptop should be able to access any wireless networks in the area. |
|||
Click on the network icon (five bars on the upper-right of the [[OLPC Human Interface Guidelines/The Laptop Experience/The Frame|Frame]]). A list of available wireless networks will show up in a drop down menu. |
Click on the network icon (five bars on the upper-right of the [[OLPC Human Interface Guidelines/The Laptop Experience/The Frame|Frame]]). A list of available wireless networks will show up in a drop down menu. |
||
If you cannot see any networks, it may be because the embedded control did not properly initialize the USB ports (the network controller is a [[USB peripherals|USB device]])—you will need to reboot. |
If you cannot see any networks, it may be because the embedded control did not properly initialize the USB ports (the network controller is a [[USB peripherals|USB device]])—you will need to reboot. |
||
| display = block }} |
|||
{{anchor|Switching between activities}} |
|||
====[[OLPC Human Interface Guidelines/Activities/Activity Basics/lang-es#Switching Activities|활동 전환]]==== |
====[[OLPC Human Interface Guidelines/Activities/Activity Basics/lang-es#Switching Activities|활동 전환]]==== |
||
{{ Translated text | |
|||
<font size="-1"><blockquote>You can have multiple activities running at once—moving between them by returning to the Home view (key with one dot—[[Image:Key zoom.jpg]]) and then clicking on an activity that you'd like to go to.</blockquote></font> |
|||
You can have multiple activities running at once—moving between them by returning to the Home view (key with one dot—[[Image:Key zoom.jpg]]) and then clicking on an activity that you'd like to go to. |
|||
| display = block }} |
|||
<div id="Exiting Activities"/> |
|||
====[[OLPC Human Interface Guidelines/Activities/Activity Basics/lang-kr#Ending Activities|활동 종료]]==== |
|||
{{anchor|Exiting Activities}} |
|||
====[[OLPC Human Interface Guidelines/Activities/Activity Basics/lang-ko#Ending Activities|활동 종료]]==== |
|||
[[Image:Exiting-browser.jpg|none|브라우저 종료]] |
[[Image:Exiting-browser.jpg|none|브라우저 종료]] |
||
{{ Translated text | |
|||
<font size="-1"><blockquote>To [[OLPC Human Interface Guidelines/Activities/Activity Basics#Ending Activities|exit an activity]], click on the Frame [[Image:Key frame.jpg]] key to bring up the [[OLPC Human Interface Guidelines/The Laptop Experience/The Frame|Frame]]. |
|||
To [[OLPC Human Interface Guidelines/Activities/Activity Basics#Ending Activities|exit an activity]], click on the Frame [[Image:Key frame.jpg]] key to bring up the [[OLPC Human Interface Guidelines/The Laptop Experience/The Frame|Frame]]. |
|||
Put the cursor over the activity icon at the top center of the frame and click on the X with the circle around it. |
Put the cursor over the activity icon at the top center of the frame and click on the X with the circle around it. |
||
((Image:Exiting-browser.jpg|none|exiting the browser)) |
((Image:Exiting-browser.jpg|none|exiting the browser)) |
||
| display = block }} |
|||
{{anchor|1. Web Browsing}} |
|||
===1. 웹 브라우징=== |
===1. 웹 브라우징=== |
||
[[Image:Browser.jpg|thumb|right|브라우저]] |
[[Image:Browser.jpg|thumb|right|브라우저]] |
||
{{ Translated text | |
|||
<font size="-1"><blockquote>To launch the web browser, click the "globe" icon [[Image:Activity3.png]] at the bottom-left-hand corner of the [[OLPC Human Interface Guidelines/The Laptop Experience/The Frame|Frame]]; place the cursor over the icon and click the left button below the touch pad '''ONCE'''. |
|||
To launch the web browser, click the "globe" icon [[Image:Activity3.png]] at the bottom-left-hand corner of the [[OLPC Human Interface Guidelines/The Laptop Experience/The Frame|Frame]]; place the cursor over the icon and click the left button below the touch pad '''ONCE'''. |
|||
Type search terms into the Google search field or type URL in bar at the top of the screen. |
Type search terms into the Google search field or type URL in bar at the top of the screen. |
||
| Line 170: | Line 191: | ||
((Image:Browser.jpg|none)) |
((Image:Browser.jpg|none)) |
||
Please note that currently, the web browser does not support Flash, Java or Chinese characters. |
Please note that currently, the web browser does not support Flash, Java or Chinese characters. |
||
| display = block }} |
|||
<br clear='all'> |
<br clear='all'> |
||
{{anchor|2. Etoys}} |
|||
===2. [[e토이]]=== |
===2. [[e토이]]=== |
||
[[Image:etoys-start.jpg|Etoys start screen|thumb|right|Etoys]] |
[[Image:etoys-start.jpg|Etoys start screen|thumb|right|Etoys]] |
||
{{ Translated text | |
|||
From the frame, click the shooting-star icon [[Image:Activity1.png]], '''ONCE'''. The Etoys activity will load and show a launch screen: |
|||
* yellow "demo": shows a "welcome demo" that will run in a loop. You can exit the demo by clicking "PREV" in the orange "Navigator" bar at the bottom left. |
* yellow "demo": shows a "welcome demo" that will run in a loop. You can exit the demo by clicking "PREV" in the orange "Navigator" bar at the bottom left. |
||
* orange "tutorial game": a nice tutorial to learn about Etoys "handles". |
* orange "tutorial game": a nice tutorial to learn about Etoys "handles". |
||
| Line 185: | Line 207: | ||
* blue "load project": find a project on disk. |
* blue "load project": find a project on disk. |
||
((Image:etoys-start.jpg|Etoys start screen)) |
((Image:etoys-start.jpg|Etoys start screen)) |
||
| display = block }} |
|||
{{anchor|3. Memosono game}} |
|||
===3. 메모소노 게임=== |
===3. 메모소노 게임=== |
||
{{ Translated text | |
|||
<font size="-1"><blockquote>This is a memory game for two players. Winner matches the most images and completes his/her ice-cream cone on the right-hand side. |
|||
This is a memory game for two players. Winner matches the most images and completes his/her ice-cream cone on the right-hand side. |
|||
From the [[OLPC Human Interface Guidelines/The Laptop Experience/The Frame|Frame]], click on the icon that looks like a 3×3 matrix—[[Image:Activity7.png]]. |
From the [[OLPC Human Interface Guidelines/The Laptop Experience/The Frame|Frame]], click on the icon that looks like a 3×3 matrix—[[Image:Activity7.png]]. |
||
Play game by giving each player a turn to click on pairs of blocks to reveal images with corresponding sounds. The object of the game is to make as many matches as possible. |
Play game by giving each player a turn to click on pairs of blocks to reveal images with corresponding sounds. The object of the game is to make as many matches as possible. |
||
| display = block }} |
|||
{{anchor|4. TamTam}} |
|||
===4. [[TamTam|탐탐]]=== |
===4. [[TamTam|탐탐]]=== |
||
[[Image:Tamtam.jpg|thumb|right|[[TamTam]]]] |
[[Image:Tamtam.jpg|thumb|right|[[TamTam]]]] |
||
{{ Translated text | |
|||
From the [[OLPC Human Interface Guidelines/The Laptop Experience/The Frame|Frame]], click on the drum icon—[[Image:Activity8.png]]. |
|||
((Image:Tamtam.jpg|none)) |
((Image:Tamtam.jpg|none)) |
||
| Line 207: | Line 232: | ||
Each picture on the right-hand side of the screen makes its own distinct sound. Click on the drum icons on the lower-right corner to set a beat for your composition. The far-right slider controls tempo of the drum. |
Each picture on the right-hand side of the screen makes its own distinct sound. Click on the drum icons on the lower-right corner to set a beat for your composition. The far-right slider controls tempo of the drum. |
||
Use the keyboard to play sounds at different pitches. |
Use the keyboard to play sounds at different pitches. |
||
| display = block }} |
|||
{{anchor|5. Dual-resolution display}} |
|||
===5. 듀얼 해상도 디스플레이=== |
===5. 듀얼 해상도 디스플레이=== |
||
[[Image:Key_slider.jpg|none]] |
[[Image:Key_slider.jpg|none]] |
||
{{ Translated text | |
|||
These are instructions for demonstrating both the color and the black-and-white modes of the display from any activity. In black-and-white mode, with the backlight off, the screen is high resolution and viewable in sunlight; it is the most energy-efficient setting. |
|||
On the top row of the keyboard is a long button with different-sized solid circles. |
On the top row of the keyboard is a long button with different-sized solid circles. |
||
| Line 228: | Line 254: | ||
*To turn off the backlight, press the smallest dot (on the far left) 12 to 15 times. |
*To turn off the backlight, press the smallest dot (on the far left) 12 to 15 times. |
||
*To turn on the backlight, press the second dot from the left between 12 and 15 times. |
*To turn on the backlight, press the second dot from the left between 12 and 15 times. |
||
| display = block }} |
|||
{{anchor|6. Handheld mode (or eBook mode) and camera mode}} |
|||
===6. 핸드핼드 (또는 ''eBook'') 모드와 카메라 모드=== |
===6. 핸드핼드 (또는 ''eBook'') 모드와 카메라 모드=== |
||
{{ Translated text | |
|||
<font size="-1"><blockquote>When in this mode, keyboard and touchpad are covered, so only game controller buttons (which can be used for scrolling), camera, and microphone work. |
|||
When in this mode, keyboard and touchpad are covered, so only game controller buttons (which can be used for scrolling), camera, and microphone work. |
|||
((gallery)) |
((gallery)) |
||
Image:Rotate-1.jpg|Bring the display up to a 90-degree angle (and put the antennae down). |
Image:Rotate-1.jpg|Bring the display up to a 90-degree angle (and put the antennae down). |
||
| Line 239: | Line 267: | ||
Image:Rotate-3.jpg|Lay the display down onto the keyboard. |
Image:Rotate-3.jpg|Lay the display down onto the keyboard. |
||
Image:Rotate-4.jpg|Enjoy! |
Image:Rotate-4.jpg|Enjoy! |
||
((/gallery |
((/gallery)) |
||
| display = block }} |
|||
{{anchor|Using the camera}} |
|||
====카메라==== |
====카메라==== |
||
{{ Translated text | |
|||
<font size="-1"><blockquote>The camera can be used in ebook mode, but needs to be turned on in laptop mode: from the [[OLPC Human Interface Guidelines/The Laptop Experience/The Frame|Frame]], click on the eye icon—[[Image:Activity6.png]]. Turn off the Frame and then put the laptop into ebook mode.</blockquote></font> |
|||
The camera can be used in ebook mode, but needs to be turned on in laptop mode: from the [[OLPC Human Interface Guidelines/The Laptop Experience/The Frame|Frame]], click on the eye icon—[[Image:Activity6.png]]. Turn off the Frame and then put the laptop into ebook mode. |
|||
| display = block }} |
|||
{{anchor|7. Chat}} |
|||
===7. 채팅=== |
===7. 채팅=== |
||
{{ Translated text | |
|||
<font size="-1"><blockquote>Prerequisite--sign onto Wireless network—preferably an open network that requires no authentication. |
|||
Prerequisite--sign onto Wireless network—preferably an open network that requires no authentication. |
|||
* Go to network view. ([[Image:Key zoom.jpg]]—Circle with 8 dots: This icon shows you the entire [[OLPC Human Interface Guidelines/The Laptop Experience/Zoom Metaphor#Neighborhood|Neighborhood]]. Brings up all users available on the mesh network;) |
* Go to network view. ([[Image:Key zoom.jpg]]—Circle with 8 dots: This icon shows you the entire [[OLPC Human Interface Guidelines/The Laptop Experience/Zoom Metaphor#Neighborhood|Neighborhood]]. Brings up all users available on the mesh network;) |
||
| Line 258: | Line 290: | ||
* Click on the chat activity |
* Click on the chat activity |
||
* Wait a minute |
* Wait a minute |
||
* Start chatting. |
* Start chatting. |
||
| display = block }} |
|||
{{anchor|8. Write}} |
|||
===8. 쓰기=== |
===8. 쓰기=== |
||
[[Image:Activity4.png]] |
[[Image:Activity4.png]] |
||
{{anchor|9. BlockParty}} |
|||
===9. 블럭파티=== |
===9. 블럭파티=== |
||
{{ Translated text | |
|||
<font size="-1"><blockquote>This is a tetris-like game</blockquote></font> |
|||
This is a tetris-like game |
|||
| display = block }} |
|||
{{anchor|10. Paint}} |
|||
===10. 페인트=== |
===10. 페인트=== |
||
{{ Translated text | |
|||
<font size="-1"><blockquote>This is an activity to make drawings and paintings.</blockquote></font> |
|||
This is an activity to make drawings and paintings. |
|||
| display = block }} |
|||
{{anchor|11. Slideshow}} |
|||
===11. 슬라이드쇼=== |
===11. 슬라이드쇼=== |
||
{{anchor|12. News Reader}} |
|||
===12. 뉴스 리더=== |
===12. 뉴스 리더=== |
||
{{anchor|13. Calculadora}} |
|||
===13. 계산기=== |
===13. 계산기=== |
||
{{ Translated text | |
|||
<font size="-1"><blockquote>This is a simple calculator, it can sum, subtract, divide and multiply.</blockquote></font> |
|||
This is a simple calculator, it can sum, subtract, divide and multiply. |
|||
| display = block }} |
|||
{{anchor|Other How To's}} |
|||
<div id="Other How To's"/> |
|||
==기타== |
==기타== |
||
{{anchor|How to see what programs are running}} |
|||
===어떤 프로그램이 동작 중인지 확인하는 법=== |
===어떤 프로그램이 동작 중인지 확인하는 법=== |
||
{{ Translated text | |
|||
Turn on the [[OLPC Human Interface Guidelines/The Laptop Experience/The Frame|Frame]] and click the circle with one dot in it at the top left hand corner of the frame or push that same button on the top row of the keys on the keyboard. |
|||
[[Image:Key_zoom.jpg]] — Buttons from Left to Right: [[OLPC Human Interface Guidelines/The Laptop Experience/Zoom Metaphor#Neighborhood|Neighborhood]], [[OLPC Human Interface Guidelines/The Laptop Experience/Zoom Metaphor#Groups|Friends/Groups]], [[OLPC Human Interface Guidelines/The Laptop Experience/Zoom Metaphor#Home|Home]], Back to [[OLPC Human Interface Guidelines/The Laptop Experience/Zoom Metaphor#Activity|Activity]] |
[[Image:Key_zoom.jpg]] — Buttons from Left to Right: [[OLPC Human Interface Guidelines/The Laptop Experience/Zoom Metaphor#Neighborhood|Neighborhood]], [[OLPC Human Interface Guidelines/The Laptop Experience/Zoom Metaphor#Groups|Friends/Groups]], [[OLPC Human Interface Guidelines/The Laptop Experience/Zoom Metaphor#Home|Home]], Back to [[OLPC Human Interface Guidelines/The Laptop Experience/Zoom Metaphor#Activity|Activity]] |
||
| Line 302: | Line 342: | ||
[[OLPC Human Interface Guidelines/The Laptop Experience/Zoom Metaphor#Home|Home]] screen will come up, but this time, icons that represent the programs running will appear in a circle around the XO logo. This is called the activity ring. When the ring is full you will not be able to start any more activities. |
[[OLPC Human Interface Guidelines/The Laptop Experience/Zoom Metaphor#Home|Home]] screen will come up, but this time, icons that represent the programs running will appear in a circle around the XO logo. This is called the activity ring. When the ring is full you will not be able to start any more activities. |
||
Click the icon to access that activity. |
Click the icon to access that activity. |
||
| display = block }} |
|||
{{anchor|Bugs and or Known Issues}} |
|||
==버그와 알려진 이슈들== |
==버그와 알려진 이슈들== |
||
{{anchor|1. Keys that do not work}} |
|||
===1. 작동하지 않는 키들=== |
===1. 작동하지 않는 키들=== |
||
| Line 314: | Line 355: | ||
[[Image:Key_grab.jpg]] — Teclas de 'agarrado' (''grab'') en ambos lados de la barra espaciadora. |
[[Image:Key_grab.jpg]] — Teclas de 'agarrado' (''grab'') en ambos lados de la barra espaciadora. |
||
{{ Translated text | |
|||
<font size="-1"><blockquote> |
|||
((Image:Key_camera_mic.jpg)) — Camera/microphone toggle key |
((Image:Key_camera_mic.jpg)) — Camera/microphone toggle key |
||
((Image:Key_grab.jpg|none)) — Grab keys (on either side of the space bar) |
((Image:Key_grab.jpg|none)) — Grab keys (on either side of the space bar) |
||
| display = block }} |
|||
{{anchor|2. The laptop does not turn on}} |
|||
===2. 켜지지 않는 노트북=== |
===2. 켜지지 않는 노트북=== |
||
[[Image:Battery-1.jpg|250px]] [[Image:Battery-2.jpg|250px]] |
[[Image:Battery-1.jpg|250px]] [[Image:Battery-2.jpg|250px]] |
||
{{ Translated text | |
|||
<font size="-1"><blockquote>You must unplug the laptop and remove the battery. |
|||
You must unplug the laptop and remove the battery. |
|||
Turn the XO over and move the button on the right side to the right. This will unlock the battery. |
Turn the XO over and move the button on the right side to the right. This will unlock the battery. |
||
| Line 331: | Line 373: | ||
Move button on the left side to the left while lifting up the battery. Remove the battery '''and wait at least 30 seconds'''. Replace the battery and lock the battery in place. Plug the laptop back in. |
Move button on the left side to the left while lifting up the battery. Remove the battery '''and wait at least 30 seconds'''. Replace the battery and lock the battery in place. Plug the laptop back in. |
||
Note that if you have completely discharged your battery, you will have to run the laptop without the battery—a bug in the battery-charge circuit prevents the charging of a completely dead battery. |
Note that if you have completely discharged your battery, you will have to run the laptop without the battery—a bug in the battery-charge circuit prevents the charging of a completely dead battery. |
||
| display = block }} |
|||
<div id="3. The touch pad and keyboard are locked up"/> |
|||
{{anchor|3. The touch pad and keyboard are locked up}} |
|||
===3. 터치패드와 키보드 잠금=== |
===3. 터치패드와 키보드 잠금=== |
||
{{ Translated text | |
|||
<font size="-1"><blockquote>This most likely caused by static. Try the "four-finger salute": depress the four keys in the four corners of the keyboard (Fn, Esc, Frame, and Right Arrow). If this does not help, follow the instructions for restarting the laptop by removing the battery.</blockquote></font> |
|||
This most likely caused by static. Try the "four-finger salute": depress the four keys in the four corners of the keyboard (Fn, Esc, Frame, and Right Arrow). If this does not help, follow the instructions for restarting the laptop by removing the battery. |
|||
| display = block }} |
|||
{{anchor|4. I can’t shut an activity down because the icon does not show up in the Frame}} |
|||
===4. 프레임에 아이콘이 나타나지 않아 활동을 중단할 수 없어요=== |
===4. 프레임에 아이콘이 나타나지 않아 활동을 중단할 수 없어요=== |
||
{{ Translated text | |
|||
<font size="-1"><blockquote>Try restarting Sugar by typing Ctrl-Alt-Erase. It should take about 30 seconds for Sugar to restart. If that fails, then try power-cycling the machine by pushing the power button. If all else fails, unplug the machine and remove the battery. Wait 30 seconds and then reinsert the battery, plug it back in, and power on.</blockquote></font> |
|||
Try restarting Sugar by typing Ctrl-Alt-Erase. It should take about 30 seconds for Sugar to restart. If that fails, then try power-cycling the machine by pushing the power button. If all else fails, unplug the machine and remove the battery. Wait 30 seconds and then reinsert the battery, plug it back in, and power on. |
|||
| display = block }} |
|||
[[Category:Press]] |
[[Category:Press]] |
||
| Line 348: | Line 394: | ||
[[Category:Developers]] |
[[Category:Developers]] |
||
[[Category:Sugar]] |
[[Category:Sugar]] |
||
[[Category:Demo]] |
|||
Latest revision as of 21:49, 9 December 2008
- This is an on-going translation
- 공식 번역문이 아니므로 (No Official translation), 번역이 매끄럽지 않은 부분은 원문을 참조하거나, 기타 추가적으로 번역이 요구되는 부분은 주저 없이 discussion page에 메시지를 남겨주세요.
- It's partial and NOT official translation. Refer to Original for precise content. If anyone wants more translation, just leave a message on the discussion page.
이 페이지는 데모 안내와 B1과 B2 노트북의 버그와 수정을 다룹니다.
This page describes demonstration instructions and common bugs and fixes for B1 and B2 laptops.
중요함
Please note that this is a Beta unit with an Alpha software load. There are bugs that are currently being worked on and not all components are operational, e.g., some keys do not work. We will do our best to document these and get them fixed in a timely manner.
- The touch pad is sensitive and can be hard to maneuver until you get used to it. (It needs tuning.)
- When you click on an icon, please click only ONCE or the application will load many times. Sometimes applications are slow to load. BE PATIENT.
- Static is an issue with these units, please use static guard around demo areas to reduce static from carpet.
- We have yet to implement power management, so keep the machine plugged in as much as possible.
More detail is available online at http://wiki.laptop.org/go/BTest_Software_Notes.
노트북 개관

시작하기
노트북 열기
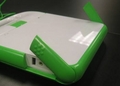
토끼 귀 세우기

노트북 '클릭' 오픈


Position the handle away from you and lift both antennae up and toward you until the laptop clicks open. Lift the screen up from the keyboard; you may have to hold the keyboard down as you lift up on the display.
켜기

The Power Button is located in the bottom right-hand corner of the bezel surrounding the screen. Note that it takes approximately two minutes for the machine to boot. However, the green power LED should come on immediately. If, for some reason, you do not see text appear on the screen within 15 seconds, or if the machine does not power on at all, please see the #Bugs and or Known Issues Section at the end of this document. (Note that sometimes the power button gets caught under the bezel.)
끄기
Update
There is no longer a shut down mode, just power the device off by using the power button when you want to turn it off.
프레임과 아이콘

Bring up the Frame onto the screen by pushing the ![]() key (an “empty rectangle” on it) on the upper right-hand corner of the keyboard or by moving the cursor to any corner of the screen (aka 'Hot Corners').
key (an “empty rectangle” on it) on the upper right-hand corner of the keyboard or by moving the cursor to any corner of the screen (aka 'Hot Corners').
상단 좌측 아이콘(장소)
- Circle with 8 dots: This icon shows you the entire Neighborhood. Brings up all users available on the mesh network;
- Circle with 3 dots: This icon takes you to your Friends/Groups view. Shows all users on mesh network that you have identified as friends;
- Circle with 1 dot: This icon takes you to your Home screen;
- Circle with rectangle: This icon takes you back to the Activity you were working on.
상단 우측 아이콘 (상태)
Update: On Build 303+ only the bulletin-board icon is in the upper-right of the frame.
하단 좌측 아이콘 (액션)

Different builds have different collections of activities. You should see something along the lines of the following:
- Globe: This icon starts the web browser;
- Shooting Star: This icon starts the Etoys activity;
- Speaking Bubble: This icon starts the chat activity;
- Abstract A: This icon starts the text editor;
- Penguin in front of the TV: This icon starts the RSS-feed reader;
- 3×3 Matrix: This icon starts the Memosono game;
- Eye: This icon starts the camera;
- Drum: This icon start the Tam Tam activity.
Other activities include BlockParty, an ebook reader, a slideshow viewer...
키보드


The center part of the touchpad can be used as a pointing device. The entire surface can be used with a stylus.
데모 안내
Patience is very important: the user interface does not yet tell you that it is busy starting activities, and we have just begun performance work. You are using alpha test software.
Demo Suite:
- Web Browsing
- Etoys
- Memosono Game
- Tam Tam
- Dual resolution monitor
- eBook and Camera
- Chat
홈 스크린
After you turn on the laptop you will come directly to the Home screen.
((Image:Hone-screen.jpg
네트워크
As many demos use the network (browser, RSS feed, mesh demos), before you begin, the laptop should be associated with a network. The laptop should be able to access any wireless networks in the area.
Click on the network icon (five bars on the upper-right of the Frame). A list of available wireless networks will show up in a drop down menu.
If you cannot see any networks, it may be because the embedded control did not properly initialize the USB ports (the network controller is a USB device)—you will need to reboot.
활동 전환
You can have multiple activities running at once—moving between them by returning to the Home view (key with one dot—![]() ) and then clicking on an activity that you'd like to go to.
) and then clicking on an activity that you'd like to go to.
활동 종료

To exit an activity, click on the Frame ![]() key to bring up the Frame.
key to bring up the Frame.
Put the cursor over the activity icon at the top center of the frame and click on the X with the circle around it.
((Image:Exiting-browser.jpg
1. 웹 브라우징

To launch the web browser, click the "globe" icon ![]() at the bottom-left-hand corner of the Frame; place the cursor over the icon and click the left button below the touch pad ONCE.
at the bottom-left-hand corner of the Frame; place the cursor over the icon and click the left button below the touch pad ONCE.
Type search terms into the Google search field or type URL in bar at the top of the screen.
((Image:Browser.jpg
2. e토이

From the frame, click the shooting-star icon ![]() , ONCE. The Etoys activity will load and show a launch screen:
, ONCE. The Etoys activity will load and show a launch screen:
- yellow "demo": shows a "welcome demo" that will run in a loop. You can exit the demo by clicking "PREV" in the orange "Navigator" bar at the bottom left.
- orange "tutorial game": a nice tutorial to learn about Etoys "handles".
- violet "new project": start creating your own projects. Journal integration is still missing, but you can save your work to the MyEtoys folder by pressing "PUBLISH" in the orange navbar. There is extensive documentation on Etoys in the wiki (start here) and at squeakland.org.
- green "project gallery": Load example science and fun projects
- blue "load project": find a project on disk.
3. 메모소노 게임
This is a memory game for two players. Winner matches the most images and completes his/her ice-cream cone on the right-hand side.
From the Frame, click on the icon that looks like a 3×3 matrix—![]() .
.
Play game by giving each player a turn to click on pairs of blocks to reveal images with corresponding sounds. The object of the game is to make as many matches as possible.
4. 탐탐

From the Frame, click on the drum icon—![]() .
.
5. 듀얼 해상도 디스플레이
These are instructions for demonstrating both the color and the black-and-white modes of the display from any activity. In black-and-white mode, with the backlight off, the screen is high resolution and viewable in sunlight; it is the most energy-efficient setting.
On the top row of the keyboard is a long button with different-sized solid circles.
((Image:Key_slider.jpg
6. 핸드핼드 (또는 eBook) 모드와 카메라 모드
When in this mode, keyboard and touchpad are covered, so only game controller buttons (which can be used for scrolling), camera, and microphone work. ((gallery))
Image:Rotate-1.jpg
카메라
The camera can be used in ebook mode, but needs to be turned on in laptop mode: from the Frame, click on the eye icon—![]() . Turn off the Frame and then put the laptop into ebook mode.
. Turn off the Frame and then put the laptop into ebook mode.
7. 채팅
Prerequisite--sign onto Wireless network—preferably an open network that requires no authentication.
- Go to network view. (
 —Circle with 8 dots: This icon shows you the entire Neighborhood. Brings up all users available on the mesh network;)
 - Add other XO icons as friends by selecting them.
- Open Chat application by clicking on balloon icon—
 .
. - Return to network view
- You should see the XO characters as well as the chat activity
- Click on the chat activity
- Wait a minute
- Start chatting.
8. 쓰기
![]()
9. 블럭파티
This is a tetris-like game
10. 페인트
This is an activity to make drawings and paintings.
11. 슬라이드쇼
12. 뉴스 리더
13. 계산기
This is a simple calculator, it can sum, subtract, divide and multiply.
기타
어떤 프로그램이 동작 중인지 확인하는 법
Turn on the Frame and click the circle with one dot in it at the top left hand corner of the frame or push that same button on the top row of the keys on the keyboard.
![]() — Buttons from Left to Right: Neighborhood, Friends/Groups, Home, Back to Activity
Buttons from Left to Right: Neighborhood, Friends, Home, Back to Activity
— Buttons from Left to Right: Neighborhood, Friends/Groups, Home, Back to Activity
Buttons from Left to Right: Neighborhood, Friends, Home, Back to Activity

Home screen will come up, but this time, icons that represent the programs running will appear in a circle around the XO logo. This is called the activity ring. When the ring is full you will not be able to start any more activities.
Click the icon to access that activity.
버그와 알려진 이슈들
1. 작동하지 않는 키들
![]() — Tecla de control de cámara/micrófono
— Tecla de control de cámara/micrófono
![]() — Teclas de 'agarrado' (grab) en ambos lados de la barra espaciadora.
— Teclas de 'agarrado' (grab) en ambos lados de la barra espaciadora.
((Image:Key_camera_mic.jpg)) — Camera/microphone toggle key
((Image:Key_grab.jpg
2. 켜지지 않는 노트북


You must unplug the laptop and remove the battery.
Turn the XO over and move the button on the right side to the right. This will unlock the battery.
((Image:Battery-1.jpg
3. 터치패드와 키보드 잠금
This most likely caused by static. Try the "four-finger salute": depress the four keys in the four corners of the keyboard (Fn, Esc, Frame, and Right Arrow). If this does not help, follow the instructions for restarting the laptop by removing the battery.
4. 프레임에 아이콘이 나타나지 않아 활동을 중단할 수 없어요
Try restarting Sugar by typing Ctrl-Alt-Erase. It should take about 30 seconds for Sugar to restart. If that fails, then try power-cycling the machine by pushing the power button. If all else fails, unplug the machine and remove the battery. Wait 30 seconds and then reinsert the battery, plug it back in, and power on.