Demo notes/lang-es: Difference between revisions
(first draft) |
(sync'ed with ID#32054) |
||
| Line 1: | Line 1: | ||
{{Translation | lang = es | source = Demo Notes | version = |
{{Translation | lang = es | source = Demo Notes | version = 32054}} |
||
{{Ongoing Translation}} |
{{Ongoing Translation}} |
||
<!-- áé íó úü ñÑ |
<!-- áé íó úü ñÑ |
||
| Line 9: | Line 9: | ||
<div id="IMPORTANT |
<div id="IMPORTANT"/> |
||
==IMPORTANTE== |
==IMPORTANTE== |
||
| Line 25: | Line 25: | ||
# We have yet to implement power management, so keep the machine plugged in as much as possible. |
# We have yet to implement power management, so keep the machine plugged in as much as possible. |
||
More detail is available online at [[ |
More detail is available online at [[BTest Software Notes|http://wiki.laptop.org/go/BTest_Software_Notes]].</blockquote></font> |
||
<div id="An overview of the machine"/> |
<div id="An overview of the machine"/> |
||
==Vista panorámica de la máquina== |
==Vista panorámica de la máquina== |
||
[[ |
[[Image:Drawing75c1.jpg|thumb|300px|center|Clic para agrandar]] |
||
<div id="Getting Started"/> |
<div id="Getting Started"/> |
||
| Line 40: | Line 40: | ||
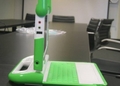
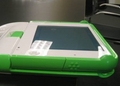
Oriente la laptop de manera tal que la manija se encuentre alejada de uno y levante ambas antenas hacia arriba y hacia uno hasta que la laptop haga clic. Levante la pantalla alejándola del teclado; probablemente tenga que retener el teclado mientras levanta la pantalla. |
Oriente la laptop de manera tal que la manija se encuentre alejada de uno y levante ambas antenas hacia arriba y hacia uno hasta que la laptop haga clic. Levante la pantalla alejándola del teclado; probablemente tenga que retener el teclado mientras levanta la pantalla. |
||
<gallery> |
|||
[[Image:Opening-1.jpg]] [[Image:Opening-2.jpg]] |
|||
Image:Opening-1.jpg|levantando las 'orejas' |
|||
Image:Opening-2.jpg|laptop 'cliqueando' abierta |
|||
</gallery> |
|||
<font size="-1"><blockquote>Position the handle away from you and lift both antennae up and toward you until the laptop clicks open. Lift the screen up from the keyboard; you may have to hold the keyboard down as you lift up on the display.</blockquote></font> |
<font size="-1"><blockquote>Position the handle away from you and lift both antennae up and toward you until the laptop clicks open. Lift the screen up from the keyboard; you may have to hold the keyboard down as you lift up on the display.</blockquote></font> |
||
| Line 46: | Line 50: | ||
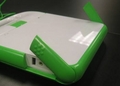
===Prendiendola=== |
===Prendiendola=== |
||
[[Image:Power-button.jpg|thumb|right|Prendiendola]] |
|||
El Botón de Encendio se encuentra en la parte inferior derecha del borde de la pantalla. Note que lleva casi dos minutos para que la máquina ''bootee''. Aunque el LED testigo verde se ilumina inmediatamente. Si por alguna razón, no apareciera ningún texto en la pantalla dentro de unos 15 segundos, o si la máquina no encendiese para nada, por favor vea la sección de [[#Bugs and or Known Issues|Errores y Problemas Conocidos]] hacia el final de este documento. (Note que a veces el botón de encendido puede quedar trabado en la tapa). |
|||
El Botón de Encendido se encuentra en la parte inferior derecha del borde de la pantalla. Note que lleva casi dos minutos para que la máquina ''bootee''. Aunque el LED testigo verde se ilumina inmediatamente. Si por alguna razón, no apareciera ningún texto en la pantalla dentro de unos 15 segundos, o si la máquina no encendiese para nada, por favor vea la sección de [[#Bugs and or Known Issues|Errores y Problemas Conocidos]] hacia el final de este documento. (Note que a veces el botón de encendido puede quedar trabado en la tapa). |
|||
[[Image:Power-button.jpg|none]] |
|||
<font size="-1"><blockquote>The Power Button is located in the bottom right-hand corner of the bezel surrounding the screen. Note that it takes approximately two minutes for the machine to boot. However, the green power LED should come on immediately. If, for some reason, you do not see text appear on the screen within 15 seconds, or if the machine does not power on at all, please see the [[#Bugs and or Known Issues]] Section at the end of this document. (Note that sometimes the power button gets caught under the bezel.)</blockquote></font> |
<font size="-1"><blockquote>The Power Button is located in the bottom right-hand corner of the bezel surrounding the screen. Note that it takes approximately two minutes for the machine to boot. However, the green power LED should come on immediately. If, for some reason, you do not see text appear on the screen within 15 seconds, or if the machine does not power on at all, please see the [[#Bugs and or Known Issues]] Section at the end of this document. (Note that sometimes the power button gets caught under the bezel.)</blockquote></font> |
||
| Line 60: | Line 64: | ||
---- |
---- |
||
[[Image:Power-off.jpg|thumb|right|Apagandola]] |
|||
Dado que carecemos de suspender/resumir (''suspend/resume''), puede ser necesario apagar la máquina: invoque el Marco sobre la pantalla (usando la tecla del Marco o moviendo el cursor hasta alguna esquina). |
|||
Dado que carecemos de suspender/resumir (''suspend/resume''), puede ser necesario apagar la máquina: invoque el Marco sobre la pantalla (usando la tecla [[Image:Key_frame.jpg]] o moviendo el cursor hasta alguna [[OLPC Human Interface Guidelines/The Laptop Experience/The Frame/lang-es#Hot Corners|esquina activa/caliente]]). |
|||
Posicione el cursor sobre la <tt>X</tt> en el círculo que aparece en la esquina superior derecha del [[OLPC Human Interface Guidelines/The Laptop Experience/The Frame/lang-es|Marco]]. A continuación aparecerá "<tt>Shut Down</tt>" . Haga clic sobre él. |
|||
[[Image:Power-off.jpg|none]] |
|||
Posicione el cursor sobre la <tt>X</tt> en el círculo que aparece en la esquina superior derecha del Marco. A continuación aparecerá "<tt>Shut Down</tt>" . Haga clic sobre él. |
|||
<font size="-1"><blockquote>'''Update ''' |
<font size="-1"><blockquote>'''Update ''' |
||
There is no longer a shut down mode, just power the device off by using the power button when you want to turn it off. |
There is no longer a shut down mode, just power the device off by using the power button when you want to turn it off. |
||
--------------------------- |
--------------------------- |
||
Since we do not yet have suspend/resume implemented, it may be necessary to power off the machine: bring up the Frame onto the screen (using the Frame key or by moving the cursor to a corner.) |
|||
((Image:Power-off.jpg|none)) |
((Image:Power-off.jpg|none)) |
||
Since we do not yet have suspend/resume implemented, it may be necessary to power off the machine: bring up the Frame onto the screen (using the [[Image:Key_frame.jpg]] key or by moving the cursor to a [[OLPC Human Interface Guidelines/The Laptop Experience/The Frame#Hot Corners|hot corner]].) |
|||
Put cursor over the X with a circle around it on the upper right-hand corner of the [[OLPC Human Interface Guidelines/The Laptop Experience/The Frame|Frame]]. After a moment, “Shut Down” will appear. Click on shutdown.</blockquote></font> |
|||
Put cursor over the X with a circle around it on the upper right-hand corner of the frame. After a moment, “Shut Down” will appear. Click on shutdown.</blockquote></font> |
|||
<div id="The Frame and the icons"/> |
<div id="The Frame and the icons"/> |
||
==El Marco y los íconos== |
==El [[OLPC Human Interface Guidelines/The Laptop Experience/The Frame/lang-es|Marco]] y los íconos== |
||
Invoque el Marco usando la tecla con "el rectángulo vacío" en la esquina superior derecha del teclado... |
|||
[[Image:Key_frame.jpg|none|la tecla con "el rectángulo vacío"]] |
|||
o moviendo el cursor hacia alguna de las esquinas en la pantalla. |
|||
[[Image:Frame-photo.jpg|none|Como se organiza el Marco y una captura de el]] |
|||
Invoque el [[OLPC Human Interface Guidelines/The Laptop Experience/The Frame/lang-es|Marco]] usando la tecla [[Image:Key_frame.jpg]] (un "rectángulo vacío") en la esquina superior derecha del teclado... o moviendo el cursor hacia alguna de las esquinas en la pantalla (o '[[OLPC Human Interface Guidelines/The Laptop Experience/The Frame/lang-es#Hot Corners|esquinas activas/calientes]]'). |
|||
<font size="-1"><blockquote>Bring up the Frame onto the screen by pushing the button with the “empty rectangle” on it on the upper right-hand corner of the keyboard... |
|||
[[Image:Frame-photo.jpg|center|Como se organiza el Marco y una captura de el]] |
|||
((Image:Key_frame.jpg|none|the button with the “empty rectangle”)) |
|||
<font size="-1"><blockquote>Bring up the [[OLPC Human Interface Guidelines/The Laptop Experience/The Frame|Frame]] onto the screen by pushing the [[Image:Key_frame.jpg]] key (an “empty rectangle” on it) on the upper right-hand corner of the keyboard or by moving the cursor to any corner of the screen ([[OLPC Human Interface Guidelines/The Laptop Experience/The Frame#Hot Corners|aka 'Hot Corners']]). |
|||
or by moving the cursor to any corner of the screen. |
|||
((Image:Frame-photo.jpg| |
((Image:Frame-photo.jpg|center|Here is how the frame is organized and a screen capture of the frame.])) |
||
</blockquote></font> |
</blockquote></font> |
||
| Line 99: | Line 92: | ||
===Iconos arriba-izquierda (lugares)=== |
===Iconos arriba-izquierda (lugares)=== |
||
[[Image:Zoom. |
[[Image:Zoom icons.png|thumb|left|Iconos esquina superior izquierda]] |
||
* Círculo con 8 puntos — este icono muestra la totalidad del Vecindario. Muestra a todos los usuarios disponibles en la red de malla; |
* Círculo con 8 puntos — este icono muestra la totalidad del [[OLPC Human Interface Guidelines/The Laptop Experience/Zoom Metaphor/lang-es#Neighborhood|Vecindario]]. Muestra a todos los usuarios disponibles en la red de malla; |
||
* Círculo con 3 puntos — este icono muestra tus Amigos. Muestra a todos los usuarios en la red de malla que hayan sido identificados como amigos; |
* Círculo con 3 puntos — este icono muestra tus [[OLPC Human Interface Guidelines/The Laptop Experience/Zoom Metaphor/lang-es#Groups|Amigos/Grupos]]. Muestra a todos los usuarios en la red de malla que hayan sido identificados como amigos; |
||
* Círculo con 1 punto — este icono muestra la vista del Hogar; |
* Círculo con 1 punto — este icono muestra la vista del [[OLPC Human Interface Guidelines/The Laptop Experience/Zoom Metaphor/lang-es#Home|Hogar]]; |
||
* Círculo con rectángulo — este icono muestra la Actividad sobre la que se estaba trabajando. |
* Círculo con rectángulo — este icono muestra la [[OLPC Human Interface Guidelines/The Laptop Experience/Zoom Metaphor/lang-es#Activity|Actividad]] sobre la que se estaba trabajando. |
||
<font size="-1"><blockquote> |
<font size="-1"><blockquote> |
||
*Circle with 8 dots: This icon shows you the entire Neighborhood. Brings up all users available on the mesh network; |
*Circle with 8 dots: This icon shows you the entire [[OLPC Human Interface Guidelines/The Laptop Experience/Zoom Metaphor#Neighborhood|Neighborhood]]. Brings up all users available on the mesh network; |
||
*Circle with 3 dots: This icon takes you to your Friends view. Shows all users on mesh network that you have identified as friends; |
*Circle with 3 dots: This icon takes you to your [[OLPC Human Interface Guidelines/The Laptop Experience/Zoom Metaphor#Groups|Friends/Groups]] view. Shows all users on mesh network that you have identified as friends; |
||
*Circle with 1 dot: This icon takes you to your Home screen; |
*Circle with 1 dot: This icon takes you to your [[OLPC Human Interface Guidelines/The Laptop Experience/Zoom Metaphor#Home|Home]] screen; |
||
*Circle with rectangle: This icon takes you back to the Activity you were working on.</blockquote></font> |
*Circle with rectangle: This icon takes you back to the [[OLPC Human Interface Guidelines/The Laptop Experience/Zoom Metaphor#Activity|Activity]] you were working on.</blockquote></font> |
||
<br clear='all'> |
|||
<div id="Top-right icons (status)"/> |
<div id="Top-right icons (status)"/> |
||
| Line 118: | Line 112: | ||
---- |
---- |
||
[[Image:Status.jpg| |
[[Image:Status.jpg|thumb|200px|right|Iconos esquina superior derecha]] |
||
* Círculo con una <tt>X</tt> — este icono apaga la laptop; |
* Círculo con una <tt>X</tt> — este icono apaga la laptop; |
||
| Line 131: | Line 125: | ||
*Five bars growing in size from left to right: This icon shows the wireless connection. Click on it to choose a wireless network from a drop-down menu; |
*Five bars growing in size from left to right: This icon shows the wireless connection. Click on it to choose a wireless network from a drop-down menu; |
||
*Circle with overlapping rectangles: This icon toggles the bulletin-board (chat) framework on and off.</blockquote></font> |
*Circle with overlapping rectangles: This icon toggles the bulletin-board (chat) framework on and off.</blockquote></font> |
||
<br clear='all'> |
|||
<div id="Bottom-left icons (actions)"/> |
<div id="Bottom-left icons (actions)"/> |
||
===Iconos abajo-izquierda (acciones)=== |
===Iconos abajo-izquierda (acciones)=== |
||
[[Image:Actions.jpg| |
[[Image:Actions.jpg|thumb|200px|left|Iconos esquina inferior izquierda]] |
||
De izquierda a derecha (Note que el orden de los íconos cambia según los ''builds''): |
De izquierda a derecha (Note que el orden de los íconos cambia según los ''builds''): |
||
| Line 155: | Line 150: | ||
*'''Eye''': This icon starts the camera; |
*'''Eye''': This icon starts the camera; |
||
*'''Drum''': This icon start the Tam Tam activity.</blockquote></font> |
*'''Drum''': This icon start the Tam Tam activity.</blockquote></font> |
||
<br clear='all'> |
|||
<div id="The Keyboard"/> |
<div id="The Keyboard"/> |
||
==El Teclado== |
==El Teclado== |
||
[[Image:keyboard-touchpad.jpg|thumb|left|Teclado]] |
|||
La parte central del ''touchpad'' puede ser usada como dispositivo para señalar. Toda la superficie puede ser usada con un puntero. |
|||
[[Image: |
[[Image:Trackpad.png|thumb|right|''Touchpad'']] |
||
<font size="-1"><blockquote>The center part of the touchpad can be used as a pointing device. The entire surface can be used with a stylus. |
|||
La parte central del ''touchpad'' puede ser usada como dispositivo para señalar. Toda la superficie puede ser usada con un puntero. |
|||
((Image:keyboard-touchpad.jpg|none))</blockquote></font> |
|||
<font size="-1"><blockquote>The center part of the touchpad can be used as a pointing device. The entire surface can be used with a stylus.</blockquote></font> |
|||
<br clear='all'> |
|||
<div id="Demo instructions"/> |
<div id="Demo instructions"/> |
||
| Line 190: | Line 187: | ||
<div id="Home screen"/> |
<div id="Home screen"/> |
||
===Vista del [[OLPC Human Interface Guidelines/The Laptop Experience/Zoom Metaphor/lang-es#Home|Hogar]]=== |
|||
===Vista del Hogar=== |
|||
Una vez que se haya encendido la laptop, se irá directamente a la pantalla Hogar. |
|||
[[Image:Hone-screen.jpg|none]] |
|||
[[Image:Hone-screen.jpg|thumb|100px|right|Vista del [[OLPC Human Interface Guidelines/The Laptop Experience/Zoom Metaphor/lang-es#Home|Hogar]]]] |
|||
Para comenzar, invoque al Marco apretando la tecla 'Marco' arriba a la izquierda del teclado. |
|||
Una vez que se haya encendido la laptop, se irá directamente a la pantalla [[OLPC Human Interface Guidelines/The Laptop Experience/Zoom Metaphor/lang-es#Home|Hogar]]. |
|||
Para comenzar, invoque al [[OLPC Human Interface Guidelines/The Laptop Experience/The Frame/lang-es|Marco]] apretando la tecla 'Marco' [[Image:Key frame.jpg]] arriba a la izquierda del teclado. |
|||
[[Image:Key_frame.jpg|none]] |
|||
<font size="-1"><blockquote>After you turn on the laptop you will come directly to the Home screen. |
<font size="-1"><blockquote>After you turn on the laptop you will come directly to the [[OLPC Human Interface Guidelines/The Laptop Experience/Zoom Metaphor#Home|Home]] screen. |
||
((Image:Hone-screen.jpg|none)) |
((Image:Hone-screen.jpg|none)) |
||
To begin, bring up the Frame by pushing the “Frame” |
To begin, bring up the [[OLPC Human Interface Guidelines/The Laptop Experience/The Frame|Frame]] by pushing the “Frame” [[Image:Key_frame.jpg]] key on the upper-right corner of the keyboard. |
||
((Image:Key_frame.jpg|none))</blockquote></font> |
((Image:Key_frame.jpg|none))</blockquote></font> |
||
| Line 212: | Line 206: | ||
Como muchas de las demos utilizan la red (navegador, noticias RSS, demos de la malla), antes de comenzar, la laptop debe estar asociada a alguna red. La laptop deberia ser capaz de conectarse a cualquier red inalámbrica en el area. |
Como muchas de las demos utilizan la red (navegador, noticias RSS, demos de la malla), antes de comenzar, la laptop debe estar asociada a alguna red. La laptop deberia ser capaz de conectarse a cualquier red inalámbrica en el area. |
||
Haga clic en el icono de red (las cinco barras arriba a la izquierda del Marco). Una lista con las redes inalámbrica disponibles serán mostradas en un menú ''drop-down''. |
Haga clic en el icono de red (las cinco barras arriba a la izquierda del [[OLPC Human Interface Guidelines/The Laptop Experience/The Frame/lang-es|Marco]]). Una lista con las redes inalámbrica disponibles serán mostradas en un menú ''drop-down''. |
||
Si no se ve ninguna red, es posible que sea porque el controlador embarcado no logró inicializar los puertos USB (el controlador de red es un dispositivo USB)—deberá ''rebootear''. |
Si no se ve ninguna red, es posible que sea porque el controlador embarcado no logró inicializar los puertos USB (el controlador de red es un [[USB peripherals/lang-es|dispositivo USB]])—deberá ''rebootear''. |
||
<font size="-1"><blockquote>As many demos use the network (browser, RSS feed, mesh demos), before you begin, the laptop should be associated with a network. The laptop should be able to access any wireless networks in the area. |
<font size="-1"><blockquote>As many demos use the network (browser, RSS feed, mesh demos), before you begin, the laptop should be associated with a network. The laptop should be able to access any wireless networks in the area. |
||
Click on the network icon (five bars on the upper-right of the Frame). A list of available wireless networks will show up in a drop down menu. |
Click on the network icon (five bars on the upper-right of the [[OLPC Human Interface Guidelines/The Laptop Experience/The Frame|Frame]]). A list of available wireless networks will show up in a drop down menu. |
||
If you cannot see any networks, it may be because the embedded control did not properly initialize the USB ports (the network controller is a USB device)—you will need to reboot.</blockquote></font> |
If you cannot see any networks, it may be because the embedded control did not properly initialize the USB ports (the network controller is a [[USB peripherals|USB device]])—you will need to reboot.</blockquote></font> |
||
<div id="Switching between activities"/> |
<div id="Switching between activities"/> |
||
====Cambiando entre actividades==== |
====[[OLPC Human Interface Guidelines/Activities/Activity Basics/lang-es#Switching Activities|Cambiando entre actividades]]==== |
||
Se pueden tener varias actividades ejecutándose al mismo tiempo—uno se mueve entre ellas volviendo al Hogar (la tecla con un único punto) y haciendo clic en la actividad que uno quiera activar. |
Se pueden tener varias actividades ejecutándose al mismo tiempo—uno se mueve entre ellas volviendo al Hogar (la tecla con un único punto—[[Image:Key zoom.jpg]]) y haciendo clic en la actividad que uno quiera activar. |
||
<font size="-1"><blockquote>You can have multiple activities running at once—moving between them by returning to the Home view ( |
<font size="-1"><blockquote>You can have multiple activities running at once—moving between them by returning to the Home view (key with one dot—[[Image:Key zoom.jpg]]) and then clicking on an activity that you'd like to go to.</blockquote></font> |
||
<div id="Exiting Activities"/> |
<div id="Exiting Activities"/> |
||
====Abandonando Actividades==== |
====[[OLPC Human Interface Guidelines/Activities/Activity Basics/lang-es#Ending Activities|Abandonando Actividades]]==== |
||
Para abandonar (cerrar) una actividad, invoque al Marco (con la tecla o moviendo el cursor a una esquina). |
Para [[OLPC Human Interface Guidelines/Activities/Activity Basics/lang-es#Ending Activities|abandonar (cerrar) una actividad]], invoque al [[OLPC Human Interface Guidelines/The Laptop Experience/The Frame/lang-es|Marco]] (con la tecla [[Image:Key frame.jpg]] o moviendo el cursor a una esquina). |
||
Posicione el cursor sobre el icono de la actividad que se encuentra arriba al centro del marco, y despues haga clic en la <tt>X</tt> en un círculo. |
Posicione el cursor sobre el icono de la actividad que se encuentra arriba al centro del marco, y despues haga clic en la <tt>X</tt> en un círculo. |
||
[[Image:Exiting-browser.jpg|none|exiting the browser]] |
[[Image:Exiting-browser.jpg|none|exiting the browser]] |
||
<font size="-1"><blockquote>To exit an activity, click on the Frame |
<font size="-1"><blockquote>To [[OLPC Human Interface Guidelines/Activities/Activity Basics#Ending Activities|exit an activity]], click on the Frame [[Image:Key frame.jpg]] key to bring up the [[OLPC Human Interface Guidelines/The Laptop Experience/The Frame|Frame]]. |
||
Put the cursor over the activity icon at the top center of the frame and click on the X with the circle around it. |
Put the cursor over the activity icon at the top center of the frame and click on the X with the circle around it. |
||
| Line 244: | Line 238: | ||
===1. Navegador de Red=== |
===1. Navegador de Red=== |
||
[[Image:Browser.jpg|thumb|right|Navegando]] |
|||
Para arrancar el navegador de red, haga clic en el icono con un "globo" en la parte inferior izquierda del Marco; haga clic con el botón izquierdo bajo el ''touchpad'' UNA VEZ. |
|||
Para arrancar el navegador de red, haga clic en el icono con un "globo" [[Image:Activity3.png]] en la parte inferior izquierda del [[OLPC Human Interface Guidelines/The Laptop Experience/The Frame/lang-es|Marco]]; haga clic con el botón izquierdo bajo el ''touchpad'' UNA VEZ. |
|||
Escriba los terminos de búsqueda en el campo de la página de Google o escriba el URL en la barra arriba. |
Escriba los terminos de búsqueda en el campo de la página de Google o escriba el URL en la barra arriba. |
||
[[Image:Browser.jpg|none]] |
|||
Por favor note que actualmente el navegador no soporta Flash, Java o caracteres chinos. |
Por favor note que actualmente el navegador no soporta Flash, Java o caracteres chinos. |
||
<font size="-1"><blockquote>To launch the web browser, click the "globe" icon at the bottom-left-hand corner of the Frame; place the cursor over the icon and click the left button below the touch pad '''ONCE'''. |
<font size="-1"><blockquote>To launch the web browser, click the "globe" icon [[Image:Activity3.png]] at the bottom-left-hand corner of the [[OLPC Human Interface Guidelines/The Laptop Experience/The Frame|Frame]]; place the cursor over the icon and click the left button below the touch pad '''ONCE'''. |
||
Type search terms into the Google search field or type URL in bar at the top of the screen. |
Type search terms into the Google search field or type URL in bar at the top of the screen. |
||
| Line 258: | Line 251: | ||
Please note that currently, the web browser does not support Flash, Java or Chinese characters.</blockquote></font> |
Please note that currently, the web browser does not support Flash, Java or Chinese characters.</blockquote></font> |
||
<br clear='all'> |
|||
<div id="2. Etoys"/> |
<div id="2. Etoys"/> |
||
===2. Etoys=== |
===2. [[Etoys]]=== |
||
[[Image:etoys-start.jpg|Etoys start screen|thumb|right|eToys]] |
|||
Desde el Marco, haga clic en el icono con la estrella fugaz, '''UNA VEZ'''. La actividad eToys arrancará y mostrara su pantalla de lanzamiento: |
|||
Desde el Marco, haga clic en el icono con la estrella fugaz [[Image:Activity1.png]], '''UNA VEZ'''. La actividad eToys arrancará y mostrara su pantalla de lanzamiento: |
|||
* "demo" amarillo — muestra una "demo" de bienvenida que corre sin fin. Se puede salir de la demo haciendo clic en el botón <tt>"PREV"</tt> de la barra de Navegación anaranjada abajo a la izquierda. |
* "demo" amarillo — muestra una "demo" de bienvenida que corre sin fin. Se puede salir de la demo haciendo clic en el botón <tt>"PREV"</tt> de la barra de Navegación anaranjada abajo a la izquierda. |
||
* "juego/tutorial" anaranjado — un buen tutorial para aprender sobre los ''handles'' (manijas) de eToys. |
* "juego/tutorial" anaranjado — un buen tutorial para aprender sobre los ''handles'' (manijas) de eToys. |
||
| Line 268: | Line 263: | ||
* "galería de proyectos" verde: carga o abre proyectos de ejemplos, ciencia o divertidos |
* "galería de proyectos" verde: carga o abre proyectos de ejemplos, ciencia o divertidos |
||
* "carga proyectos" azul: permite la busqueda y carga de proyectos en el disco. |
* "carga proyectos" azul: permite la busqueda y carga de proyectos en el disco. |
||
[[Image:NavigatorFlap.jpeg|center]] |
|||
<font size="-1"><blockquote>From the frame, click the shooting-star icon [[Image:Activity1.png]], '''ONCE'''. The etoys activity will load and show a launch screen: |
|||
[[Image:etoys-start.jpg|Etoys start screen]] |
|||
<font size="-1"><blockquote>From the frame, click the shooting-star icon, '''ONCE'''. The etoys activity will load and show a launch screen: |
|||
* yellow "demo": shows a "welcome demo" that will run in a loop. You can exit the demo by clicking "PREV" in the orange "Navigator" bar at the bottom left. |
* yellow "demo": shows a "welcome demo" that will run in a loop. You can exit the demo by clicking "PREV" in the orange "Navigator" bar at the bottom left. |
||
* orange "tutorial game": a nice tutorial to learn about Etoys "handles". |
* orange "tutorial game": a nice tutorial to learn about Etoys "handles". |
||
| Line 284: | Line 279: | ||
Este es un juego de memoria para dos jugadores. El ganador es aquel que obtiene la mayor cantidad de pares y completa su helado en el lado derecho. |
Este es un juego de memoria para dos jugadores. El ganador es aquel que obtiene la mayor cantidad de pares y completa su helado en el lado derecho. |
||
Desde el Marco, haga clic en el icono que es una grilla de 3 x 3. |
Desde el [[OLPC Human Interface Guidelines/The Laptop Experience/The Frame/lang-es|Marco]], haga clic en el icono que es una grilla de 3 x 3—[[Image:Activity7.png]]. |
||
Juegue el juego haciendo un clic por turno por jugador en un par de bloques para mostrar las imagenes y sonidos correspondientes. El objetivo del juego es conseguir la mayor cantidad de pares como sea posible. |
Juegue el juego haciendo un clic por turno por jugador en un par de bloques para mostrar las imagenes y sonidos correspondientes. El objetivo del juego es conseguir la mayor cantidad de pares como sea posible. |
||
<font size="-1"><blockquote>This is a memory game for two players. Winner matches the most images and completes his/her ice-cream cone on the right-hand side. |
<font size="-1"><blockquote>This is a memory game for two players. Winner matches the most images and completes his/her ice-cream cone on the right-hand side. |
||
From the Frame, click on the icon that looks like a 3×3 matrix. |
From the [[OLPC Human Interface Guidelines/The Laptop Experience/The Frame|Frame]], click on the icon that looks like a 3×3 matrix—[[Image:Activity7.png]]. |
||
Play game by giving each player a turn to click on pairs of blocks to reveal images with corresponding sounds. The object of the game is to make as many matches as possible.</blockquote></font> |
Play game by giving each player a turn to click on pairs of blocks to reveal images with corresponding sounds. The object of the game is to make as many matches as possible.</blockquote></font> |
||
<div id="4. |
<div id="4. TamTam"/> |
||
===4. |
===4. [[TamTam]]=== |
||
[[Image:Tamtam.jpg|thumb|right|[[TamTam]]]] |
|||
Desde el Marco, haga clic en el icono del tambor. |
|||
Desde el [[OLPC Human Interface Guidelines/The Laptop Experience/The Frame/lang-es|Marco]], haga clic en el icono del tambor—[[Image:Activity8.png]]. |
|||
[[Image:Tamtam.jpg|none]] |
|||
Cada imagen a la derecha de la pantalla tiene su propio sonido. Haga clic en los iconos con el tambor abajo a la derecha para darle ritmo a la composición. El ''slider'' más a la derecha determina el tempo del tambor. |
Cada imagen a la derecha de la pantalla tiene su propio sonido. Haga clic en los iconos con el tambor abajo a la derecha para darle ritmo a la composición. El ''slider'' más a la derecha determina el tempo del tambor. |
||
Utilice el teclado para reproducir un sonido en tonos diferentes. |
Utilice el teclado para reproducir un sonido en tonos diferentes. |
||
<font size="-1"><blockquote>From the Frame, click on the drum icon. |
<font size="-1"><blockquote>From the [[OLPC Human Interface Guidelines/The Laptop Experience/The Frame|Frame]], click on the drum icon—[[Image:Activity8.png]]. |
||
((Image:Tamtam.jpg|none)) |
((Image:Tamtam.jpg|none)) |
||
| Line 348: | Line 342: | ||
En este modo, tanto el teclado como el ''touchpad'' se encuentran cubiertos, con lo cual sólo los botones de la consola (que puede ser usados para desplazar), la cámara y micrófono funcionan. |
En este modo, tanto el teclado como el ''touchpad'' se encuentran cubiertos, con lo cual sólo los botones de la consola (que puede ser usados para desplazar), la cámara y micrófono funcionan. |
||
<gallery> |
|||
[[Image:Rotate-1.jpg|none]] |
|||
Posicione la pantalla en un ángulo de 90 grados (y baje las antenas). |
Image:Rotate-1.jpg|Posicione la pantalla en un ángulo de 90 grados (y baje las antenas). |
||
Image:Rotate-2.jpg|Gire la pantalla 180 grados hasta que mire hacia atras. |
|||
Image:Rotate-3.jpg|Acueste a la pantalla sobre el teclado. |
|||
Gire la pantalla 180 grados hasta que mire hacia atras. |
|||
Image:Rotate-4.jpg|Disfrute! |
|||
</gallery> |
|||
Acueste a la pantalla sobre el teclado. |
|||
[[Image:Rotate-4.jpg|none]] |
|||
<font size="-1"><blockquote>When in this mode, keyboard and touchpad are covered, so only game controller buttons (which can be used for scrolling), camera, and microphone work. |
<font size="-1"><blockquote>When in this mode, keyboard and touchpad are covered, so only game controller buttons (which can be used for scrolling), camera, and microphone work. |
||
((gallery)) |
|||
((Image:Rotate-1.jpg|none)) |
|||
Bring the display up to a 90-degree angle (and put the antennae down). |
Image:Rotate-1.jpg|Bring the display up to a 90-degree angle (and put the antennae down). |
||
Image:Rotate-2.jpg|Rotate the display 180 degrees until it is facing backwards. |
|||
Rotate the display |
Image:Rotate-3.jpg|Lay the display down onto the keyboard. |
||
Image:Rotate-4.jpg|Enjoy! |
|||
((/gallery>></blockquote></font> |
|||
Lay the display down onto the keyboard. |
|||
((Image:Rotate-4.jpg|none))</blockquote></font> |
|||
<div id="Using the camera"/> |
<div id="Using the camera"/> |
||
====Usando la cámara==== |
====Usando la cámara==== |
||
La cámara puede ser usada en modo ''eBook'', pero necesita seer activada en el modo laptop: desde el Marco, haga clic en el icono con el ojo. Desactive el Marco, y proceda a poner a la laptop en modo ''eBook''. |
La cámara puede ser usada en modo ''eBook'', pero necesita seer activada en el modo laptop: desde el Marco, haga clic en el icono con el ojo—[[Image:Activity6.png]]. Desactive el [[OLPC Human Interface Guidelines/The Laptop Experience/The Frame/lang-es|Marco]], y proceda a poner a la laptop en modo ''eBook''. |
||
<font size="-1"><blockquote>The camera can be used in ebook mode, but needs to be turned on in laptop mode: from the Frame, click on the eye icon. Turn off the Frame and then put the laptop into ebook mode.</blockquote></font> |
<font size="-1"><blockquote>The camera can be used in ebook mode, but needs to be turned on in laptop mode: from the [[OLPC Human Interface Guidelines/The Laptop Experience/The Frame|Frame]], click on the eye icon—[[Image:Activity6.png]]. Turn off the Frame and then put the laptop into ebook mode.</blockquote></font> |
||
<div id="7. Chat"/> |
<div id="7. Chat"/> |
||
===7. Chat=== |
===7. Chat=== |
||
Prerequisito — estar conectado a una red inalámbrica. |
Prerequisito — estar conectado a una red inalámbrica—preferentemente una abierta sin autentificación. |
||
* Ir a la vista del Vecindario (Círculo con 8 puntos: este icono muestra a todo el Vecindario y los usuarios disponibles en la red de malla); |
* Ir a la vista del Vecindario ([[Image:Key zoom.jpg]]—Círculo con 8 puntos: este icono muestra a todo el [[OLPC Human Interface Guidelines/The Laptop Experience/Zoom Metaphor/lang-es#Neighborhood|Vecindario]] y los usuarios disponibles en la red de malla); |
||
* Seleccione y agregue a otros iconos XO como amigos. |
* Seleccione y agregue a otros iconos XO como amigos. |
||
* Habra la actividad de Chat haciendo clic en el icono con el globo de texto |
* Habra la actividad de Chat haciendo clic en el icono con el globo de texto—[[Image:Activity2.png]] |
||
* Vuelva a la vista del Vecindario |
* Vuelva a la vista del Vecindario |
||
* Tanto los XOs como la actividad de chat deben ser visibles |
* Tanto los XOs como la actividad de chat deben ser visibles |
||
| Line 383: | Line 375: | ||
* Espere un momento |
* Espere un momento |
||
* Comienze a chatear |
* Comienze a chatear |
||
<font size="-1"><blockquote>Prerequisite--sign onto Wireless network |
<font size="-1"><blockquote>Prerequisite--sign onto Wireless network—preferably an open network that requires no authentication. |
||
* Go to network view. |
* Go to network view. ([[Image:Key zoom.jpg]]—Circle with 8 dots: This icon shows you the entire [[OLPC Human Interface Guidelines/The Laptop Experience/Zoom Metaphor#Neighborhood|Neighborhood]]. Brings up all users available on the mesh network;) |
||
* Add other XO icons as friends by selecting them. |
* Add other XO icons as friends by selecting them. |
||
* Open Chat application by clicking on balloon icon. |
* Open Chat application by clicking on balloon icon—[[Image:Activity2.png]]. |
||
* Return to network view |
* Return to network view |
||
* You should see the XO characters as well as the chat activity |
* You should see the XO characters as well as the chat activity |
||
* Click on the chat activity |
* Click on the chat activity |
||
* Wait a minute |
* Wait a minute |
||
* Start chatting. |
* Start chatting.</blockquote></font> |
||
<div id="8. Write"/> |
<div id="8. Write"/> |
||
===8. Escriba=== |
===8. Escriba=== |
||
[[Image:Activity4.png]] |
|||
<div id="9. BlockParty"/> |
<div id="9. BlockParty"/> |
||
| Line 421: | Line 415: | ||
<font size="-1"><blockquote>This is a simple calculator, it can sum, subtract, divide and multiply.</blockquote></font> |
<font size="-1"><blockquote>This is a simple calculator, it can sum, subtract, divide and multiply.</blockquote></font> |
||
<div id="Other How |
<div id="Other How To's"/> |
||
==Otros HowTo's== |
==Otros HowTo's== |
||
| Line 427: | Line 421: | ||
===Como ver que programas estan ejecutándose=== |
===Como ver que programas estan ejecutándose=== |
||
Active el Marco y haga clic en el círculo con un solo punto en la parte superior izquierda del Marco o presione la tecla con el mismo diseño en la fila superior del teclado. |
Active el [[OLPC Human Interface Guidelines/The Laptop Experience/The Frame/lang-es|Marco]] y haga clic en el círculo con un solo punto en la parte superior izquierda del Marco o presione la tecla con el mismo diseño en la fila superior del teclado. |
||
[[Image:Key_zoom.jpg]] — Los botones de Izquierda a Derecha: [[OLPC Human Interface Guidelines/The Laptop Experience/Zoom Metaphor/lang-es#Neighborhood|Vecindario]], [[OLPC Human Interface Guidelines/The Laptop Experience/Zoom Metaphor/lang-es#Groups|Amigos/Grupos]], [[OLPC Human Interface Guidelines/The Laptop Experience/Zoom Metaphor/lang-es#Home|Hogar]], retornar a la [[OLPC Human Interface Guidelines/The Laptop Experience/Zoom Metaphor/lang-es#Activity|Actividad]] |
|||
[[Image:Key_zoom.jpg|none]] |
|||
Los botones de Izquierda a Derecha: Vecindarios, Amigos, Hogar, retornar a la Actividad |
|||
[[Image:Home.jpg|thumb| |
[[Image:Home.jpg|thumb|right]] |
||
La vista del Hogar aparecerá, pero esta vez, los iconos que representan a las actividades ejecutándose aparecen en el círculo que rodea al logo XO. Se lo llama el anillo de actividades (''activity ring''). Cuando el anillo se llena ya no se pueden lanzar otras actividades. |
La vista del [[OLPC Human Interface Guidelines/The Laptop Experience/Zoom Metaphor/lang-es#Home|Hogar]] aparecerá, pero esta vez, los iconos que representan a las actividades ejecutándose aparecen en el círculo que rodea al logo XO. Se lo llama el anillo de actividades (''activity ring''). Cuando el anillo se llena ya no se pueden lanzar otras actividades. |
||
Haga clic en el icono de una actividad en el anillo para activarla. |
Haga clic en el icono de una actividad en el anillo para activarla. |
||
<font size="-1"><blockquote>Turn on the |
<font size="-1"><blockquote>Turn on the [[OLPC Human Interface Guidelines/The Laptop Experience/The Frame|Frame]] and click the circle with one dot in it at the top left hand corner of the frame or push that same button on the top row of the keys on the keyboard. |
||
((Image:Key_zoom.jpg|none)) |
|||
((Image:Key_zoom.jpg)) — Buttons from Left to Right: [[OLPC Human Interface Guidelines/The Laptop Experience/Zoom Metaphor#Neighborhood|Neighborhood]], [[OLPC Human Interface Guidelines/The Laptop Experience/Zoom Metaphor#Groups|Friends/Groups]], [[OLPC Human Interface Guidelines/The Laptop Experience/Zoom Metaphor#Home|Home]], Back to [[OLPC Human Interface Guidelines/The Laptop Experience/Zoom Metaphor#Activity|Activity]] |
|||
Buttons from Left to Right: Neighborhood, Friends, Home, Back to Activity |
Buttons from Left to Right: Neighborhood, Friends, Home, Back to Activity |
||
((Image:Home.jpg|thumb|none)) |
((Image:Home.jpg|thumb|none)) |
||
Home screen will come up, but this time, icons that represent the programs running will appear in a circle around the XO logo. This is called the activity ring. When the ring is full you will not be able to start any more activities. |
[[OLPC Human Interface Guidelines/The Laptop Experience/Zoom Metaphor#Home|Home]] screen will come up, but this time, icons that represent the programs running will appear in a circle around the XO logo. This is called the activity ring. When the ring is full you will not be able to start any more activities. |
||
Click the icon to access that activity.</blockquote></font> |
Click the icon to access that activity.</blockquote></font> |
||
<div id="Bugs and or Known Issues"/> |
<div id="Bugs and or Known Issues"/>; |
||
==Errores y otros problemas conocidos== |
==Errores y otros problemas conocidos== |
||
| Line 456: | Line 448: | ||
===1. Teclas que no funcionan=== |
===1. Teclas que no funcionan=== |
||
[[Image:Key_camera_mic.jpg |
[[Image:Key_camera_mic.jpg]] — Tecla de control de cámara/micrófono |
||
Tecla de control de cámara/micrófono |
|||
[[Image:Key_grab.jpg |
[[Image:Key_grab.jpg]] — Teclas de 'agarrado' (''grab'') en ambos lados de la barra espaciadora. |
||
Teclas de 'agarrado' (''grab'') en ambos lados de la barra espaciadora. |
|||
<font size="-1"><blockquote> |
<font size="-1"><blockquote> |
||
((Image:Key_camera_mic.jpg |
((Image:Key_camera_mic.jpg)) — Camera/microphone toggle key |
||
((Image:Key_grab.jpg|none)) — Grab keys (on either side of the space bar)</blockquote></font> |
|||
Camera/microphone toggle key |
|||
((Image:Key_grab.jpg|none)) |
|||
Grab keys (on either side of the space bar)</blockquote></font> |
|||
<div id="2. The laptop does not turn on"/> |
<div id="2. The laptop does not turn on"/> |
||
| Line 476: | Line 463: | ||
Ponga la XO boca abajo y mueva el botón a la derecha hacia la derecha. Esto destraba la batería. |
Ponga la XO boca abajo y mueva el botón a la derecha hacia la derecha. Esto destraba la batería. |
||
[[Image:Battery-1.jpg|thumb|none]] |
|||
[[Image:Battery-1.jpg|250px]] [[Image:Battery-2.jpg|250px]] |
|||
Mueva el botón a la izquierda hacia la izquierda al mismo tiempo que levanta la batería. Retire la batería '''y espere por lo menos 30 segundos'''. Reinserte la batería y vuelva a trabarla en su lugar. Enchufe la laptop. |
Mueva el botón a la izquierda hacia la izquierda al mismo tiempo que levanta la batería. Retire la batería '''y espere por lo menos 30 segundos'''. Reinserte la batería y vuelva a trabarla en su lugar. Enchufe la laptop. |
||
| Line 485: | Line 473: | ||
Turn the XO over and move the button on the right side to the right. This will unlock the battery. |
Turn the XO over and move the button on the right side to the right. This will unlock the battery. |
||
((Image:Battery-1.jpg| |
((Image:Battery-1.jpg|250px)) ((Image:Battery-2.jpg|250px)) |
||
Move button on the left side to the left while lifting up the battery. Remove the battery '''and wait at least 30 seconds'''. Replace the battery and lock the battery in place. Plug the laptop back in. |
Move button on the left side to the left while lifting up the battery. Remove the battery '''and wait at least 30 seconds'''. Replace the battery and lock the battery in place. Plug the laptop back in. |
||
((Image:Battery-2.jpg|thumb|none)) |
|||
Note that if you have completely discharged your battery, you will have to run the laptop without the battery—a bug in the battery-charge circuit prevents the charging of a completely dead battery.</blockquote></font> |
Note that if you have completely discharged your battery, you will have to run the laptop without the battery—a bug in the battery-charge circuit prevents the charging of a completely dead battery.</blockquote></font> |
||
Revision as of 17:11, 7 April 2007
| Traducción de Demo Notes | original |
| Demo Notes/translations +/- | cambios |
- This is an on-going translation
Esta página describe instrucciones de demostración, errores comunes y sus soluciones para las laptops B1 y B2.
- Ver también: Notas de Hardware, Notas de Software, Notas de Biblioteca
This page describes demonstration instructions and common bugs and fixes for B1 and B2 laptops.
IMPORTANTE
Por favor noten que esta es una unidad Beta con software Alfa cargado. Hay errores (bugs) sobre los que se esta trabajando y no todos los componentes estan operacionales, ej: algunas teclas no funcionan. Haremos lo posible para documentarlos y corregirlos cuanto antes.
- El touchpad es sensible y puede ser dificil de usar hasta que uno se acostumbre. (Necesita ajustes.)
- Cuando un hace clic en un icono, por favor, hágalo solamente UNA VEZ o la actividad será cargada varias veces. A veces las actividades tardan en cargar. SEA PACIENTE.
- Las descargas estáticas son un problema con estas unidades, por favor use medidas apropiadas cuando haga demostraciones a fin de reducir la estatica. (ej: evitar alfombras o disponer de dispositivos para descargarse).
- Todavía falta instrumentar el manejo de energía, por lo cual mantenga la unidad enchufada de ser posible.
Más detalles se pueden encontrar en Notas de Software BTest.
Please note that this is a Beta unit with an Alpha software load. There are bugs that are currently being worked on and not all components are operational, e.g., some keys do not work. We will do our best to document these and get them fixed in a timely manner.
- The touch pad is sensitive and can be hard to maneuver until you get used to it. (It needs tuning.)
- When you click on an icon, please click only ONCE or the application will load many times. Sometimes applications are slow to load. BE PATIENT.
- Static is an issue with these units, please use static guard around demo areas to reduce static from carpet.
- We have yet to implement power management, so keep the machine plugged in as much as possible.
More detail is available online at http://wiki.laptop.org/go/BTest_Software_Notes.
Vista panorámica de la máquina

Comenzando
Abriendo la laptop
Oriente la laptop de manera tal que la manija se encuentre alejada de uno y levante ambas antenas hacia arriba y hacia uno hasta que la laptop haga clic. Levante la pantalla alejándola del teclado; probablemente tenga que retener el teclado mientras levanta la pantalla.
levantando las 'orejas'

laptop 'cliqueando' abierta


Position the handle away from you and lift both antennae up and toward you until the laptop clicks open. Lift the screen up from the keyboard; you may have to hold the keyboard down as you lift up on the display.
Prendiendola

El Botón de Encendido se encuentra en la parte inferior derecha del borde de la pantalla. Note que lleva casi dos minutos para que la máquina bootee. Aunque el LED testigo verde se ilumina inmediatamente. Si por alguna razón, no apareciera ningún texto en la pantalla dentro de unos 15 segundos, o si la máquina no encendiese para nada, por favor vea la sección de Errores y Problemas Conocidos hacia el final de este documento. (Note que a veces el botón de encendido puede quedar trabado en la tapa).
The Power Button is located in the bottom right-hand corner of the bezel surrounding the screen. Note that it takes approximately two minutes for the machine to boot. However, the green power LED should come on immediately. If, for some reason, you do not see text appear on the screen within 15 seconds, or if the machine does not power on at all, please see the #Bugs and or Known Issues Section at the end of this document. (Note that sometimes the power button gets caught under the bezel.)
Apagandola
Novedad
Ya no hay un modo de apagado, simplemente apague la unidad por medio del botón de encendido cuando se la quiera apagar.

Dado que carecemos de suspender/resumir (suspend/resume), puede ser necesario apagar la máquina: invoque el Marco sobre la pantalla (usando la tecla ![]() o moviendo el cursor hasta alguna esquina activa/caliente).
o moviendo el cursor hasta alguna esquina activa/caliente).
Posicione el cursor sobre la X en el círculo que aparece en la esquina superior derecha del Marco. A continuación aparecerá "Shut Down" . Haga clic sobre él.
Update
There is no longer a shut down mode, just power the device off by using the power button when you want to turn it off.
((Image:Power-off.jpg|none)) Since we do not yet have suspend/resume implemented, it may be necessary to power off the machine: bring up the Frame onto the screen (using the
key or by moving the cursor to a hot corner.)
Put cursor over the X with a circle around it on the upper right-hand corner of the Frame. After a moment, “Shut Down” will appear. Click on shutdown.
El Marco y los íconos
Invoque el Marco usando la tecla ![]() (un "rectángulo vacío") en la esquina superior derecha del teclado... o moviendo el cursor hacia alguna de las esquinas en la pantalla (o 'esquinas activas/calientes').
(un "rectángulo vacío") en la esquina superior derecha del teclado... o moviendo el cursor hacia alguna de las esquinas en la pantalla (o 'esquinas activas/calientes').

Bring up the Frame onto the screen by pushing the
((Image:Frame-photo.jpg|center|Here is how the frame is organized and a screen capture of the frame.]))
Iconos arriba-izquierda (lugares)
- Círculo con 8 puntos — este icono muestra la totalidad del Vecindario. Muestra a todos los usuarios disponibles en la red de malla;
- Círculo con 3 puntos — este icono muestra tus Amigos/Grupos. Muestra a todos los usuarios en la red de malla que hayan sido identificados como amigos;
- Círculo con 1 punto — este icono muestra la vista del Hogar;
- Círculo con rectángulo — este icono muestra la Actividad sobre la que se estaba trabajando.
- Circle with 8 dots: This icon shows you the entire Neighborhood. Brings up all users available on the mesh network;
- Circle with 3 dots: This icon takes you to your Friends/Groups view. Shows all users on mesh network that you have identified as friends;
- Circle with 1 dot: This icon takes you to your Home screen;
- Circle with rectangle: This icon takes you back to the Activity you were working on.
Iconos arriba-derecha (estado)
Novedad: A partir del Build 368 estos íconos no están disponibles.

- Círculo con una X — este icono apaga la laptop;
- Cinco barras de tamaño creciente de izquierda a derecha — este icono muestra la conexión inalámbrica. Haga clic en el para elegir la red inalámbrica de un menú drop-down;
- Círculo con rectángulos solapados — este icono invoca/oculta las Carteleras (bulletin-board)
Update: On Build 368 these icons are not available.
((Image:Status.jpg|none))
- Circle with an X: This icon shuts down the laptop;
- Five bars growing in size from left to right: This icon shows the wireless connection. Click on it to choose a wireless network from a drop-down menu;
- Circle with overlapping rectangles: This icon toggles the bulletin-board (chat) framework on and off.
Iconos abajo-izquierda (acciones)

De izquierda a derecha (Note que el orden de los íconos cambia según los builds):
- Globo: este icono arranca el navegador de red;
- Estrella fugaz: la actividad eToys;
- Globo de texto: la actividad de chat;
- A abstracta: la actividad de (editor) de texto;
- Pingüino frente a TV: la actividad lectora de noticias RSS;
- Grilla 3 x 3: el juego Memosono;
- Ojo: la actividad de la cámara;
- Tambor: la actividad TamTam.
From left to right (Note that the order of the icons changes in different builds):
- Globe: This icon starts the web browser;
- Shooting Star: This icon starts the eToys activity;
- Speaking Bubble: This icon starts the chat activity;
- Abstract A: This icon starts the text editor;
- Penguin in front of the TV: This icon starts the RSS-feed reader;
- 3×3 Matrix: This icon starts the Memosono game;
- Eye: This icon starts the camera;
- Drum: This icon start the Tam Tam activity.
El Teclado


La parte central del touchpad puede ser usada como dispositivo para señalar. Toda la superficie puede ser usada con un puntero.
The center part of the touchpad can be used as a pointing device. The entire surface can be used with a stylus.
Instrucciones de Demo
Paciencia es fundamental: la interfaz por el momento no avisa si se encuentra ocupada, y recien comienzan los trabajos sobre rendimiento. Estas usando software alfa de pruebas.
Conjunto de la demo:
- Navegador de red
- eToys
- Juego Memosono
- TamTam
- Pantalla de resolución dual
- eBook y cámara
- Chat
Patience is very important: the user interface does not yet tell you that it is busy starting activities, and we have just begun performance work. You are using alpha test software.
Demo Suite:
- Web Browsing
- eToys
- Memosono Game
- Tam Tam
- Dual resolution monitor
- eBook and Camera
- Chat
Vista del Hogar

Una vez que se haya encendido la laptop, se irá directamente a la pantalla Hogar.
Para comenzar, invoque al Marco apretando la tecla 'Marco' ![]() arriba a la izquierda del teclado.
arriba a la izquierda del teclado.
After you turn on the laptop you will come directly to the Home screen.
((Image:Hone-screen.jpg|none))
To begin, bring up the Frame by pushing the “Frame”
((Image:Key_frame.jpg|none))
La Red
Como muchas de las demos utilizan la red (navegador, noticias RSS, demos de la malla), antes de comenzar, la laptop debe estar asociada a alguna red. La laptop deberia ser capaz de conectarse a cualquier red inalámbrica en el area.
Haga clic en el icono de red (las cinco barras arriba a la izquierda del Marco). Una lista con las redes inalámbrica disponibles serán mostradas en un menú drop-down.
Si no se ve ninguna red, es posible que sea porque el controlador embarcado no logró inicializar los puertos USB (el controlador de red es un dispositivo USB)—deberá rebootear.
As many demos use the network (browser, RSS feed, mesh demos), before you begin, the laptop should be associated with a network. The laptop should be able to access any wireless networks in the area.
Click on the network icon (five bars on the upper-right of the Frame). A list of available wireless networks will show up in a drop down menu.
If you cannot see any networks, it may be because the embedded control did not properly initialize the USB ports (the network controller is a USB device)—you will need to reboot.
Cambiando entre actividades
Se pueden tener varias actividades ejecutándose al mismo tiempo—uno se mueve entre ellas volviendo al Hogar (la tecla con un único punto—![]() ) y haciendo clic en la actividad que uno quiera activar.
) y haciendo clic en la actividad que uno quiera activar.
You can have multiple activities running at once—moving between them by returning to the Home view (key with one dot—
) and then clicking on an activity that you'd like to go to.
Abandonando Actividades
Para abandonar (cerrar) una actividad, invoque al Marco (con la tecla ![]() o moviendo el cursor a una esquina).
o moviendo el cursor a una esquina).
Posicione el cursor sobre el icono de la actividad que se encuentra arriba al centro del marco, y despues haga clic en la X en un círculo.

To exit an activity, click on the Frame
Put the cursor over the activity icon at the top center of the frame and click on the X with the circle around it.
((Image:Exiting-browser.jpg|none|exiting the browser))

Para arrancar el navegador de red, haga clic en el icono con un "globo" ![]() en la parte inferior izquierda del Marco; haga clic con el botón izquierdo bajo el touchpad UNA VEZ.
en la parte inferior izquierda del Marco; haga clic con el botón izquierdo bajo el touchpad UNA VEZ.
Escriba los terminos de búsqueda en el campo de la página de Google o escriba el URL en la barra arriba.
Por favor note que actualmente el navegador no soporta Flash, Java o caracteres chinos.
To launch the web browser, click the "globe" icon
at the bottom-left-hand corner of the Frame; place the cursor over the icon and click the left button below the touch pad ONCE.
Type search terms into the Google search field or type URL in bar at the top of the screen.
((Image:Browser.jpg|none))
Please note that currently, the web browser does not support Flash, Java or Chinese characters.
2. Etoys

Desde el Marco, haga clic en el icono con la estrella fugaz ![]() , UNA VEZ. La actividad eToys arrancará y mostrara su pantalla de lanzamiento:
, UNA VEZ. La actividad eToys arrancará y mostrara su pantalla de lanzamiento:
- "demo" amarillo — muestra una "demo" de bienvenida que corre sin fin. Se puede salir de la demo haciendo clic en el botón "PREV" de la barra de Navegación anaranjada abajo a la izquierda.
- "juego/tutorial" anaranjado — un buen tutorial para aprender sobre los handles (manijas) de eToys.
- "nuevo proyecto" violeta: crea un nuevo proyecto. Integración con el Diario está pendiente, sin embargo se puede grabar el trabajo realizado al directorio/carpeta MyEtoys apretando el botón "PUBLISH" en la barra de navegación anaranjada. Existe una amplia documentación sobre Etoys en el wiki (comience por acá) y en squeakland.org.
- "galería de proyectos" verde: carga o abre proyectos de ejemplos, ciencia o divertidos
- "carga proyectos" azul: permite la busqueda y carga de proyectos en el disco.

From the frame, click the shooting-star icon
, ONCE. The etoys activity will load and show a launch screen:
- yellow "demo": shows a "welcome demo" that will run in a loop. You can exit the demo by clicking "PREV" in the orange "Navigator" bar at the bottom left.
- orange "tutorial game": a nice tutorial to learn about Etoys "handles".
- violet "new project": start creating your own projects. Journal integration is still missing, but you can save your work to the MyEtoys folder by pressing "PUBLISH" in the orange navbar. There is extensive documentation on Etoys in the wiki (start here) and at squeakland.org.
- green "project gallery": Load example science and fun projects
- blue "load project": find a project on disk.
((Image:etoys-start.jpg|Etoys start screen))
3. Juego Memosono
Este es un juego de memoria para dos jugadores. El ganador es aquel que obtiene la mayor cantidad de pares y completa su helado en el lado derecho.
Desde el Marco, haga clic en el icono que es una grilla de 3 x 3—![]() .
.
Juegue el juego haciendo un clic por turno por jugador en un par de bloques para mostrar las imagenes y sonidos correspondientes. El objetivo del juego es conseguir la mayor cantidad de pares como sea posible.
This is a memory game for two players. Winner matches the most images and completes his/her ice-cream cone on the right-hand side.
From the Frame, click on the icon that looks like a 3×3 matrix—
.
Play game by giving each player a turn to click on pairs of blocks to reveal images with corresponding sounds. The object of the game is to make as many matches as possible.
4. TamTam

Desde el Marco, haga clic en el icono del tambor—![]() .
.
Cada imagen a la derecha de la pantalla tiene su propio sonido. Haga clic en los iconos con el tambor abajo a la derecha para darle ritmo a la composición. El slider más a la derecha determina el tempo del tambor.
Utilice el teclado para reproducir un sonido en tonos diferentes.
From the Frame, click on the drum icon—
.
((Image:Tamtam.jpg|none))
Each picture on the right-hand side of the screen makes its own distinct sound. Click on the drum icons on the lower-right corner to set a beat for your composition. The far-right slider controls tempo of the drum.
Use the keyboard to play sounds at different pitches.
5. Pantalla de resolución dual
Estas son las instrucciones para demostrar tanto el modo color como el blanco-y-negro de la pantalla desde cualquier actividad. En el modo blanco-y-negro, sin iluminación, la pantalla es de alta resolucion y legible con luz solar directa; es la configuración más eficiente en cuanto al consumo de energía.
En la parte superior del teclado hay un botón largo con una serie de círculos sólidos de tamaño creciente.
Los dos círculos más grandes controlan el modo B&N o color de la pantalla.
- Presionando el círculo más grande (último a la derecha) pone a la pantalla en modo B&N
- Presionando el segundo círculo más grande (penúltimo a la derecha) pone a la pantalla en modo color.
Los dos círculos menores a la izquierda en el boton controlan la iluminación.
- Para bajar/apagar la iluminación de fondo, presione el círculo más pequeño (primero de la izquierda) unas 12 a 15 veces.
- Para prender/subir la iluminacion de fondo, presione el segundo círculo más pequeño (segundo de la izquierda) unas 12 a 15 veces.
These are instructions for demonstrating both the color and the black-and-white modes of the display from any activity. In black-and-white mode, with the backlight off, the screen is high resolution and viewable in sunlight; it is the most energy-efficient setting.
On the top row of the keyboard is a long button with different-sized solid circles.
((Image:Key_slider.jpg|none))
The two larger circles control the B&W and color modes on the display.
- Pushing the largest circle (far right) puts the display into B&W mode.
- Pushing the second largest (second from the right) circle puts the display into color mode.
The two smaller circles on the left side of the button control the backlight.
- To turn off the backlight, press the smallest dot (on the far left) 12 to 15 times.
- To turn on the backlight, press the second dot from the left between 12 and 15 times.
6. Modo consola (o eBook) y modo de cámara
En este modo, tanto el teclado como el touchpad se encuentran cubiertos, con lo cual sólo los botones de la consola (que puede ser usados para desplazar), la cámara y micrófono funcionan.
Posicione la pantalla en un ángulo de 90 grados (y baje las antenas).
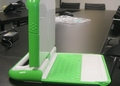
Gire la pantalla 180 grados hasta que mire hacia atras.
Acueste a la pantalla sobre el teclado.
Disfrute!


When in this mode, keyboard and touchpad are covered, so only game controller buttons (which can be used for scrolling), camera, and microphone work.
((gallery)) Image:Rotate-1.jpg|Bring the display up to a 90-degree angle (and put the antennae down). Image:Rotate-2.jpg|Rotate the display 180 degrees until it is facing backwards. Image:Rotate-3.jpg|Lay the display down onto the keyboard. Image:Rotate-4.jpg|Enjoy!
((/gallery>>
Usando la cámara
La cámara puede ser usada en modo eBook, pero necesita seer activada en el modo laptop: desde el Marco, haga clic en el icono con el ojo—![]() . Desactive el Marco, y proceda a poner a la laptop en modo eBook.
. Desactive el Marco, y proceda a poner a la laptop en modo eBook.
The camera can be used in ebook mode, but needs to be turned on in laptop mode: from the Frame, click on the eye icon—
. Turn off the Frame and then put the laptop into ebook mode.
7. Chat
Prerequisito — estar conectado a una red inalámbrica—preferentemente una abierta sin autentificación.
- Ir a la vista del Vecindario (—Círculo con 8 puntos: este icono muestra a todo el Vecindario y los usuarios disponibles en la red de malla);
- Seleccione y agregue a otros iconos XO como amigos.
- Habra la actividad de Chat haciendo clic en el icono con el globo de texto—

- Vuelva a la vista del Vecindario
- Tanto los XOs como la actividad de chat deben ser visibles
- Haga clic en la actividad de chat
- Espere un momento
- Comienze a chatear
Prerequisite--sign onto Wireless network—preferably an open network that requires no authentication.
- Go to network view. (
- Add other XO icons as friends by selecting them.
- Open Chat application by clicking on balloon icon—
- Return to network view
- You should see the XO characters as well as the chat activity
- Click on the chat activity
- Wait a minute
- Start chatting.
8. Escriba
![]()
9. BlockParty
Este es un juego similar a Tetris.
This is a tetris-like game
10. Pintar
Esta es una actividad para hacer dibujos y pintar.
This is an activity to make drawings and paintings.
11. Diaporama
12. Lector de Noticias
13. Calculadora
Esta es una simple calculadora capaz de sumar, restar, dividir y multiplicar.
This is a simple calculator, it can sum, subtract, divide and multiply.
Otros HowTo's
Como ver que programas estan ejecutándose
Active el Marco y haga clic en el círculo con un solo punto en la parte superior izquierda del Marco o presione la tecla con el mismo diseño en la fila superior del teclado.
![]() — Los botones de Izquierda a Derecha: Vecindario, Amigos/Grupos, Hogar, retornar a la Actividad
— Los botones de Izquierda a Derecha: Vecindario, Amigos/Grupos, Hogar, retornar a la Actividad

La vista del Hogar aparecerá, pero esta vez, los iconos que representan a las actividades ejecutándose aparecen en el círculo que rodea al logo XO. Se lo llama el anillo de actividades (activity ring). Cuando el anillo se llena ya no se pueden lanzar otras actividades.
Haga clic en el icono de una actividad en el anillo para activarla.
Turn on the Frame and click the circle with one dot in it at the top left hand corner of the frame or push that same button on the top row of the keys on the keyboard.
((Image:Key_zoom.jpg)) — Buttons from Left to Right: Neighborhood, Friends/Groups, Home, Back to Activity Buttons from Left to Right: Neighborhood, Friends, Home, Back to Activity
((Image:Home.jpg|thumb|none))
Home screen will come up, but this time, icons that represent the programs running will appear in a circle around the XO logo. This is called the activity ring. When the ring is full you will not be able to start any more activities.
Click the icon to access that activity.
Errores y otros problemas conocidos
1. Teclas que no funcionan
![]() — Tecla de control de cámara/micrófono
— Tecla de control de cámara/micrófono
![]() — Teclas de 'agarrado' (grab) en ambos lados de la barra espaciadora.
— Teclas de 'agarrado' (grab) en ambos lados de la barra espaciadora.
((Image:Key_camera_mic.jpg)) — Camera/microphone toggle key
((Image:Key_grab.jpg|none)) — Grab keys (on either side of the space bar)
2. La laptop no enciende
Se debe desenchufar la laptop y retirarle la batería.
Ponga la XO boca abajo y mueva el botón a la derecha hacia la derecha. Esto destraba la batería.


Mueva el botón a la izquierda hacia la izquierda al mismo tiempo que levanta la batería. Retire la batería y espere por lo menos 30 segundos. Reinserte la batería y vuelva a trabarla en su lugar. Enchufe la laptop.
Note que si la batería ha sido descargada completamente, deberá utilizar la laptop sin batería por un error en la lógica en el circuito de recarga previene su recarga cuando ha sido descargada completamente.
You must unplug the laptop and remove the battery.
Turn the XO over and move the button on the right side to the right. This will unlock the battery.
((Image:Battery-1.jpg|250px)) ((Image:Battery-2.jpg|250px))
Move button on the left side to the left while lifting up the battery. Remove the battery and wait at least 30 seconds. Replace the battery and lock the battery in place. Plug the laptop back in.
Note that if you have completely discharged your battery, you will have to run the laptop without the battery—a bug in the battery-charge circuit prevents the charging of a completely dead battery.
3. El touchpad y teclado estan bloqueados
Lo más probable es que haya sido causa de la estática.
Siga las instrucciones para restaurar la laptop retirando la batería.
This most likely caused by static. Follow the instructions for restarting the laptop by removing the battery.
4. No puedo finalizar una actividad porque el icono no figura en el Marco
No existe por el momento otra forma mas que apagar completamente la unidad y retirarle la batería.
There is no other fix for this except shutting the device down and removing the battery.