Flashing LinuxBIOS on A-Test Boards: Difference between revisions
(Fixed problem with MSR numbers >= 0x80000000) |
|||
| (23 intermediate revisions by 8 users not shown) | |||
| Line 1: | Line 1: | ||
{{deprecated}} |
|||
== Warnings == |
== Warnings == |
||
'''If you are upgrading to Linux BIOS, you are on the wrong page (See [[Upgrading_to_LinuxBIOS]]).''' |
|||
'''YOU CAN BRICK YOUR MACHINE IF YOU FOLLOW ANY OF THESE STEPS!''' |
|||
'''You can "brick" your machine if you make any mistakes in following these steps, so please take care! Therefore, please do not preceed unless you are sure that you know what you are doing!''' |
|||
| ⚫ | |||
containing your newly flashed LinuxBIOS. For now, this only covers flashing a PLCC chip. |
|||
---- |
|||
| ⚫ | |||
This page documents how to flash LinuxBIOS on the OLPC board for development of |
|||
LinuxBIOS using PLCC EEPROM chips; it is not intended for general users. |
|||
the ROM image right now is to write the image to a PLCC ROM chip and use that in the PLCC socket on the Rev A boards. |
|||
| ⚫ | |||
| ⚫ | |||
You will want to use 8Mbit ROM chips, like |
|||
| ⚫ | [https://www.em.avnet.com/pns/home/0,5533,CID%253D0%2526CCD%253DUSA%2526SID%253D0%2526DID%253DDF2%2526LID%253D0%2526BID%253DDF2%2526CTP%253DPNS,00.html?ref=https://emwcs.avnet.com/webapp/wcs/stores/servlet/RemoteAdvancedSearchView?langId=-1&storeId=500201&catalogId=500201&manufacturerPartNum=SST49LF008A-33-4C-NH |
||
For now, this only covers writing the image to this PLCC ROM chip and using it in that PLCC socket; there is no sane way to write to the serial flash (that which contains the normal BIOS) without a huge risk of bricking your device. |
|||
| ⚫ | You will want to use SST49LF008A 8-Mbit EEPROM chips. [https://www.em.avnet.com/pns/home/0,5533,CID%253D0%2526CCD%253DUSA%2526SID%253D0%2526DID%253DDF2%2526LID%253D0%2526BID%253DDF2%2526CTP%253DPNS,00.html?ref=https://emwcs.avnet.com/webapp/wcs/stores/servlet/RemoteAdvancedSearchView?langId=-1&storeId=500201&catalogId=500201&manufacturerPartNum=SST49LF008A-33-4C-NH Supplier for worldwide shipping] [http://www.bios-chip.de/index.html?bios-chips,_leer_2.htm Supplier for shipping to Germany]. |
||
==Boot with normal BIOS and setup toolchain== |
==Boot with normal BIOS and setup toolchain== |
||
| Line 22: | Line 26: | ||
===rdmsr=== |
===rdmsr=== |
||
Build the rdmsr (read MSR) tool by [[User:Rminnich|Ron Minnich]]: |
Build the rdmsr (read MSR, model specific register) tool by [[User:Rminnich|Ron Minnich]]: |
||
<code><pre><nowiki> |
<code><pre><nowiki> |
||
#define _LARGEFILE64_SOURCE |
|||
#include <sys/types.h> |
#include <sys/types.h> |
||
#include <sys/stat.h> |
#include <sys/stat.h> |
||
| Line 46: | Line 51: | ||
fd_msr = open("/dev/cpu/0/msr", O_RDONLY); |
fd_msr = open("/dev/cpu/0/msr", O_RDONLY); |
||
lseek64(fd_msr, (off64_t)addr, SEEK_SET); |
|||
read(fd_msr, buf, 8); |
read(fd_msr, buf, 8); |
||
| Line 70: | Line 75: | ||
<code><pre><nowiki> |
<code><pre><nowiki> |
||
#define _LARGEFILE64_SOURCE |
|||
#include <sys/types.h> |
#include <sys/types.h> |
||
#include <sys/stat.h> |
#include <sys/stat.h> |
||
| Line 101: | Line 107: | ||
fd_msr = open("/dev/cpu/0/msr", O_WRONLY); |
fd_msr = open("/dev/cpu/0/msr", O_WRONLY); |
||
lseek64(fd_msr, (off64_t)addr, SEEK_SET); |
|||
if (write(fd_msr, buf, 8) < 0) |
if (write(fd_msr, buf, 8) < 0) |
||
perror(""); |
perror(""); |
||
| Line 114: | Line 120: | ||
% gcc wrmsr.c -o wrmsr |
% gcc wrmsr.c -o wrmsr |
||
</pre> |
</pre> |
||
You may get some warnings; they're not important and may be ignored. |
|||
===flashrom=== |
===flashrom=== |
||
[http://www.openbios.org/viewcvs/trunk/LinuxBIOSv2.tar.gz?view=tar Download the latest LinuxBIOS snapshot] to get the flashrom utility. Unpack the archive, and go into the util/flashrom directory. After making sure you have your distribution's pciutils and pcituils-dev package installed, run make. This will build the flashrom utility; copy it into a convenient location (such as /usr/local/bin). |
[http://www.openbios.org/viewcvs/trunk/LinuxBIOSv2.tar.gz?view=tar Download the latest LinuxBIOS snapshot] to get the flashrom utility. Unpack the archive, and go into the util/flashrom directory. After making sure you have your distribution's pciutils and pcituils-dev package installed, run make. This will build the flashrom utility; copy it into a convenient location (such as /usr/local/bin). |
||
== |
== Flashing == |
||
=== Inserting the chip === |
|||
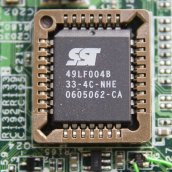
[[Image:Eeprom_chip_mounted.jpg|frame|right|EEPROM chip mounted correctly in socket]] |
|||
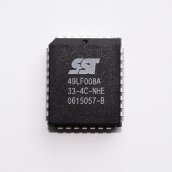
[[Image:Eeprom_chip_unmounted.jpg|frame|right|EEPROM chip, unmounted; pin 1 is dot facing up]] |
|||
Because the board will be booting from the EEPROM chip we insert, we cannot boot while a blank EEPROM chip is inserted (otherwise you will not be able to boot). Thus, you're going to have to insert the EEPROM chip while the machine is running. |
|||
Be quick and careful: and remember, pin 1 is the triangle/dot, and these must line up with the socket properly. See the pictures at the right for guidance. |
|||
If you're using an A test board and a PLCC EEPROM chip, go ahead and insert the chip now, before following the next few steps. |
|||
===Enable writing to flash=== |
===Enable writing to flash=== |
||
On Linux, make sure you: |
On Linux, make sure you have the MSR kernel module loaded: |
||
<code><pre> |
<code><pre> |
||
| Line 131: | Line 150: | ||
<code><pre> |
<code><pre> |
||
./rdmsr 0x1808 |
% ./rdmsr 0x1808 |
||
./wrmsr 0x1808 22:ff:80:02:10:f7:bf:00 |
% ./wrmsr 0x1808 22:ff:80:02:10:f7:bf:00 |
||
./rdmsr 0x1808 |
% ./rdmsr 0x1808 |
||
</pre></code> |
</pre></code> |
||
The first command will read the MSR 0x1808; the second will write a value to this register; the third will read the register again. The value read from the third command should match the one written in the second command. If wrmsr produces an error "Bad file descriptor", you forgot to load the MSR kernel module (see above). |
|||
===Using flashrom=== |
===Using flashrom=== |
||
| Line 158: | Line 179: | ||
==Boot with LinuxBIOS== |
==Boot with LinuxBIOS== |
||
You can now reboot. Make sure you shutdown properly (your disk/filesystems must be in a consistent state, and been unmounted properly). On reboot you'll be greeted by the OLPC LinuxBIOS splash screen, where you can select boot method. Choose USB to boot from a USB disk, hopefully using one of the [[Build images|build images]]. |
You can now reboot. Make sure you shutdown properly (your disk/filesystems must be in a consistent state, and been unmounted properly). On reboot you'll be greeted by the OLPC LinuxBIOS splash screen, where you can select boot method. Choose USB to boot from a USB disk, hopefully using one of the [[Build images|build images]]. |
||
: Newer versions of the rom (after Aug 10) will boot from NAND/USB without keyboard intervention. Press ESC during the progress bar to see the boot menu.--[[User:JordanCrouse|JordanCrouse]] ([[User talk:JordanCrouse|Talk to me!]]) 15:12, 11 August 2006 (EDT) |
|||
[[Category:Hardware]] |
|||
[[Category:Developers]] |
|||
[[Category:Firmware]] |
|||
Latest revision as of 17:43, 24 May 2007
WarningsIf you are upgrading to Linux BIOS, you are on the wrong page (See Upgrading_to_LinuxBIOS). You can "brick" your machine if you make any mistakes in following these steps, so please take care! Therefore, please do not preceed unless you are sure that you know what you are doing! This page documents how to flash LinuxBIOS on the OLPC board for development of LinuxBIOS using PLCC EEPROM chips; it is not intended for general users. HardwareThese instructions are only for the revision "A" test boards. You can place a PLCC EEPROM into the (only) socket on the test board, flash it with LinuxBIOS, and reboot from the EEPROM chip containing your newly flashed LinuxBIOS. For now, this only covers writing the image to this PLCC ROM chip and using it in that PLCC socket; there is no sane way to write to the serial flash (that which contains the normal BIOS) without a huge risk of bricking your device. You will want to use SST49LF008A 8-Mbit EEPROM chips. Supplier for worldwide shipping Supplier for shipping to Germany. Boot with normal BIOS and setup toolchainUse your normal serial BIOS (currently, by Insyde Software) to boot into a Linux distribution. You'll need to build some software before you can flash your EEPROM chip with LinuxBIOS. rdmsrBuild the rdmsr (read MSR, model specific register) tool by Ron Minnich: with: % gcc rdmsr.c -o rdmsr wrmsrBuild the wrmsr (write MSR) tool (also by Ron Minnich): with: % gcc wrmsr.c -o wrmsr You may get some warnings; they're not important and may be ignored. flashromDownload the latest LinuxBIOS snapshot to get the flashrom utility. Unpack the archive, and go into the util/flashrom directory. After making sure you have your distribution's pciutils and pcituils-dev package installed, run make. This will build the flashrom utility; copy it into a convenient location (such as /usr/local/bin). FlashingInserting the chipBecause the board will be booting from the EEPROM chip we insert, we cannot boot while a blank EEPROM chip is inserted (otherwise you will not be able to boot). Thus, you're going to have to insert the EEPROM chip while the machine is running. Be quick and careful: and remember, pin 1 is the triangle/dot, and these must line up with the socket properly. See the pictures at the right for guidance. If you're using an A test board and a PLCC EEPROM chip, go ahead and insert the chip now, before following the next few steps. Enable writing to flashOn Linux, make sure you have the MSR kernel module loaded: so you will have MSR device files. To enable PLCC writing on the OLPC board, you need to enable flash writing. Once you've built rdmsr and wrmsr, run: The first command will read the MSR 0x1808; the second will write a value to this register; the third will read the register again. The value read from the third command should match the one written in the second command. If wrmsr produces an error "Bad file descriptor", you forgot to load the MSR kernel module (see above). Using flashromOnce you've got flashrom working, you can now flash your LinuxBIOS image. Check that flashrom can see your writable flash chip: You should see a note about a writable part being detected. If so, you can now write to the part, with the LinuxBIOS image you've built previously: Once it's written, verify that it has been written properly: Boot with LinuxBIOSYou can now reboot. Make sure you shutdown properly (your disk/filesystems must be in a consistent state, and been unmounted properly). On reboot you'll be greeted by the OLPC LinuxBIOS splash screen, where you can select boot method. Choose USB to boot from a USB disk, hopefully using one of the build images.
|


