Olin university chapter/Software/PythonTutorial: Difference between revisions
| (4 intermediate revisions by the same user not shown) | |||
| Line 643: | Line 643: | ||
Next, I'm going to suggest something you might kill me for, but also [http://sourceforge.net/projects/wxglade download and install wxGlade]. Glade products are basically GUI-based programs for making GUIs. Although they are quite atrocious to use to make a GUI of any reasonable scale, I find it a sweet tool to use when just trying to figure out how to code a piece of something. |
Next, I'm going to suggest something you might kill me for, but also [http://sourceforge.net/projects/wxglade download and install wxGlade]. Glade products are basically GUI-based programs for making GUIs. Although they are quite atrocious to use to make a GUI of any reasonable scale, I find it a sweet tool to use when just trying to figure out how to code a piece of something. |
||
===Hello World=== |
|||
To get started, and just to check that you installed the right version of wxPython, try running the following code: |
|||
<pre><nowiki> |
|||
import wx |
|||
app = wx.PySimpleApp() |
|||
frame = wx.Frame(None, wx.ID_ANY, "Hello World") |
|||
frame.Show(True) |
|||
app.MainLoop() |
|||
</nowiki></pre> |
|||
You should get a nice frame window that looks like: |
|||
[[Image:Helloworld.PNG]] |
|||
Great! Now all we have to do is add some widgets! |
|||
===Using Glade=== |
===Using Glade=== |
||
First off: wxGlade is dumb. But just like pet rocks are dumb, if you're trying to break a window, they can still be useful. Remember this when you use wxGlade and realize just how dumb it is. It's not there to be your user-friendly tool to make your life easy, but if you understand it enough, you can use it to bypass a lot of confusing API. |
First off: wxGlade is dumb. But just like pet rocks are dumb, if you're trying to break a window, they can still be useful. Remember this when you use wxGlade and realize just how dumb it is. It's not there to be your user-friendly tool to make your life easy, but if you understand it enough, you can use it to bypass a lot of confusing API. |
||
The way that we're going to work through this is to first use Glade once to see how you would use it to build GUIs. Then, we'll look through the compiled code and see where Glade is dumb. |
|||
An easier way is to first build the framework of your code by using some of the examples provided in the [[http://wiki.wxpython.org/Getting%20Started Getting Started tutorial]]. Then, when you need a particular widget, use Glade to see what the code and parameters for it is, a particularly useful method when you know what a widget looks like but not what it's called. When you get good at this, you will no longer need Glade, and can just look up the API for each widget directly. |
|||
====Glade GUI-for-GUIs walkthrough==== |
====Glade GUI-for-GUIs walkthrough==== |
||
| Line 682: | Line 704: | ||
You can also insert a widget in the bottom cell, but if you do that, you're done with the Frame. So instead, we're going to embed a boxsizer by selecting the middle icon in the bottom row and clicking the bottom empty cell. Keep the settings on wx.Horizontal, and select 2 for the number of slots. |
You can also insert a widget in the bottom cell, but if you do that, you're done with the Frame. So instead, we're going to embed a boxsizer by selecting the middle icon in the bottom row and clicking the bottom empty cell. Keep the settings on wx.Horizontal, and select 2 for the number of slots. |
||
[[Image:OLPCOlinPythonTutorialwxGlade_5.png]] |
|||
[[Image:OLPCOlinPythonTutorialwxGlade_6.png]] |
[[Image:OLPCOlinPythonTutorialwxGlade_6.png]] |
||
| Line 698: | Line 718: | ||
Sweet! |
Sweet! |
||
====Cleaning it up==== |
|||
Whew! That was a lot of work! After all that effort, this is the code that was generated: |
|||
<pre> |
|||
#!/usr/bin/env python |
|||
# -*- coding: iso-8859-15 -*- |
|||
# generated by wxGlade 0.6.3 on Wed Jan 28 14:54:37 2009 |
|||
import wx |
|||
# begin wxGlade: extracode |
|||
# end wxGlade |
|||
class MyFrame1(wx.Frame): |
|||
def __init__(self, *args, **kwds): |
|||
# begin wxGlade: MyFrame1.__init__ |
|||
kwds["style"] = wx.DEFAULT_FRAME_STYLE |
|||
wx.Frame.__init__(self, *args, **kwds) |
|||
self.spin_ctrl_1 = wx.SpinCtrl(self, -1, "", min=0, max=100) |
|||
self.tree_ctrl_1 = wx.TreeCtrl(self, -1, style=wx.TR_HAS_BUTTONS|wx.TR_DEFAULT_STYLE|wx.SUNKEN_BORDER) |
|||
self.button_1 = wx.Button(self, -1, "button_1") |
|||
self.__set_properties() |
|||
self.__do_layout() |
|||
# end wxGlade |
|||
def __set_properties(self): |
|||
# begin wxGlade: MyFrame1.__set_properties |
|||
self.SetTitle("frame_2") |
|||
# end wxGlade |
|||
def __do_layout(self): |
|||
# begin wxGlade: MyFrame1.__do_layout |
|||
sizer_1 = wx.BoxSizer(wx.VERTICAL) |
|||
sizer_2 = wx.BoxSizer(wx.HORIZONTAL) |
|||
sizer_1.Add(self.spin_ctrl_1, 0, 0, 0) |
|||
sizer_2.Add(self.tree_ctrl_1, 1, wx.EXPAND, 0) |
|||
sizer_2.Add(self.button_1, 0, 0, 0) |
|||
sizer_1.Add(sizer_2, 1, wx.EXPAND, 0) |
|||
self.SetSizer(sizer_1) |
|||
sizer_1.Fit(self) |
|||
self.Layout() |
|||
# end wxGlade |
|||
# end of class MyFrame1 |
|||
class MyMenuBar(wx.MenuBar): |
|||
def __init__(self, *args, **kwds): |
|||
# begin wxGlade: MyMenuBar.__init__ |
|||
wx.MenuBar.__init__(self, *args, **kwds) |
|||
self.__set_properties() |
|||
self.__do_layout() |
|||
# end wxGlade |
|||
def __set_properties(self): |
|||
# begin wxGlade: MyMenuBar.__set_properties |
|||
pass |
|||
# end wxGlade |
|||
def __do_layout(self): |
|||
# begin wxGlade: MyMenuBar.__do_layout |
|||
pass |
|||
# end wxGlade |
|||
# end of class MyMenuBar |
|||
if __name__ == "__main__": |
|||
app = wx.PySimpleApp(0) |
|||
wx.InitAllImageHandlers() |
|||
frame_1 = (None, -1, "") |
|||
app.SetTopWindow(frame_1) |
|||
frame_1.Show() |
|||
app.MainLoop() |
|||
</pre> |
|||
Try running the code. You will probably see a multitude of errors. Sadly, our pet rock, aka Glade, is really dumb and sucky in creating code that is optimal, and at times, correct. Therefore, we have to do some cleaning up. I went through and cleaned up this code a bit to give you an idea of what needs to be changed. |
|||
First off, there is a commented header generated that allows some compabitility with wxGlade. |
|||
<pre> |
|||
#!/usr/bin/env python |
|||
# -*- coding: iso-8859-15 -*- |
|||
# generated by wxGlade 0.6.3 on Wed Jan 28 14:54:37 2009 |
|||
</pre> |
|||
Kill it. |
|||
Next, scroll to the very end and look at the very last block |
|||
<pre> |
|||
if __name__ == "__main__": |
|||
app = wx.PySimpleApp(0) |
|||
wx.InitAllImageHandlers() |
|||
frame_1 = (None, -1, "") |
|||
app.SetTopWindow(frame_1) |
|||
frame_1.Show() |
|||
app.MainLoop() |
|||
if __name__ == "__main__": |
|||
app = wx.App() |
|||
wx.InitAllImageHandlers() |
|||
frame_1 = MyFrame1(None, -1, "") |
|||
app.SetTopWindow(frame_1) |
|||
frame_1.Show() |
|||
app.MainLoop() |
|||
</pre> |
|||
There are a few things downright wrong with this code. First of all, by assigning frame_1 to a tuple, you don't really get a frame. So change the line |
|||
<pre>frame_1 = (None, -1, "")</pre> |
|||
to |
|||
<pre>frame_1 = MyFrame1(None, -1, "")</pre> |
|||
Now, instead of initializing a tuple, you have initialized a wxFrame with three arguments. |
|||
At this point, your script should run. You should see a rather hideous GUI box with little widgets that overlay on top of each other. The other thing that wxGlade isn't supporting is packing each sizer separately. In many ways, it's like wxGlade is shoving all of your valuables in a box with some cardboard, without really sealing up each individual box neatly. That's your job. |
|||
Go to the <pre>__do_layout(self)</pre> function of the MyFrame class. Here, you will see the badly packed sizers. You will notice that, although there is a line for |
|||
<pre> |
|||
sizer_1.Fit(self)</pre> |
|||
there is no equivalent for sizer_2. So, after everything has been added into sizer_2, add another line: |
|||
<pre> |
|||
sizer_2.Fit(self)</pre> |
|||
Now, you should get a less hideous GUI that looks something more like: |
|||
[[Image:Frame_2.PNG]] |
|||
Not the prettiest, but it is what you want. A copy of the final code should look something like: |
|||
<pre> |
|||
import wx |
|||
class MyFrame1(wx.Frame): |
|||
def __init__(self, *args, **kwds): |
|||
# begin wxGlade: MyFrame1.__init__ |
|||
kwds["style"] = wx.DEFAULT_FRAME_STYLE |
|||
wx.Frame.__init__(self, *args, **kwds) |
|||
self.spin_ctrl_1 = wx.SpinCtrl(self, -1, "", min=0, max=100) |
|||
self.tree_ctrl_1 = wx.TreeCtrl(self, -1, style=wx.TR_HAS_BUTTONS|wx.TR_DEFAULT_STYLE|wx.SUNKEN_BORDER) |
|||
self.button_1 = wx.Button(self, 1, "button_1") |
|||
self.__set_properties() |
|||
self.__do_layout() |
|||
# end wxGlade |
|||
def __set_properties(self): |
|||
# begin wxGlade: MyFrame1.__set_properties |
|||
self.SetTitle("frame_2") |
|||
# end wxGlade |
|||
def __do_layout(self): |
|||
sizer_1 = wx.BoxSizer(wx.VERTICAL) |
|||
sizer_2 = wx.BoxSizer(wx.HORIZONTAL) |
|||
sizer_1.Add(self.spin_ctrl_1, 0, 0, 0) |
|||
sizer_2.Add(self.tree_ctrl_1, 1, wx.EXPAND, 0) |
|||
sizer_2.Add(self.button_1, 0, 0, 0) |
|||
sizer_2.Fit(self) |
|||
sizer_1.Add(sizer_2, 1, wx.EXPAND, 0) |
|||
self.SetSizer(sizer_1) |
|||
sizer_1.Fit(self) |
|||
self.Layout() |
|||
class MyMenuBar(wx.MenuBar): |
|||
def __init__(self, *args, **kwds): |
|||
wx.MenuBar.__init__(self, *args, **kwds) |
|||
self.__set_properties() |
|||
self.__do_layout() |
|||
def __set_properties(self): |
|||
pass |
|||
def __do_layout(self): |
|||
pass |
|||
if __name__ == "__main__": |
|||
app = wx.PySimpleApp() |
|||
wx.InitAllImageHandlers() |
|||
frame_1 = MyFrame1(None, -1, "") |
|||
app.SetTopWindow(frame_1) |
|||
frame_1.Show() |
|||
app.MainLoop() |
|||
</pre> |
|||
=== |
===What does it all look like?=== |
||
===Summary Project=== |
===Summary Project=== |
||
Latest revision as of 18:33, 7 February 2009
Purpose
(This wiki is still under construction; please bear with the suckiness)
Olin OLPC-software team includes a wide variety of people with a variety of skills. This page is created to allow everyone to have fundamentals in programming in python and pygame, in order to create activities for the xo.
This tutorial will only include fundamentals, up to what is taught in Olin's Software Design course. For more complicated cool stuff, please refer to online documentation.
If you want to learn how to design cool things, take Software Design, website found here.
Structure
This tutorial contains five modules, including an extra module for anyone with no exposure to programming in general. Each day includes significantly more advanced material than the day before, so it's up to the reader whether they wish to do all five days at once, or one per week.
The writer also strongly recommends that the suggested projects at the end of each "day" not be skipped, and be done without time constraint, as there's no way you can learn a programming language without searching documentation for every cool function you can think of. (Along that line of thought, Allen Downey's homework assignments are also sweet for extra practice.)
Downloading Python
This is the link for python download. Most Linux distributions should come with the latest Python version; in Windows, you have to dig around a bit.
Day 0: Fun in the Swamp
This extra module is intended for anyone who does not have much exposure to object oriented programming (ie Java, Python, C++). For those who just want to learn Python, you can skip this module.
In this module, we will experiment with using other people's code to draw pretty pictures and get comfortable with dot notation.
Swampy
(Swampy is created by Allen Downey, and is used here with his permission)
Go to the Swampy install page and download Swampy.zip. This is Allen Downey's sweet collection of various fun programs. Put the zip file in your folder of choice, and open them in your editor of choice. (IDLE comes with our laptops, in which you hit F5 to run.)
Try running some of the programs suggested on the install page. Take some time to poke around the code you're curious how things work.
(Not all the programs will run in Windows, so if you are super curious, reboot into Linux and mess around with it there.)
TurtleWorld.py
TurtleWorld.py contains some fun features that allow you to actually use some of your cool programming skills.
- Run TurtleWorld.py. A GUI (graphical user interface) should pop up, with options like Print Canvas, quit, Make Turtle, Clear, and Run File.
- Hit run file. By default, the file loaded should be turtle_code.py. It should make a nice tree-like picture for you. This is Bob the Turtle's way of welcoming you to his world!
- When you're done with Tree-Bob, click Make Turtle. A table of controls should pop up, including 'bk', 'fd', 'lt', 'rt', 'pu', 'pd', which stand for back, forward, left, right, pen up, and pen down (respectively). Mess with these controls until you get a feel of what they do.
In the rather big text window, there should be code there like
world.clear()
bob = Turtle(world)
- Open turtle_code.py and see if you can see what codes Allen is using to make the little guy move and stuff. Test your theories in the box and click run code.
- When you get comfortable with the coding, open a file and make a script for moving the turtle around. See if you can do something fun, like write your name across the screen in different colors.
Yay! you have just completed the first major software Design homework!
Summary project
Create 4 functions that automate the process of writing the letters "H","E","L",and "O". Then write an all-encompassing function that writes "Hello" across the screen.
Day 1: Python command line and datatypes
What makes Python special
Welcome to Day 1 of Python! Let's start by discussing some things that make Python different from other languages.
First off, Python is an object-oriented programming language. That is to say, like Java and C++, Python allows for features such as encapsulation, modularity, polymorphism, and inheritance. For more details on OOP, visit the wikipedia page.
In addition, unlike Java and C, Python is an interpreted language, as opposed to compiled. In a compiled language, your code is first optimized and translated into an intermediate language before it is translated into machine code and run. In an interpreted language, the code is translated into byte code on the fly.
What does this mean for you as a programmer? Most significantly, it allows you to test your code in the command line. Let's try a few examples.
Using Python command line
In Windows, you can go to Start >> run, and type 'cmd'. When the black box appears, type 'python'. Your left-hand-thingy should change from C:> to >>>. To exit, press Ctrl+Z.
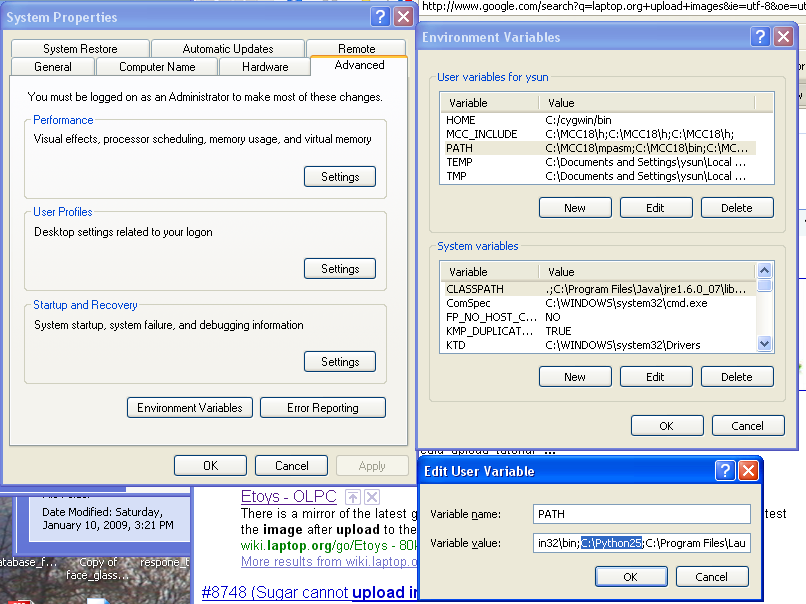
If for some reason, the command "python" doesn't work in the Windows command line, this probably means that you have to add it to your path. In order to do this, go to Control Panel --> System --> Advanced --> Environmental Variables.
Under the Environmental Variables, select PATH, and hit Edit. DO NOT DELETE ANYTING! At the end of the list, append in the path address to your python file. It should be located in your C:, but check just to make sure.
The program IDLE also comes with command line interface. You can open any file in Idle and press F5 - just running a program should pull up the command window.
In Linux, just open the terminal and hit 'python'. Again, you will get >>>, and press Ctrl+D to exit.
Ok! Let's start with the basics. Try some basic arithmetic.
>>> 4+2
6
>>> 2*5
10
>>> 24253+25**234
13120851772591970218341729665918412362442230858130915344051855763613858400562
32050137162814324990843283325386797397736524945233295734089673870945050769957
55091452989029811052637862837845279926865242823532256606449119992115313321360
56422089272734917501243994926621269360992197686300019541030814629323231201851
74047946929931664878L
(Note how, in that last operation, ** stands for ^, since ^ is reserved for 'xor'.)
Floating point division
Everything up until now should be somewhat intuitive. Let's try something else.
>>> 25/10
2
Hmm, that doesn't seem right, last time I checked. I wonder what could be wrong? Some of you may recognize this as classic floating point division mistake. What's happening here is that python has stored the values 25 and 10 as integers, and when it divides them, it can only return another integer. In this case, it rounds the answer for you. In order to use floating point division for real, you have to actually use a decimal point.
>>> 25./10
2.5
>>> 25/10.
2.5
As soon as that decimal point is there, the float (a number that isn't an integer) is declared, and you can continue work as usual. Unlike many other langauges, python doesn't have doubles. It calls them all floats.
But this brings up a fundamental difference between Matlab, a nice simulation environment, and Python, a programming language. Matlab is slow and clunky because it does many things for you, like convert integers to floats when necessary. Python is fast, and flexible, but requires you to kind of know what you're doing.
Strings
Let's try something Matlab is not so good at dealing with: strings. Try some of the following stuff:
>>> blubbermonkeys

Traceback (most recent call last):
  File "<pyshell#3>", line 1, in <module>
    blubbermonkeys
NameError: name 'blubbermonkeys' is not defined
Gee, I wonder why that didn't work. Wait, hang on. In most programming languages, strings aren't just whatever you type in. They are actually a special type of object. If I type in 'blubbermonkeys' straight up, it's actually asking Python "What's a blubbermonkey?" And since you've never previously defined a blubbermonkey, then, well, Python doesn't know.
So instead, we use quotes to designate strings.
>>> "Blubbermonkeys"
'Blubbermonkeys'
>>> "I love OLPC!"
'I love OLPC!'
Yay! that worked! Now let's try more interesting things.
>>> 'Tank' + 'Nikki'
'TankNikki'
We fused together Tank and Nikki! Sweet!
For any of you who have formated an output file from scratch, you know that one of the coolest things in the world are escape characters. In python, as in many other langauges, you use a '\' to indicate that you are 'escaping' from string mode, and into cool formatting world. What can you do with escape characters? Well, you can create a new line ('\n'), for one, or use tabs ('\t'). Let's attempt this.
>>> 'Tank\n Nikki\n Mel\n SJ'
'Tank\n Nikki\n Mel\n SJ'
Ewww... Ok, so just like in MatLab, where you can technically display stuff by not putting in that last semicolon, it isn't the most elegant way of doing it. In MatLab, we use 'disp' to display things intentionally. In Python, we use 'print'.
>>> print 'Tank\n Nikki\n Mel\n SJ'
Tank
 Nikki
 Mel
 SJ

>>>print 'Tank \t is a sophomore \n Nikki \t is a junior \n Mel \t is a grad \n SJ \t is a real adult'
Tank 	 is a sophomore
 Nikki 	 is a junior
 Mel 	 is a grad
 SJ 	 is a real adult
Sweet! That looks a ton better.
Variables
Hey, let's define a variable! For you MatLab lovers out there, it's just like Matlab. For you Java and C fans out there, you will love Python, because it's much easier. You don't need to explicitly state the type of variable before declaring it; Python just kind of knows. Well, sort of. Let's look just at integers and strings.
>>> a = 3
>>> b = 4
>>> c = a**2 + b**2
>>> print c
25

>>> name = 'Yifan'
>>> print name + ' is Great!'
Yifan is Great!
As you are quickly discerning, anything can be defined as a variable. So far, all we really know what to play with are strings and numbers, but when we get to making classes, we'll see that we can go way beyond that.
Datatypes
At this point it is most prudent to look at some datatypes. As I have hinted to already, Python has floats, doubles, integers, and strings. The other major datatypes are tuples, lists, and dictionaries.
Lists, as its name represents, are just collections of stuff in order, and are usually represented in brackets. There are many kinds of lists, such as:
>>> mylist = [1,2,3,4,5]
>>> print mylist
[1, 2, 3, 4, 5]
>>> mylist = ['Elsa','Colin','Xy']
>>> print mylist
['Elsa', 'Colin', 'Xy']
Neat. I wonder if I can add to this list.
>>> mylist[4] = 'Aaron'

Traceback (most recent call last):
  File "<pyshell#8>", line 1, in <module>
    mylist[4] = 'Aaron'
IndexError: list assignment index out of range
Aww, crap! I guess that means I'll just have to replace Xy, then.
>>> mylist[3] = 'Aaron'

Traceback (most recent call last):
  File "<pyshell#9>", line 1, in <module>
    mylist[3] = 'Aaron'
IndexError: list assignment index out of range
Wait, what? This makes no sense now! My list is 3 elements long, I'm replacing the third element...
Ah, but grasshopper, in the real world, three elements long lists have indices 0,1,2, not 1,2,3. So, if we try again
>>> mylist[2] = 'Aaron'
>>> print mylist
['Elsa', 'Colin', 'Aaron']
Sweet! I replaced Xy!
And, for future reference, if I didn't want to replace xy, I could have added Aaron to the list as follows:
>>> mylist.append('Aaron')
>>> print mylist
['Elsa', 'Colin', 'Xy', 'Aaron']
Neat. I can make a list and replace any element of it I want. What else can I do?
Well, I can find out how long a list is:
>>>len(mylist)
4
Or, even better...
>>> for item in mylist:
	print item + ' is AWESOME!'
Elsa is AWESOME!
Colin is AWESOME!
Xy is AWESOME!
Aaron is AWESOME!
Hey look at that! Lists allow you to use for loops! If it isn't evident yet, the for loop structure is done by iterating through a list. Actually, this is exactly what you do when you use a for loop in Matlab; when you say
for x = 1:10
 <do stuff>
What you actually are doing is instantiating a vector x including the integer values 1-10, and looping through each element in x.
In Python, it's exactly the same, except the syntax is more like
for x in [1,2,3,4,5,6,7,8,9,10]:
	<do stuff>
(note the colon)
Or, for shorthand,
for x in range(10):
	<do stuff>
(Note to audience. Actually I am lying to you. range(10) returns a list of [0,1,2,3,4,5,6,7,8,9], not [1,2,3,4,5,6,7,8,9,10]. In the real world, everything starts with 0; in Matlab, they start with 1. How odd.)
Tuples
Tuples are very much like lists, except they aren't modifiable. They are instantiated using '()' ie:
>>> x = (1,2,3)
So exactly are some differences between lists and tuples? Let's try some simple experiments.
>>> x[1] = 3
Traceback (most recent call last):
  File "<pyshell#36>", line 1, in <module>
    x[1] = 3
TypeError: 'tuple' object does not support item assignment
How sad. As it turns out, tuples are useful for things that you want one way forever, like the size of your window in a GUI. You should never try to change a tuple value. If you really, really, really want to, though, you can convert it to a list, as follows:
>>> a = (3,1,4)
>>> list(a)
[3, 1, 4]
What about for loops? You can, thankfully, use tuples in looping, ie:
>>> for n in range(len(x)):
	print 'I have', n, ' apples'

I have 0  apples
I have 1  apples
I have 2  apples
So tuples aren't that evil.
Dictionaries
Dictionaries are kind of sort of like lists, except that they are unordered, and like actual dictionaries, come in a key-value pair. That is to say they are mostly used for lookup. You indicate dictionaries using 'dict([<key>,<value>],[<key>,<value>])' or using curly brackets '{}'
>>> dict([('Brian', 'Mod Con'), ('Mark', 'ICB'), ('Ben', 'Design Nature')])
{'Brian': 'Mod Con', 'Ben': 'Design Nature', 'Mark': 'ICB'}
Note how the order is not preserved, but the pairing is. To iterate through a dictionary, you can use d.keys() to go through the keys, and d.values() to go through the values. To go through both, you can use d.items() to get a tuple pair.
Examples:
>>> d = dict([('Brian', 'Mod Con'), ('Mark', 'ICB'), ('Ben', 'Design Nature')])
>>> for i in d.keys():
	print 'I love ' + i

I love Brian
I love Ben
I love Mark
>>> for i in d.values():
	print 'I love ' + i

I love Mod Con
I love Design Nature
I love ICB

>>> for k,v in d.items():
	print 'I love ' + k + ' and ' + v

I love Brian and Mod Con
I love Ben and Design Nature
I love Mark and ICB
Sweet! That was a ton of stuff for day 1. Let's take a deep breath and dive into the summary project!
Summary project: Organizing list of senators
Download the following file and put it in your directory of choice: List of Congress - THESE DON'T EXIST ANYMORE
In the spirit of the election, I have copy-pasted a list of US senators into listOfCongress.txt. If you open it you can see that I made no efforts whatsoever to make it neat - the original site organized it by alphabet, in two columns seperated by a tab. At the end of each letter, there's an annoying '^ return to top' text.
- You are an announcer at some special meeting. It is your job to announce the name of each congressperson, alphabetically by last name, which state, and which district this person is from. Sadly, you get sweaty palms and tend to mess up when you get nervous, so you need to first write out word for word exactly what you would say before you say it. Arrange the text such a format. Use this file to get started.
- Whew! That was fun! Now let's try something more interesting! Organize the information in the following format
- Each person is a key-value pair in a dictionary
- The keys are the "first, last" name of the congressperson
- The values are len = 2 tuples, where the first value is the state that the congressperson is from, and the second is the district number
- Make a trivia game out of this with your own scoring system. Refer to this file again for help on command-line inputs.
Hint: You may want to look here for string manipulation help.
Solutions
(As feedback, it would be superly awesome if you were to upload your solution here somewhere, so I and others can see what you got out of this tutorial.)
| Name | File |
|---|---|
| Yifan | solutions |
| Your name | Your solutions |
Day 2: Classes, objects, functions
Encapsulation, modularity, polymorphism, and inheritance
Up until now, we've really only been working with cute tricks. By this point, however, we should be comfortable with the basic datatypes of Python, and capable of writing simple scripts to do just about anything tedious.
But for large scale programs, we need to take advantage of the higher level tools Python offers us. As mentioned earlier, Python is unique in that it is an object-oriented programming language, meaning that it encompasses features like encapsulation, modularity, polymorphism, and inheritance (taken from the wikipedia page).
Encapsulation is the ability to make things invisible. It would be very painful if we had to program everything in the bits and bytes of machine language that our computer actually uses to make things happen. Instead, we give our thanks to people who write assemblers and compilers so that we as programmers can write at a higher level, while the more nitty-gritty stuff happens invisible to us.
Modularity gives us the ability to divide tasks into modules. From an outsider's view, a module is only a black box that takes in parameters and returns answers. This makes dividing the work up easier; if you and I write a peice of code together, then I don't really care how you write your part as long as I know how I can use your part in my part, or vice versa.
Polymorphism is when an object can appear and be used as another object. Pretend that I had a function that performs a square root function. I then instantiate two variables: a = 1, and b = 2, and then perform sqrt(a) and sqrt(b), the square root function views a and b as the same thing. In this way, two objects of the same type can be used in the exact same way.
Finally, inheritance, is, just as it sounds, the ability of an object to take the attributes of another object. Say I were trying to program a whale. This could get very tedious. Thankfully, my friend has already programmed mammals in general. I can then inherit from the 'mammal' program in defining 'whale'.
Whew. That was a lot of theory. Let's see how these ideas apply to things like classes, objects, and functions.
Functions
Functions allow for the features like encapsulation and modularity to work. Just as you might expect, it's a way to take code and encapsulate it in a block that takes in parameters and returns outputs. The format for functions in Python is as follows:
def <function name> (<param 1>,<param2>):
	<insert code here>
	return <output>
Say I wanted to write a function that adds two numbers, a and b. I could do something like
def add(a,b):
    c = a + b
    return c
or
def add(a,b):
    return a + b
Wow. That was rather roundabout. What if we programmed an entire calculator instead? Maybe something more like:
def calculate(a,b,op):
    if op == '+':
        return a + b
    elif op == '-':
        return a - b
    elif op == 'x':
        return a*b
    elif op == '/':
        return (a+0.0)/b
And I can nest that function into another function and make a command-line calculator:
def calculator():
    a = input("Type the equation \n")
    b = a.split()
    print calculate(float(b[0]),float(b[2]),b[1])
Note that this function doesn't take in any paramters nor returns any values. It is, in a sense, the 'main' function of this example. I can use that function now to do some fun things.
while(1):
    calculator()
If I run this, I get something that looks like
Type the equation
'8 + 2'
10.0
Type the equation
'5 - 1'
4.0
Type the equation
'2 x 5'
10.0
Type the equation
'2 / 8'
0.25
Congratulations, kids! You have created your first calculator! Interestingly enough, the first computer created by Intel (the 4004 chip) was basically a glorified calculator. And we just did it in 9 lines of code! Oh the power of encapsulation!
Classes and objects
One way to think of classes and objects is to think of it like taxonomy. Say that all programming things are living things. These living things are then divided into animals, plants, fungi, algae, and bacteria. The animals are then further divided into things with spines and things without spines. And so on, you get the picture.
It is easy to divide programs in the same way. Say that I wanted to write a program that would count my change for me. I might make a class, 'Coins'. All coins are metal, amd most are silver, and hopefully they all fit in your pocket.
class Coins():
    madeOf = 'metal'
    color = 'silver'
    fitInPocket = True
I can then make several more specific classes of special coins, all of which inherit from "Coins".
class Quarters(Coins):
    value = 0.25
class Dimes(Coins):
    value = 0.1
class Nickles(Coins):
    value = 0.05
class Pennies(Coins):
    value = 0.01
    color = 'bronze'
Note that Pennies are kind of a mutation when it comes to color, so I redefined that.
On the flip side of things, I might want to do the same with bills. In this case, I can make more classes:
class Bills():
    madeOf = 'paper'
    color = 'green'
    fitInPocket = True
class OneDollar(Bills):
    value = 1.0
class FiveDollar(Bills):
    value = 5.0
class TenDollar(Bills):
    value = 10.0
class TwentyDollar(Bills):
    value = 20.0
Ok. So what? Well, now I can make things happen. Say I had 23 pennies, 25 nickles, a quarter, and a five dollar bill. I might calculate the total change as follows.
c = []
for n in range(23):
    p = Pennies()
    c.append(p)
for n in range(25):
    n = Nickles()
    c.append(n)
q = Quarters()
c.append(q)
f = FiveDollar()
c.append(f)

totalChange = 0
for n in c:
    totalChange += n.value
print totalChange
And if I run this, I get
6.73
Ok. Now you're thinking, "I can think of at least five hundred better ways to calculate this." You may be right, but what if, instead of a handful of change, you had a jar of change? Or, what if you were a store clerk and wanted to know how much stuff is in the register? And, what if instead of knowing how many coins you had, you had a program that could identify each coin by its weight (another attribute!), and count it up for you? Then this isn't such a bad way to approach it.
The bottom line is this: scripting is great for cute, fun, shortcut things, but for any real-sized program, you're going to need to use functions, classes, and objects in order to organize your work in some robust form.
Summary project
(under construction) Do this Software Design homework 07
Day 3: Files
Today we embark upon the fun adventure of dealing with files! After this module, you should be able to make any permanent programs, ie can read from a file and write to a file to save its state. Think of the possibilities!
There's really not much for me to write about when it comes to files. The theory is exactly the same as before: remember to make lots of functions, classes, and objects and to use all kinds of datatypes to make your code robust and easy to decode.
Most of the goods on dealing with files can be found here. Here are some important examples:
Opening and reading from a file
f = open("hello.txt")
try:
    for line in f:
        print line
finally:
    f.close()
Or, according to the site above, if you have Python 2.5 or higher,
from __future__ import with_statement

with open("hello.txt") as f:
    for line in f:
        print line
You can also write to a file using the 'write' command.
Really, that's all you need to know.
Summary project
Again, we steal Allen Downey's homework assignment: Markov Analysis
Day 4: GUIs
What are GUIs
So you now know how to make your computer do menial tasks for you. Clearly, though, that's not how the guys at Microsoft do it; when was the last time you had to use the Windows command line? (As in you had no other alternative?)
If you haven't guessed already, GUIs stand for graphical user interfaces. These are what most software companies use to make their programs more appealing for the general public who may be more comfortable with clicking a little thing that says "Would you like to save now, pretty please?" than just typing "save file" into a command line.
In this module, we'll be working with GUIs a bit. There are different packages you can use. It just so happens that Tkinter comes with most Python installations, and is what Allen Downey usually uses in his educational programs. I, personally, however, am more familiar with wxPython, so I'm going to show you some basic ways of getting comfortable with that.
Packing
The philosophy behind most GUI programming is packing stuff on your screen. There are many different ways to do this. We can, for example, stack them in neat little grids like we stack eggs or fruit (Grid Sizers). Or, we could just shove them on top of each other in any way that fits, like we stack crap in our dorm rooms (Box Sizers). There are many different packing mechanisms, or sizers, some better than others in different situations.
So what exactly is it that you're packing? In the fruit industry, we are packing oranges. On moving day, we pack coffee cups, T-shirts, unused bars of soap, etc. In the GUI world, we pack widgets; scroll bars, menu bars, buttons, etc.
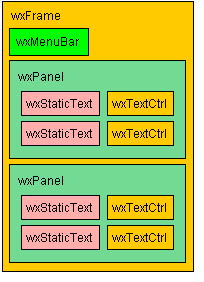
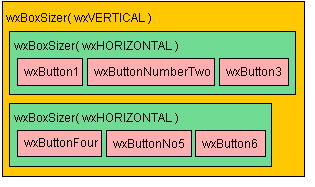
Some examples of packing in wxPython:
(Both images taken from [[1]], a very nice page to learn wxPython)
As you can see, GUI packing is a bit more layered than typical packing. If I'm just trying to store my books away, I might just shove them in a box. But in GUI packing, I'm probably going to shove my BoxOfBooks into another BoxOfStuff, perhaps adjacent to a BoxOfClothing that contains three boxes of its own for each type of clothing. Once you get comfortable with this idea of layered boxes, however, the rest is just syntax.
TKinter vs wxPython
The two major packages that support GUI building in Python are TKinter and wxPython. Although TKinter is a more established package that usually comes with your python install, more and more people are using and developing wxPython. At any rate, as mentioned before, because I have personally used wxPython far more than TKinter, that's the package we're going to talk about. However, for your own benefit, there is a nice pros and cons list provided [here]. (Yes, it is on wxPython's website, and therefore is skewed, but pretty accurate nonetheless)
Existing Tutorials
There are several nice tutorials existing that go through how to program in wxPython, so I will start out by providing them. First, the [Getting Started] page is very good, and will walk you through the basic packing structure. You can also find [an older tutorial here].
Downloads
To start, first download and install wxPython.
Next, I'm going to suggest something you might kill me for, but also download and install wxGlade. Glade products are basically GUI-based programs for making GUIs. Although they are quite atrocious to use to make a GUI of any reasonable scale, I find it a sweet tool to use when just trying to figure out how to code a piece of something.
Hello World
To get started, and just to check that you installed the right version of wxPython, try running the following code:
import wx
app = wx.PySimpleApp()
frame = wx.Frame(None, wx.ID_ANY, "Hello World")
frame.Show(True)
app.MainLoop()
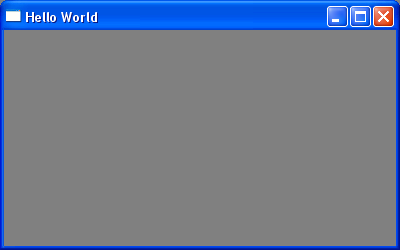
You should get a nice frame window that looks like:
Great! Now all we have to do is add some widgets!
Using Glade
First off: wxGlade is dumb. But just like pet rocks are dumb, if you're trying to break a window, they can still be useful. Remember this when you use wxGlade and realize just how dumb it is. It's not there to be your user-friendly tool to make your life easy, but if you understand it enough, you can use it to bypass a lot of confusing API.
The way that we're going to work through this is to first use Glade once to see how you would use it to build GUIs. Then, we'll look through the compiled code and see where Glade is dumb.
An easier way is to first build the framework of your code by using some of the examples provided in the [Getting Started tutorial]. Then, when you need a particular widget, use Glade to see what the code and parameters for it is, a particularly useful method when you know what a widget looks like but not what it's called. When you get good at this, you will no longer need Glade, and can just look up the API for each widget directly.
Glade GUI-for-GUIs walkthrough
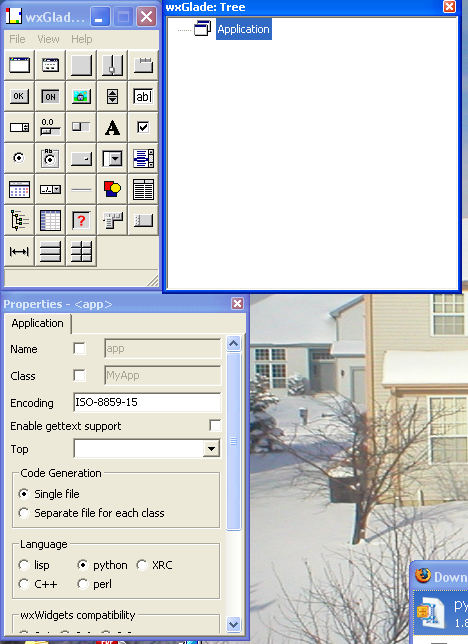
After you've installed wxGlade, boot it up.
This is what it should look like.
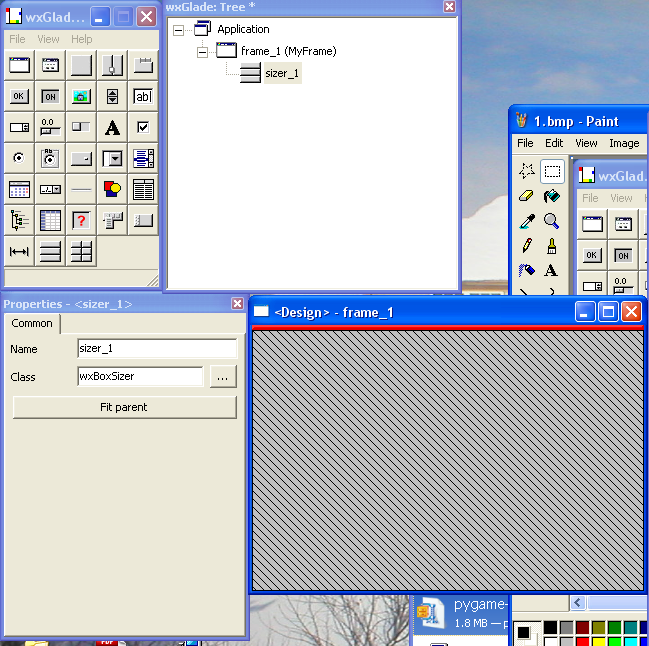
The best way to start out is to make a frame. Click on the upmost leftmost icon on the panel, which should give you a frame with a free 1x1 box sizer inside.
Sizers in general are the GUI's way of packing your stuff. When you open any GUI, you will see that it's composed of buttons, pictures, text, toolbars, etc. All of these are lovingly called "widgets" in GUI world. These widgets go into sizers.
There are many different kinds of sizers. GridSizers will put your stuff in an n by n grid. BoxSizers only allow you to choose the number of rows or column. Any sizer will allow you to place another sizer within a cell, and for that reason, many people use BoxSizer, despite its limited ability, because it's easier to think of it in an embedded design paradigm.
By inserting a frame, you have a free box sizer. Note that if you click the third icon in the first row, you will get a free panel. If you want to stick anything in the panel, you need to insert a boxsizer.
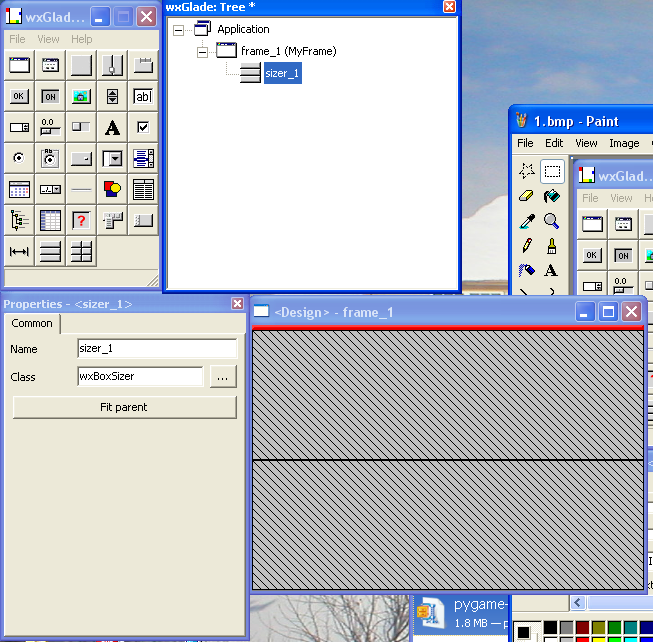
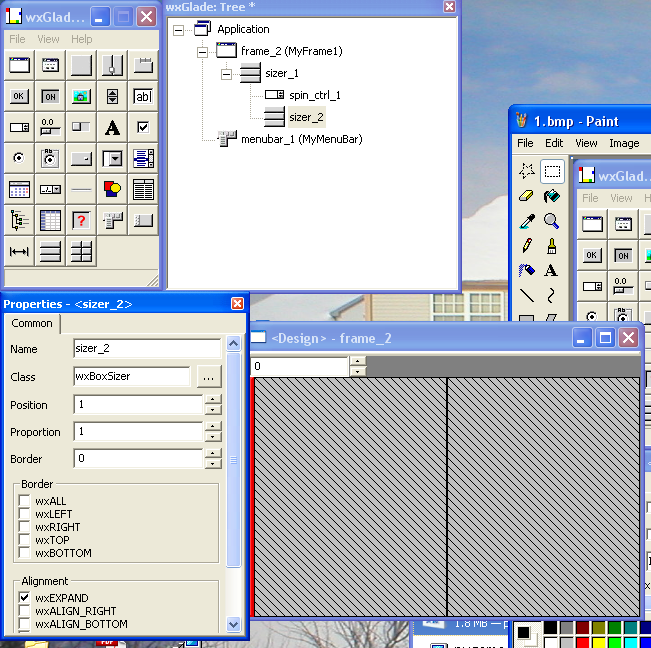
But that's not what we're going to do in this walkthrough. Instead, we're going to play with the box sizer. Right click the sizer in the Tree window, and click "Add slot". Your sizer is now split into two vertical rows.
If, instead, you had wanted horizontal columns, you can delete the sizer, insert a new sizer, and set it as horizontal instead of vertical. But let's not do that in this walk through.
Instead, let's experiment with placing widgets into sizers. Select any widget and click on the upper cell. You can see that the cell size hugs the widget.
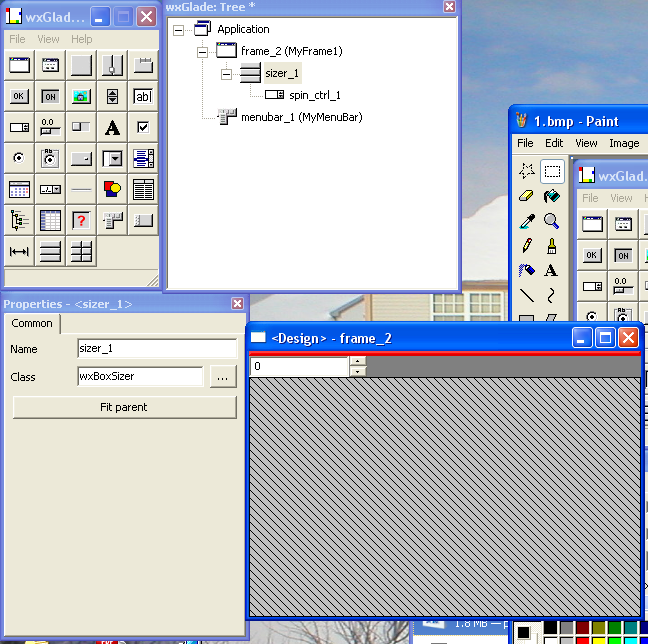
You will also notice that some widgets, like menubars and toolbars, don't go into the cells, but instead are floating. That isn't the way they should appear on the GUI, but these two widgets have become so standardized that they don't need to go into the sizers.
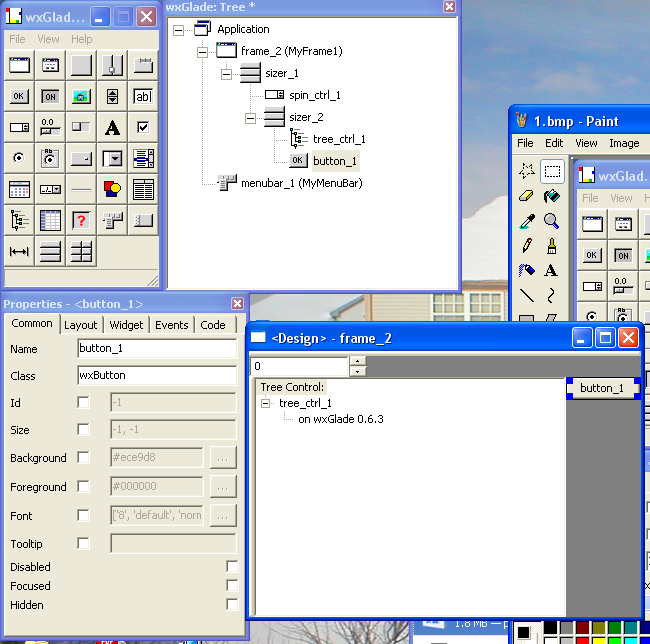
You can also insert a widget in the bottom cell, but if you do that, you're done with the Frame. So instead, we're going to embed a boxsizer by selecting the middle icon in the bottom row and clicking the bottom empty cell. Keep the settings on wx.Horizontal, and select 2 for the number of slots.
Great! Now fill these two cells with your widget of choice.
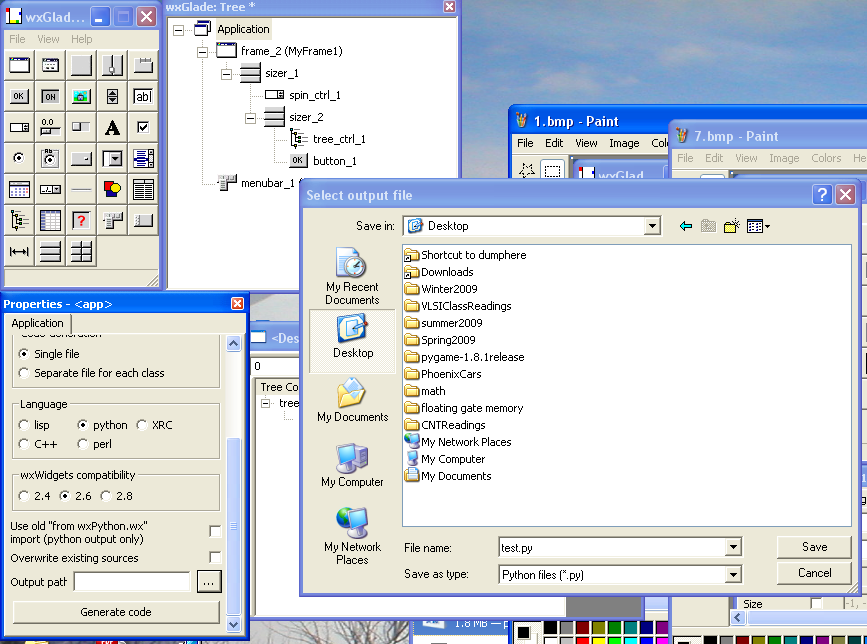
Sweet. Now let's look at some code! In the Tree window, click Application. In the Properties window, scroll down. Make sure it's set for Language: Python, and compatibility: the version of python you are now running. As you can see, on my version of Glade, it annoyingly only works with the even-number versions. In this case, yes, you do have to download a compatible version of python.
Click the "..." button and find the place you want to store the code. Then click "Generate Code" to get the goods.
Sweet!
Cleaning it up
Whew! That was a lot of work! After all that effort, this is the code that was generated:
#!/usr/bin/env python
# -*- coding: iso-8859-15 -*-
# generated by wxGlade 0.6.3 on Wed Jan 28 14:54:37 2009

import wx

# begin wxGlade: extracode
# end wxGlade


class MyFrame1(wx.Frame):
    def __init__(self, *args, **kwds):
        # begin wxGlade: MyFrame1.__init__
        kwds["style"] = wx.DEFAULT_FRAME_STYLE
        wx.Frame.__init__(self, *args, **kwds)
        self.spin_ctrl_1 = wx.SpinCtrl(self, -1, "", min=0, max=100)
        self.tree_ctrl_1 = wx.TreeCtrl(self, -1, style=wx.TR_HAS_BUTTONS|wx.TR_DEFAULT_STYLE|wx.SUNKEN_BORDER)
        self.button_1 = wx.Button(self, -1, "button_1")

        self.__set_properties()
        self.__do_layout()
        # end wxGlade

    def __set_properties(self):
        # begin wxGlade: MyFrame1.__set_properties
        self.SetTitle("frame_2")
        # end wxGlade

    def __do_layout(self):
        # begin wxGlade: MyFrame1.__do_layout
        sizer_1 = wx.BoxSizer(wx.VERTICAL)
        sizer_2 = wx.BoxSizer(wx.HORIZONTAL)
        sizer_1.Add(self.spin_ctrl_1, 0, 0, 0)
        sizer_2.Add(self.tree_ctrl_1, 1, wx.EXPAND, 0)
        sizer_2.Add(self.button_1, 0, 0, 0)
        sizer_1.Add(sizer_2, 1, wx.EXPAND, 0)
        self.SetSizer(sizer_1)
        sizer_1.Fit(self)
        self.Layout()
        # end wxGlade

# end of class MyFrame1


class MyMenuBar(wx.MenuBar):
    def __init__(self, *args, **kwds):
        # begin wxGlade: MyMenuBar.__init__
        wx.MenuBar.__init__(self, *args, **kwds)

        self.__set_properties()
        self.__do_layout()
        # end wxGlade

    def __set_properties(self):
        # begin wxGlade: MyMenuBar.__set_properties
        pass
        # end wxGlade

    def __do_layout(self):
        # begin wxGlade: MyMenuBar.__do_layout
        pass
        # end wxGlade

# end of class MyMenuBar


if __name__ == "__main__":
    app = wx.PySimpleApp(0)
    wx.InitAllImageHandlers()
    frame_1 = (None, -1, "")
    app.SetTopWindow(frame_1)
    frame_1.Show()
    app.MainLoop()
Try running the code. You will probably see a multitude of errors. Sadly, our pet rock, aka Glade, is really dumb and sucky in creating code that is optimal, and at times, correct. Therefore, we have to do some cleaning up. I went through and cleaned up this code a bit to give you an idea of what needs to be changed.
First off, there is a commented header generated that allows some compabitility with wxGlade.
#!/usr/bin/env python
# -*- coding: iso-8859-15 -*-
# generated by wxGlade 0.6.3 on Wed Jan 28 14:54:37 2009
Kill it.
Next, scroll to the very end and look at the very last block
if __name__ == "__main__":
    app = wx.PySimpleApp(0)

    wx.InitAllImageHandlers()
    frame_1 = (None, -1, "")
    app.SetTopWindow(frame_1)
    frame_1.Show()
    app.MainLoop()

if __name__ == "__main__":

    app = wx.App()
    wx.InitAllImageHandlers()
    frame_1 = MyFrame1(None, -1, "")
    app.SetTopWindow(frame_1)
    frame_1.Show()
    app.MainLoop()
There are a few things downright wrong with this code. First of all, by assigning frame_1 to a tuple, you don't really get a frame. So change the line
frame_1 = (None, -1, "")
to
frame_1 = MyFrame1(None, -1, "")
Now, instead of initializing a tuple, you have initialized a wxFrame with three arguments.
At this point, your script should run. You should see a rather hideous GUI box with little widgets that overlay on top of each other. The other thing that wxGlade isn't supporting is packing each sizer separately. In many ways, it's like wxGlade is shoving all of your valuables in a box with some cardboard, without really sealing up each individual box neatly. That's your job.
Go to the
__do_layout(self)
function of the MyFrame class. Here, you will see the badly packed sizers. You will notice that, although there is a line for
sizer_1.Fit(self)
there is no equivalent for sizer_2. So, after everything has been added into sizer_2, add another line:
sizer_2.Fit(self)
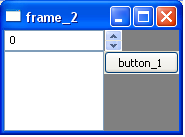
Now, you should get a less hideous GUI that looks something more like:
Not the prettiest, but it is what you want. A copy of the final code should look something like:
import wx
class MyFrame1(wx.Frame):
    def __init__(self, *args, **kwds):
        # begin wxGlade: MyFrame1.__init__
        kwds["style"] = wx.DEFAULT_FRAME_STYLE
        wx.Frame.__init__(self, *args, **kwds)
        self.spin_ctrl_1 = wx.SpinCtrl(self, -1, "", min=0, max=100)
        self.tree_ctrl_1 = wx.TreeCtrl(self, -1, style=wx.TR_HAS_BUTTONS|wx.TR_DEFAULT_STYLE|wx.SUNKEN_BORDER)
        self.button_1 = wx.Button(self, 1, "button_1")
        self.__set_properties()
        self.__do_layout()
        # end wxGlade

    def __set_properties(self):
        # begin wxGlade: MyFrame1.__set_properties
        self.SetTitle("frame_2")
        # end wxGlade

    def __do_layout(self):
        sizer_1 = wx.BoxSizer(wx.VERTICAL)
        sizer_2 = wx.BoxSizer(wx.HORIZONTAL)
        sizer_1.Add(self.spin_ctrl_1, 0, 0, 0)
        sizer_2.Add(self.tree_ctrl_1, 1, wx.EXPAND, 0)
        sizer_2.Add(self.button_1, 0, 0, 0)
        sizer_2.Fit(self)
        sizer_1.Add(sizer_2, 1, wx.EXPAND, 0)
        self.SetSizer(sizer_1)
        sizer_1.Fit(self)
        self.Layout()


class MyMenuBar(wx.MenuBar):
    def __init__(self, *args, **kwds):
        wx.MenuBar.__init__(self, *args, **kwds)

        self.__set_properties()
        self.__do_layout()

    def __set_properties(self):
        pass

    def __do_layout(self):
        pass


if __name__ == "__main__":
    app = wx.PySimpleApp()
    wx.InitAllImageHandlers()
    frame_1 = MyFrame1(None, -1, "")
    app.SetTopWindow(frame_1)
    frame_1.Show()
    app.MainLoop()
What does it all look like?
Summary Project
Make a GUI for any of the previous programs you have made. These could include:
- Trivia
- Calculator
- Poker
- Markov Analysis
or anything else you can dream of!
Day 5: PyGame
By this point, you should be pretty comfortable with the general python language. The next step in OLPC programming is to learn how to actually make a game. In this section, we will go over how to use pygame, and then we can make activities!
Alternatives to PyGame
The author of this wiki chose to give a tutorial on PyGame because
- it is one of the better documented game development packages for python
- it is capable of many things
- it comes with the Sugar image
However, we do recognize that many people develop with other packages and in other ways, ie PyGTK, PyCairo. The current OLPC-Nepal deployment develops their activities using Flash. Comments about the merits of Flash aside, it is often the case that the immediacy of an activity outranks the need for high quality activities, so it is often important to choose the package that best fits the needs.
Downloads
Go here for Python downloading options. Be sure that it is compatible with your current version of python. There should be packages available for Windows, Mac, and all Linux distributions.
Existing Pygame Tutorials
We won't discuss much about the syntax idiosyncrasies since there are many, many, MANY fantastic existing pygame tutorials that will do that for you. Many of them can be found at the python documentation page, with rather famous ones like Line by Line Pummel-the-Chimp.
Also, there is a nice collection of Pygame code examples, which you can go through and mess with, and see how you affect the program.
Using PyGame
There are many ways of using PyGame to further your gaming needs. We will discuss two distinct paradigms that we've observed, and hope that it helps you plan out your PyGame project.
Pygame: an action-filled adventure!
In programming games that require a lot of action and collision detection, most people use PyGame Sprites. Fundamentally, a sprite is
- a rect object (for position info)
- an image object
PyGame then allows for all these sprites to be placed in a group. While the game runs, the program iterates through these sprites to constantly update their position, color, and size, to re-render them. Sprite objects also come with collision control; these features allow Sprites to commonly be used when the game requires high action, ie shooting, running around, etc.
Pygame: a world of puzzles and drawing
Alternatively, your program may not require so much collision control and high-speed rendering, but may require better manipulation of shapes. In this paradigm, it may be easier to use the pygame.draw functions, which make it easy for one to draw all sorts of shapes and colors. However, you can't exactly move a drawing; if you want an object to move, you would have to erase and redraw it. This may be fine for slow-rendering situations like word games, puzzles, etc, but may not be compatible for the action-filled games.
OLPC's Pygame Wrapper
Now you have a wonderfulicious python program. Great! What the crap are you going to do with it though? Hey, I have an idea! How about we bundle it into a .xo bundle, and then stick it onto one of those cute laptops and see if it works? Fantastic!
Making the bundle
Now, there are several ways we can go about this. If it is your intent to really get to know how to make .xo bundles, you may find this rather wonderful Sugar activity tutorial handy. If, instead, you're lazy and you just want your activity to work, you can download a Pygame Wrapper that will essentially take care of all of that for you.
Testing the bundle
Again, this is a problem that can be approached in many ways. Let's try some interesting things.
If you already have an xo, put your program onto a USB stick and stick it into the xo. Try to first run the python program straight up (eg, Terminal --> python <game>.py) If that works, you may have to run a setup and reboot, but then your game should be playable.
If you don't, then you can try a number of things. If you have tons of space on your computer, and your game isn't terribly big and feature-filled, you can download an emulator or use jhbuild.
If you want to try something super-awesome and you happen to have a 2G or bigger USB lying around unused, you can try your game on a Sugar On A Stick, an external boot partition.
If none of these work for you, please leave a note here with a description of your problems. We learn the most by seeing where the bugs are so please help us!
Summary project
Go to neopets.com. Find your favorite game and re-make it. Don't steal their images or publicize it without their permission!
Now make it a .xo bundle. Now try it on an xo. Fun and games! Woo!
