Sugar Instructions: Difference between revisions
m (re-categorization) |
m (obsoleted by Manuals, mention help activity) |
||
| (50 intermediate revisions by 24 users not shown) | |||
| Line 1: | Line 1: | ||
{{Obsolete |link=[[Manuals]]}} |
|||
{{Translations}} |
|||
<font color="red">Note: this page is deprecated since much of its information is '''obsolete'''. Please refer to the [[Help (activity)]] instead.</font> |
|||
== Different versions of Sugar behave differently! == |
|||
The Sugar software is evolving rapidly, so there are different instructions, depending which version you have. The OLPC software comes in "builds", which are loaded into the laptop's firmware (or booted from a CD image, USB key, or SD card). This page documents the Sugar version in the current stable build (Build 385). You can find all versions of this documentation in [[:Category:Sugar]]. |
|||
== Installing == |
== Installing == |
||
If you have an OLPC laptop, [[Sugar]] is already installed. |
If you have an OLPC laptop, [[Sugar]] is already installed. |
||
Otherwise you can either use an [[OS images for emulation|emulated laptop]], which will have Sugar built in, or you can [[OLPC Python Environment|install Python on your desktop PC]] and run the Sugar application directly on your PC. |
Otherwise you can either use an [[OS images for emulation|emulated laptop]], which will have Sugar built in, or you can [[OLPC Python Environment|install Python on your desktop PC]] (see also [[:Category:Installing Sugar]] for specific platform instructions) and run the Sugar application directly on your PC. |
||
If you are running Sugar from Python then you can skip most of the stuff in the next section, up to choosing your user name. |
If you are running Sugar from Python then you can skip most of the stuff in the next section, up to choosing your user name. |
||
== First |
== First Boot on an Emulated OLPC Laptop == |
||
When you first open an OLPC image [[OS_images_for_emulation|using an emulator]], you will see this screen. Just press enter, or wait a few seconds. |
When you first open an OLPC image [[OS_images_for_emulation|using an emulator]], you will see this screen. Just press enter, or wait a few seconds. |
||
[[Image:Bootscreen1.png|right|thumb|320px| Press space when you see this screen to enter the next screen (or just wait 10 seconds).]] |
[[Image:Bootscreen1.png|right|thumb|320px| Press space when you see this screen to enter the next screen (or just wait 10 seconds).]] |
||
<br clear="all"/> <!--prevents image pushing title out--> |
<br clear="all"/> <!--prevents image pushing title out--> |
||
This screen will appear. Again, just press enter if you are using an emulator. |
This screen will appear. Again, just press enter if you are using an emulator. |
||
[[Image:Bootscreen2.png|thumb|320px| Press enter to boot OLPC |
[[Image:Bootscreen2.png|thumb|320px| Press enter to boot OLPC if you are running inside an emulator.]] |
||
<br clear="all"/> <!--prevents image pushing title out--> |
<br clear="all"/> <!--prevents image pushing title out--> |
||
Then several screens of text will fly past as Linux begins to load. Just wait until you see the Sugar desktop shown later. |
Then several screens of text will fly past as Linux begins to load. Just wait until you see the Sugar desktop shown later. |
||
| Line 15: | Line 22: | ||
Then it will go to a login prompt. You don't have to type anything. Just wait and it will start the GUI. If you don't want to wait for the GUI to load, you can log in with username "root" and no password. |
Then it will go to a login prompt. You don't have to type anything. Just wait and it will start the GUI. If you don't want to wait for the GUI to load, you can log in with username "root" and no password. |
||
If you wait, the GUI will start. If the GUI fails to start, you may have forgotten to choose emulated when you booted, or you may have encountered the "GUI won't start" bug. The "GUI won't start" bug is fixed by reinstalling the hard disk image. In QEMU, delete the .img file (it has become corrupted), and extract the original .img file from the bz2 file, or download the image file again. Upgrading to a later version isn't necessary. |
If you wait, the GUI will start. If the GUI fails to start, you may have forgotten to choose emulated when you booted, or you may have encountered the "GUI won't start" bug. The "GUI won't start" bug is fixed by reinstalling the hard disk image. (Or it may be because of a bug in the image file, see http://dev.laptop.org/ticket/1295). In QEMU, delete the .img file (it has become corrupted), and extract the original .img file from the bz2 file, or download the image file again. Upgrading to a later version isn't necessary. |
||
<br clear="all"/> <!--prevents image pushing title out--> |
<br clear="all"/> <!--prevents image pushing title out--> |
||
=== Choosing a |
=== Choosing a name and colors === |
||
[[Image: |
[[Image:login2.png|thumb|320px|right| Type in a username and choose your icon colors here. (In some pre-303 builds, you are prompted for a picture as well.)]] |
||
The first time Sugar starts it will show a screen where you must type in a username and choose icon colors. (In some pre-303 builds, you also need to select a picture.) '''You must type in a username'''; currently the name is used infrequently, but it will appear in a hover over your iconic representation in the mesh view—on your laptop and on other XOs on the same mesh network. The icon colors have been randomly chosen; you can change them by clicking in the XO icon: keep clicking until you get an acceptable color combination. (This will be made interactive in later builds.) Press Enter or click on the ">" button to continue. |
|||
The first time Sugar starts it will pop up with a box asking for a username. Type in any name you want the computer to call you. Don't leave it blank. Press OK or Enter. It will automatically choose a colour for you. |
|||
<br clear="all"/> <!--prevents image pushing title out--> |
<br clear="all"/> <!--prevents image pushing title out--> |
||
== Getting Started with the Sugar Desktop == |
== Getting Started with the Sugar Desktop == |
||
=== Home Mode === |
=== Home Mode === |
||
[[Image:Empty_no_apps_no_frame.png|right|thumb|320px| Home Mode. This is how the screen will look when you first start up.]] |
[[Image:Empty_no_apps_no_frame.png|right|thumb|320px| Home Mode. This is how the screen will look when you first start up.]] |
||
The Sugar desktop starts up in Home mode. This shows |
The Sugar desktop starts up in Home mode. This shows an XO icon, representing you and your laptop, in the centre of the screen. Surrounding it is a ring. |
||
Later on we will see many people, but at the moment we can only see you. Each person is a different colour. |
Later on we will see many XO icons, representing many people, but at the moment we can only see you. Each person is a different colour. |
||
Around the outside of the ring are a few seemingly random placed icons: a battery, a triangle, and/or a circle. The battery icon shows how charged your laptop battery is (less color = less charge). The triangle appears if you are connected to a wireless access point. The circle appears if you are connected to a wireless mesh. (Or something like that -- none of this is documented.) |
|||
On the current G1G1 distributed machines, instead of a triangle, wireless access points may appear as an (orange) circle. If you have a wireless access point but are not yet connected, you may be able to connect using the ''neighborhood view'' button (f1, see diagram below), and clicking on the orange circle in the new view. |
|||
<br clear="all"/> <!--prevents image pushing title out--> |
<br clear="all"/> <!--prevents image pushing title out--> |
||
=== The Frame Is How You Control Sugar === |
|||
[[Image:Abiword_icon.png|right|thumb|320px| The dark frame appears when you move the mouse pointer to a corner of the screen. The activities are at the bottom of the frame.]] |
|||
The "Frame", a black border around the edge of the screen, is where many of Sugar's controls are. The frame can appear and disappear, making more room on the screen for activities. It is usually visible on the main screen with the ring, since the edges of that screen aren't used for anything else. If it is not visible, move your mouse pointer to a corner of the screen. The Frame will appear, and will stay visible as long as the mouse pointer doesn't leave the frame area for more than about half a second at a time. |
|||
You can also make the Frame appear or disapper by pressing the upper rightmost key on the OLPC keyboard |
|||
(it has a rectangle on it, like a picture frame). |
|||
=== Opening an Activity === |
=== Opening an Activity === |
||
[[Image:Abiword_icon.png|right|thumb|320px| The dark frame appears when you touch the edge of the screen. The activities are at the bottom of the frame.]] |
|||
Sugar uses "activities" rather than "applications". |
Sugar uses "activities" rather than "applications". |
||
For example a web browser is a type of activity in Sugar. The ring around you shows which activities are running. At the moment there are no activities running, so the ring is empty. |
For example a web browser is a type of activity in Sugar. The ring around you shows which activities are running. At the moment there are no activities running, so the ring is empty. |
||
So let's open an activity. To open an activity, |
So let's open an activity. To open an activity, look at the bottom of the frame, where there are some icons. |
||
At the bottom of the frame there are some icons. |
|||
These are the activities that you can open. |
These are the activities that you can open. |
||
For example, [[AbiWord| |
For example, [[AbiWord|Write]] (a word processsor based on AbiWord) is shaped like a sheet of paper with a pencil on it. To open an activity, click on its icon. A copy of the icon will move up into the ring, and pulse while the application starts up. |
||
To open an activity, click on it. |
|||
<br clear="all"/> <!--prevents image pushing title out--> |
<br clear="all"/> <!--prevents image pushing title out--> |
||
[[Image:Abiword_with_no_frame.png|right|thumb|320px| [[AbiWord| |
[[Image:Abiword_with_no_frame.png|right|thumb|320px| [[AbiWord|Write]] word processor when it first opens.]] |
||
After a few seconds a new screen will appear |
After a few seconds a new screen will appear. (The screen image to the right is from an old version of [[AbiWord|Write]]; it's been improved since we took that screen shot). |
||
You can open several activities at the same time, by going to the bottom of the frame, and clicking on another icon. |
You can open several activities at the same time, by going to the bottom of the frame, and clicking on another icon. You can only see or interact with one of them at once. |
||
<br clear="all"/> <!--prevents image pushing title out--> |
<br clear="all"/> <!--prevents image pushing title out--> |
||
=== Switching View Modes === |
=== Switching View Modes === |
||
[[Image:Zoom_icons.png|right|thumb|320px|Different View Modes]] |
[[Image:Zoom_icons.png|right|thumb|320px|Different View Modes]] |
||
To see which activities are open, go to the frame, and in the top left corner, you will see four "Zoom Icons". |
To see which activities are open, go to the frame, and in the top, near the left corner, you will see four "Zoom Icons". |
||
There are three different levels of "zoom", so you can see not just yourself and your activities, but also your friends, or everyone on the local network. |
There are three different levels of "zoom", so you can see not just yourself and your activities, but also your friends, or everyone on the local network. |
||
| Line 68: | Line 82: | ||
*'''Bulletin Board''' Toggles an extra transparent layer on top of the view, where you can add comments and stick items, like an old-fashioned bulletin board, that you want to share with everyone in that view. |
*'''Bulletin Board''' Toggles an extra transparent layer on top of the view, where you can add comments and stick items, like an old-fashioned bulletin board, that you want to share with everyone in that view. |
||
Click on the "Home" view (The |
Click on the "Home" view (The disc with a single dot inside) or press F3 on the keyboard. |
||
<br clear="all"/> <!--prevents image pushing title out--> |
<br clear="all"/> <!--prevents image pushing title out--> |
||
[[Image:Key_zoom.jpg|right|thumb|View mode keys on the OLPC keyboard.]] |
[[Image:Key_zoom.jpg|right|thumb|View mode keys on the OLPC keyboard.]] |
||
If you have a real OLPC laptop, you can change zoom mode by pressing the appropriate button on the top of your keyboard, shown here. |
If you have a real OLPC laptop, you can also change the zoom mode by pressing the appropriate button on the top of your keyboard, shown here. |
||
<br clear="all"/> <!--prevents image pushing title out--> |
<br clear="all"/> <!--prevents image pushing title out--> |
||
[[Image:Home_mode_one_app_running_frame.png|320px|right|thumb|Home View with one activity ( |
[[Image:Home_mode_one_app_running_frame.png|320px|right|thumb|Home View with one activity (Web) running, and the cursor on the Write icon in the bottom frame.]] |
||
Now you will see your icon in the |
Now you will see your XO icon in the center, and the Web icon in the surrounding circle. |
||
<br clear="all"/> <!--prevents image pushing title out--> |
<br clear="all"/> <!--prevents image pushing title out--> |
||
| Line 85: | Line 99: | ||
If you have more than one activity running, you can switch to it by clicking on the appropriate icon in the ring. |
If you have more than one activity running, you can switch to it by clicking on the appropriate icon in the ring. |
||
The size of the ring segment that an activity occupies |
The size of the ring segment that an activity occupies is intended to represent its overall memory usage, but that feature does not work yet. When the ring fills up, no additional activities may be launched until some resources are freed up. In today's XO laptops, only a few activities can be started at the same time, and when memory is exhausted, one of them will die suddenly without any warning. Note: it is possible that work or play that is in progress may be lost. |
||
<br clear="all"/> <!--prevents image pushing title out--> |
<br clear="all"/> <!--prevents image pushing title out--> |
||
[[image:Activities_in_frame_only.png|320px|thumb|right|activities in the frame]] |
[[image:Activities_in_frame_only.png|320px|thumb|right|activities in the frame]] |
||
There are currently |
There are currently ten activities on the frame. (The picture to the right is out of date.) |
||
<br clear="all"/> <!--prevents image pushing title out--> |
<br clear="all"/> <!--prevents image pushing title out--> |
||
<table border="1" cellpadding="2" cellspacing="0" border="1"> |
<table border="1" cellpadding="2" cellspacing="0" border="1"> |
||
<tr width=50pt><th> [[image:Activity1 |
<tr width=50pt><th> [[image:Activity1.png]] </th><th> [[image:Activity3.png]] </th><th> [[image:Activity6.png]] </th><th> [[image:Activity8.png]] </th></tr> |
||
<tr valign="top" width=50pt |
<tr valign="top" width=50pt> |
||
<td> Squeak [[Sugar_EToys|Etoys]] dynamic media authoring system</td> |
|||
<td> chat activity</td> |
|||
<td> [[Sugar_Instructions#Web_browser|Web Browser]]</td> |
<td> [[Sugar_Instructions#Web_browser|Web Browser]]</td> |
||
<td> [[ |
<td> [[CameraTest|Camera]], a basic camera test</td> |
||
<td> [[TamTam|TamTam]] Play music and record compositions</td> |
|||
<td> [[http://penguintv.sourceforge.net/ PenguinTV]] RSS Newsreader</td> |
|||
<td> [[ |
<td> [[Paint]] Image painting</td> |
||
<td> [[ |
<td> [[BlockParty]] Game: blocks drop out of the sky, you arrange them</td> |
||
<td> [[ |
<td> [[Calc]] Calculator</td> |
||
<td> [[http://penguintv.sourceforge.net/ News Reader]] RSS Newsreader</td> |
|||
<td> [[AbiWord|Write]] Word processor </td> |
|||
<td> [[Read]] Book reader</td> |
|||
</tr> |
</tr> |
||
</table> |
</table> |
||
| Line 113: | Line 130: | ||
[[Image:Sharing_and_closing.png|320px|thumb|right| Follow the steps above to close an activity. Click on the image to enlarge it.]] |
[[Image:Sharing_and_closing.png|320px|thumb|right| Follow the steps above to close an activity. Click on the image to enlarge it.]] |
||
To close an activity, select it (for example |
To close an activity that's already open, select it from the ring (for example, Write) if it is not |
||
already visible on the screen. |
|||
Then go to the top of the frame. You will see the |
Then go to the top of the frame. You will see the activity's icon (e.g. the Write icon) at the top of the frame, near the center. |
||
Move your mouse on the icon but don't click. |
Move your mouse on the icon but don't click. Hover there for a moment. |
||
A little menu will appear below it. |
|||
Click on the "X-in-a-disc" icon to close the activity. |
|||
A box will appear with two more icons. |
|||
In the future you will be able to share an activity with other people, by clicking on a "Disc of a few dots" icon in the same menu. Currently that doesn't work. If it did, you could find out more about sharing activities with others, by reading about |
|||
Click on the "X" icon to close the activity. |
|||
[[Sugar_Instructions#Neighborhood_View_Mode|Neighborhood View Mode]]. |
|||
<br clear="all"/> <!--prevents image pushing title out--> |
|||
To share an activity with other people, go to the frame at the top, and move your mouse on to the activity icon. |
|||
=== Internet Access === |
|||
[[Image:Neighborhood.png|320px|right|thumb|right|Neighborhood view of your local wireless Internet. The cursor is on the "sflan49b" access point near the center of the screen.]] |
|||
The Neighborhood view is intended to show you other machines and people that are connected to you via the wireless Internet built into the laptop. Each machine is represented by a different color combination. |
|||
The screen will hold a scattering of icons, placed randomly just to make life interesting. |
|||
A box will drop down, then click on the circle with many dots inside. |
|||
Note: May be uninteresting to have to search for your friends; perhaps sugar should allow arranging the icons in some order. Or use named corrals or playpens for your friends. |
|||
The view will have an "XO" icon in it somewhere, representing your laptop, in the colors that you chose the first time |
|||
you used Sugar. There may be other XO icons in different colors, representing other peoples' laptops. If there are any standard 802.11b wireless access points within range, you'll see a triangle for each one (in random colors). Each triangle may only be partly colored, showing that your laptop is receiving a faint signal from that access point. You'll also see a circle in more random colors, representing the "wireless mesh", which we'll explain later. These icons may move around or change every once in a while, seemingly at random. |
|||
There's more information "hidden" inside each icon. If you hover the mouse pointer over it, a little pop-up menu will tell you things. For example, each access point triangle has a name (its "SSID" or "ESSID"). You can't see these names all the time, but each one will pop up if you put the mouse on that triangle. The pop-up for XO icons will show you the name of that laptop (as entered into it when you first ran Sugar). |
|||
The pop-up for the circle (the wireless mesh) doesn't have any useful information. |
|||
Your laptop won't be able to access the Internet until you tell it how to connect. If you want to use a standard wireless access point, you'll have to find its icon first. Hover over each visible icon for a moment, until you see the SSID of your access point. Then click on that access point to select it for use by your laptop. (It would be simpler if access points were always labeled with their names, but that would violate some deeply held belief of the Sugar designers.) If your access point is only partly colored, due to a low signal, you may be able to improve the signal by moving the laptop's antenna "ears", or by moving the whole laptop a few centimeters in some direction. It's hard to tell whether you are making things better or worse, though, because the icon's signal strength indication only updates every once in a long while, and there's no way to ask what the signal strength is "now". |
|||
If you are accessing the Internet via the wireless mesh, click on the circle. This will only work if there is another computer on the mesh which has been set up to relay to the Internet. |
|||
The icon for whatever method your laptop is currently using to access the Internet will blink slowly. |
|||
If the selected wireless network offers an IP address via DHCP, the laptop will use IPv4. If the network offers router discovery packets, the laptop will use IPv6. It can use both versions of TCP/IP at once. |
|||
There are bugs in the wireless access Sugar interface, and/or in the kernel drivers and/or firmware. Some people find it more reliable to get a terminal window and use traditional Unix commands to configure their Internet access. (For example, "iwconfig eth0 essid my-access-point-name; ifup eth0"). Please report any bugs that you find, so that we can make wireless Internet access work more reliably. |
|||
If wireless Internet access does not work well for you, the laptop is also able to connect to a wired Ethernet via a small USB adapter. See [[USB ethernet adaptors]] before you buy one, to find out which brands work with our kernel software drivers. Wired ethernet interfaces are not configured with the Neighborhood screen. Plug the Ethernet cable into the USB adapter, then plug the USB adapter into your laptop. The laptop will stop using its wireless radio, and switch to using the wired Ethernet. But beware: if you later go into the Neighborhood screen and click on anything there, Sugar will disable your wired Ethernet. Your laptop is perfectly capable of using multiple network interfaces, but Sugar will only enable one at a time. |
|||
You are now sharing your activity. To find out more about sharing activities with others, read about [[Sugar_Instructions#Neighborhood_View_Mode|Neighborhood View Mode]]. |
|||
<br clear="all"/> <!--prevents image pushing title out--> |
<br clear="all"/> <!--prevents image pushing title out--> |
||
=== |
=== Web Browser === |
||
[[Image: |
[[Image:Sugar_browser_with_library.png|480px|thumb|right|The Sugar web browser showing part of its built-in library.]] |
||
To shut down the whole system, go to the top of the frame, and move the mouse over the "X" icon on the right. |
|||
The Sugar Web browser is started by the clicking the wireframe globe icon in the bottom frame. [[image:Activity3.png]] |
|||
Then a box will drop down saying "Shut Down". |
|||
The browser uses a small bit of code from Mozilla Firefox, but is much more limited than Firefox. |
|||
Click on the words "Shut Down" and wait a few seconds for the system to shut down. |
|||
It has a simple interface. It has one toolbar across the top, with back, forward, and reload buttons. There is a single box which sometimes holds the page title, sometimes holds the URL, and sometimes has a progress bar. It has two "book" icons, one with an out-arrow, for "Open", and one with an in-arrow, for "Save". |
|||
You can navigate by moving the mouse cursor over words or objects on the screen. Whenever the cursor changes into a pointing hand, clicking on that object will follow a "link" to some other web page. The laptop comes with a built-in library of books, stories, images, music, and other works. The same browser can also access pages over the Internet. |
|||
When you click on the title box, it will change to showing the URL of the current page. You can type in a new URL address and press Enter to make the browser go there. (Sometimes you'll have to click it two or three times before it will let you type.) The title box also shows the loading progress as a bar in the background. |
|||
Don't confuse the controls at the top with the similar looking Sugar frame. You can still move the cursor to the corner of the screen (or use the Frame key on the keyboard) to pop in the frame. To close the web browser, make the frame appear, hover over the colored globe icon in the middle of the top frame, and choose close (X in a disc) from the drop down menu. |
|||
This browser can only view one web page at a time. You can't keep a copy of one page, go off and look at a second page, and come back to the first one, without a lot of manual work. |
|||
There is a way to download files into the laptop. If you click on a link and the browser doesn't recognize its data type, it will be downloaded instead. The Frame will briefly pop in; downloads appear in the frame at the left edge of the screen. If you hover the cursor over the icon that appears there, more information will pop up. While it's downloading, there'll be a progress bar and a "Stop" menu (an X in a disc). The Stop menu doesn't appear to work. After a download has finished, there's a "Remove" menu (a dash in a disc). The Remove menu removes the icon from the left frame, but does not seem to remove the downloaded file. Downloaded files will end up in the /tmp directory on the laptop; you should move them elsewhere (by using a Linux shell) if you want to keep them permanently. |
|||
The Save command will save a copy of the currently displayed web page. letting you specify where it goes in the laptop's file system. The Open command will view a previously saved web page, popping up a file system navigation interface sure to confuse the naive user. |
|||
If you cannot get an internet connection in the sugar browser, and you're on the laptop, see [[Sugar Instructions#Internet Access]] above. If you're using QEMU, [[Using_QEMU_on_Windows_XP#How_to_Get_Networking_to_Work_in_QEmu|look here.]] |
|||
<br clear="all"/> <!--prevents image pushing title out--> |
<br clear="all"/> <!--prevents image pushing title out--> |
||
=== Terminal, Shell, or Linux Prompt === |
|||
== Neighborhood View Mode == |
|||
[[Image:Frame.jpg|480px|right|thumb|right|Neighborhood View Mode]] |
|||
You can access a shell in two ways... Either hold down Ctrl+Alt+F1 to leave the Sugar screen and return to the text console's login prompt, or open the [[Developer Console]] activity within Sugar and select the terminal tab. |
|||
Neighborhood mode shows you other people connected on the network. It also shows you which activities they are running, and which activities are being shared. Each person is represented by a different colour. |
|||
Note: Don't do this when using the QEMU emulator - the result is that QEMU hangs and you have to forcibly restart your machine. |
|||
If you use Ctrl+Alt+F1 to leave Sugar, you can return to Sugar with Ctrl+Alt+F3. |
|||
Note: do not attempt to do this at this time (12/1/2007) while running under QEMU. The machine hangs up and you must forcibly reboot. |
|||
If you use the terminal in the [[Developer Console]], you won't be logged in as "root" but as "olpc". You need to be logged in as "root" to edit some of the setup files, such as "/boot/grub/grub.conf". You can gain root access by typing "su -". The prompt suffix will change to # which denotes that you are root. You will not be able to start any graphical programs as root using this method. |
|||
For example, if you want to edit "/boot/grub/grub.conf" with Write in Sugar, hold down Ctrl+Alt+F1 to leave Sugar, and type "root" for the log in. Type "chmod a+rw /boot/grub/grub.conf". Then return to Sugar by holding down Ctrl+Alt+F3. Now you can open and save that file in Write. However, for system control files, using "vi" in a terminal window is a much better choice than Write. |
|||
Some basic shell commands you can use at the prompt are: |
|||
* ls -al (get a list of the files) |
|||
* cd dirname (change to directory dirname) |
|||
* cat filename (show the contents of filename) |
|||
=== Friends View Mode === |
|||
[[Image:Frame.jpg|480px|right|thumb|right|Friends View Mode]] |
|||
Friends mode is intended to show you other people connected on the network. Currently it doesn't work at all. Later, it will also show you which activities they are running, and which activities are being shared. Each person is represented by a different color combination. |
|||
The activities are colour coded with the colours of whoever started the activity. In this case the painting activity was started by the orange and purple girl, who you can see surrounding the orange and purple activity in the |
The activities are colour coded with the colours of whoever started the activity. In this case the painting activity was started by the orange and purple girl, who you can see surrounding the orange and purple activity in the Friends view in the middle of that screen. |
||
The left frame is the clipboard. You can copy multiple items to the clipboard. |
The left frame is the clipboard. You can copy multiple items to the clipboard. |
||
| Line 155: | Line 227: | ||
When you receive an invitation from your friend to join an activity, it will appear in the bottom frame in colour. A pop-up menu lets you accept or reject the invitation. Notifications may also appear in the bottom frame. |
When you receive an invitation from your friend to join an activity, it will appear in the bottom frame in colour. A pop-up menu lets you accept or reject the invitation. Notifications may also appear in the bottom frame. |
||
The top of the frame has the icons for " |
The top of the frame has the icons for "neighborhood", "friends", "home", and "bulletin board", just like on the keyboard. It also has something like the Windows "task bar" with the icons for the currently running activities. |
||
We are considering adding functionality to the friends view to allow one to collect "favorite" access points. |
|||
<br clear="all"/> <!--prevents image pushing title out--> |
<br clear="all"/> <!--prevents image pushing title out--> |
||
== Shortcut Keys == |
=== Shortcut Keys === |
||
You can use the following shortcut keys in Sugar: |
You can use the following shortcut keys in Sugar: |
||
* F1 |
* F1 : Zoom to Neighborhood view |
||
* F2 |
* F2 : Zoom to Friends view |
||
* F3 |
* F3 : Zoom to Home view |
||
* F4 : Zoom to Activity view |
|||
The following key combinations use modifier keys. For example "Alt+f" means "Hold down the 'Alt' key, then press the 'f' key, then release both keys." |
|||
* Ctrl+Alt+F1 (hold down) = leave Sugar screen, and return to linux prompt, so you can log in as "root" with no password. |
|||
* Ctrl+Alt+F7 (hold down) = return to Sugar Screen |
|||
* Ctrl+Alt+Backspace = terminate Sugar immediately without closing down properly. It will restart automatically in the background (use Ctrl+Alt+F7 to see it restarted). |
|||
* Alt+ |
* Alt+f : Toggle the frame |
||
* Alt+r : Rotate the screen |
|||
* Alt+Shift+F11 = start terminal (linux prompt) as user "olpc", you won't be able to log in as "root". |
|||
* Alt+q : Quit Sugar when running within a development environment (i.e. not when running an emulator image or on an OLPC laptop) |
|||
* Alt+Shift+F12 = show sugar-log-viewer window |
|||
: These combinations do not work in [http://wiki.sugarlabs.org/go/Sugar_on_a_Stick Sugar on a Stick]. |
|||
== Terminal (linux prompt) == |
|||
The following Linux key combinations can be used when running Sugar in an emulator image or on an OLPC laptop: |
|||
You can access the linux prompt in two ways... Either hold down Ctrl+Alt+F1 to leave the Sugar screen and return to the login prompt, or press Alt+Shift+F11 to open the terminal activity within Sugar. |
|||
* Ctrl+Alt+F1 (hold down) : Leave the Sugar screen, and go to the Linux prompt, so you can log in as "root" with no password. |
|||
* Ctrl+Alt+F3 (hold down) : Return to the Sugar screen |
|||
* Ctrl+Alt+Backspace : Terminate Sugar immediately without closing down properly. It will restart automatically in the background (use Ctrl+Alt+F3 to see it restarted). |
|||
Note: The shortcut keys seem to change with some regularity--apparently the most accurate information is found in [http://dev.laptop.org/git?p=sugar;a=blob;f=README the Sugar README] or [http://dev.laptop.org/git?p=sugar;a=blob;f=shell/view/keyhandler.py the source]. |
|||
If you use Alt+Shift+F11 you won't be logged in as "root" but as "olpc". You need to be logged in as "root" to edit some of the setup files, such as "/boot/grub/grub.conf". You can gain root access by typing "su -". The prompt suffix will change to # which denotes that you are root. You will not be able to start any graphical programs as root using this method. |
|||
For example, if you want to edit "/boot/grub/grub.conf" with AbiWord in Sugar, hold down Ctrl+Alt+F1 to leave Sugar, and type "root" for the log in. Type "chmod a+rw /boot/grub/grub.conf". Then return to Sugar by holding down Ctrl+Alt+F7. Now you can open and save that file in AbiWord. |
|||
To take a screenshot: |
|||
Some basic linux commands you can use at the prompt are: |
|||
* |
* Use alt+1 to take the screenshot. |
||
* In the journal, select 'Image' from the first dropdown menu. It would show you recent screenshots. Click on a screenshot and using the copy button (top toolbar, second button from the right) copy it to a USB device. |
|||
* cd dirname (change to directory dirname) |
|||
* cat filename (show the contents of filename) |
|||
== Web browser == |
|||
[[Image:Sugar_browser_with_frame_google_home_page.png|320px|thumb|right|The Sugar web browser.]] |
|||
<br clear="all"/> <!--prevents image pushing title out--> |
|||
The Sugar web-browser is started by the clicking the wireframe globe icon in the bottom frame. [[image:Activity3.png]] |
|||
== Shutting Down the System == |
|||
The browser is based on Mozilla Firefox. |
|||
To shut down the whole system, simply push the power button on the bezel; it's below the lower right corner |
|||
of the screen. This currently only works when the screen is showing graphics (as it is now). The system should leap to action immediately, and turn itself off within half a minute or so. If this doesn't happen, |
|||
you can also force a power-off by pressing and holding the power button for a few seconds. |
|||
== Sugar Activities == |
|||
It has a simple interface. By default it has one toolbar across the top, with back, forward, and reload buttons, followed by a box with the page title or URL, and a "+" button which adds an extra browser tab. If you click the "+" button then it adds a new tab, and a new toolbar appears on the left side of the screen which displays all the tabs. I couldn't work out how to close tabs. |
|||
This list provides more information about the [[Activities|activities]] available or under development. |
|||
== Under the Hood == |
|||
When you click on the title box, it will change to showing the URL, and you can type in a new address and press Enter to make it go there. The title box also shows the loading progress as a bar in the background. |
|||
See [[Understanding sugar code]]. |
|||
Don't confuse the tool bars with the similar looking frame. You can still move the cursor to the corner of the screen to pop in the frame over the top. You can then click on the coloured wire-frame globe icon in the top frame and choose close from the drop down menu. |
|||
NOTE: Currently, when a link opens in a new window, you will be stuck in that window until you close it from the top frame, at which point you will see the previous window until you close all the browser windows. |
|||
If you cannot get an internet connection in the sugar browser, [[Using_QEMU_on_Windows_XP#How_to_Get_Networking_to_Work_in_QEmu|look here.]] |
|||
<br clear="all"/> <!--prevents image pushing title out--> |
|||
== Detailed description of the Sugar Interface == |
== Detailed description of the Sugar Interface == |
||
For more info on the Sugar interface, have a look at the [[OLPC_Human_Interface_Guidelines|Human User Interface Guidelines]]. |
For more info on the Sugar interface, have a look at the [[OLPC_Human_Interface_Guidelines|Human User Interface Guidelines]]. |
||
[[Category:Sugar]] |
|||
[[Category:Emulation]] |
|||
[[Category:Installing Sugar]] |
|||
Latest revision as of 00:35, 4 November 2011
Note: this page is deprecated since much of its information is obsolete. Please refer to the Help (activity) instead.
Different versions of Sugar behave differently!
The Sugar software is evolving rapidly, so there are different instructions, depending which version you have. The OLPC software comes in "builds", which are loaded into the laptop's firmware (or booted from a CD image, USB key, or SD card). This page documents the Sugar version in the current stable build (Build 385). You can find all versions of this documentation in Category:Sugar.
Installing
If you have an OLPC laptop, Sugar is already installed. Otherwise you can either use an emulated laptop, which will have Sugar built in, or you can install Python on your desktop PC (see also Category:Installing Sugar for specific platform instructions) and run the Sugar application directly on your PC.
If you are running Sugar from Python then you can skip most of the stuff in the next section, up to choosing your user name.
First Boot on an Emulated OLPC Laptop
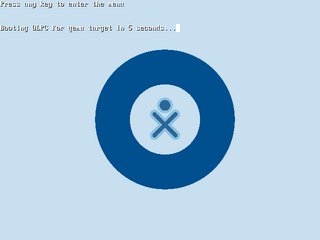
When you first open an OLPC image using an emulator, you will see this screen. Just press enter, or wait a few seconds.
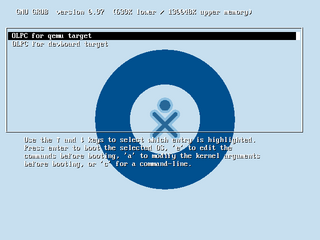
This screen will appear. Again, just press enter if you are using an emulator.
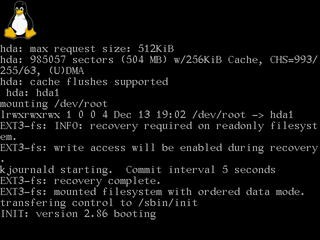
Then several screens of text will fly past as Linux begins to load. Just wait until you see the Sugar desktop shown later.
Then it will go to a login prompt. You don't have to type anything. Just wait and it will start the GUI. If you don't want to wait for the GUI to load, you can log in with username "root" and no password.
If you wait, the GUI will start. If the GUI fails to start, you may have forgotten to choose emulated when you booted, or you may have encountered the "GUI won't start" bug. The "GUI won't start" bug is fixed by reinstalling the hard disk image. (Or it may be because of a bug in the image file, see http://dev.laptop.org/ticket/1295). In QEMU, delete the .img file (it has become corrupted), and extract the original .img file from the bz2 file, or download the image file again. Upgrading to a later version isn't necessary.
Choosing a name and colors
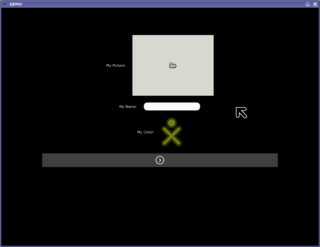
The first time Sugar starts it will show a screen where you must type in a username and choose icon colors. (In some pre-303 builds, you also need to select a picture.) You must type in a username; currently the name is used infrequently, but it will appear in a hover over your iconic representation in the mesh view—on your laptop and on other XOs on the same mesh network. The icon colors have been randomly chosen; you can change them by clicking in the XO icon: keep clicking until you get an acceptable color combination. (This will be made interactive in later builds.) Press Enter or click on the ">" button to continue.
Getting Started with the Sugar Desktop
Home Mode
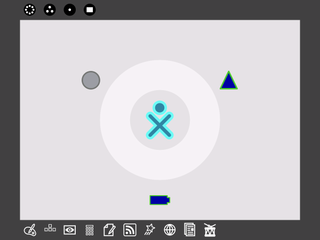
The Sugar desktop starts up in Home mode. This shows an XO icon, representing you and your laptop, in the centre of the screen. Surrounding it is a ring.
Later on we will see many XO icons, representing many people, but at the moment we can only see you. Each person is a different colour.
Around the outside of the ring are a few seemingly random placed icons: a battery, a triangle, and/or a circle. The battery icon shows how charged your laptop battery is (less color = less charge). The triangle appears if you are connected to a wireless access point. The circle appears if you are connected to a wireless mesh. (Or something like that -- none of this is documented.)
On the current G1G1 distributed machines, instead of a triangle, wireless access points may appear as an (orange) circle. If you have a wireless access point but are not yet connected, you may be able to connect using the neighborhood view button (f1, see diagram below), and clicking on the orange circle in the new view.
The Frame Is How You Control Sugar
The "Frame", a black border around the edge of the screen, is where many of Sugar's controls are. The frame can appear and disappear, making more room on the screen for activities. It is usually visible on the main screen with the ring, since the edges of that screen aren't used for anything else. If it is not visible, move your mouse pointer to a corner of the screen. The Frame will appear, and will stay visible as long as the mouse pointer doesn't leave the frame area for more than about half a second at a time.
You can also make the Frame appear or disapper by pressing the upper rightmost key on the OLPC keyboard (it has a rectangle on it, like a picture frame).
Opening an Activity
Sugar uses "activities" rather than "applications".
For example a web browser is a type of activity in Sugar. The ring around you shows which activities are running. At the moment there are no activities running, so the ring is empty.
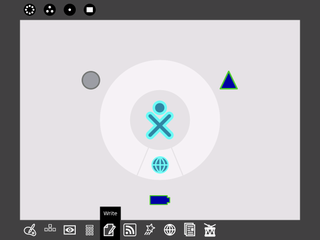
So let's open an activity. To open an activity, look at the bottom of the frame, where there are some icons. These are the activities that you can open.
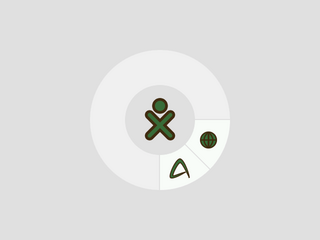
For example, Write (a word processsor based on AbiWord) is shaped like a sheet of paper with a pencil on it. To open an activity, click on its icon. A copy of the icon will move up into the ring, and pulse while the application starts up.
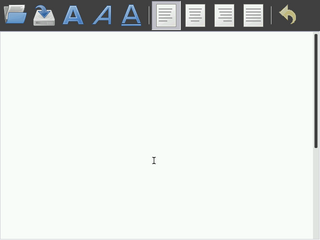
After a few seconds a new screen will appear. (The screen image to the right is from an old version of Write; it's been improved since we took that screen shot).
You can open several activities at the same time, by going to the bottom of the frame, and clicking on another icon. You can only see or interact with one of them at once.
Switching View Modes
To see which activities are open, go to the frame, and in the top, near the left corner, you will see four "Zoom Icons".
There are three different levels of "zoom", so you can see not just yourself and your activities, but also your friends, or everyone on the local network.
- Neighborhood Shows everyone in the "Neighborhood", and what activities they are sharing.
- Friends Shows only you and your friends, and their activities.
- Home Shows only you and your activities
- Bulletin Board Toggles an extra transparent layer on top of the view, where you can add comments and stick items, like an old-fashioned bulletin board, that you want to share with everyone in that view.
Click on the "Home" view (The disc with a single dot inside) or press F3 on the keyboard.
If you have a real OLPC laptop, you can also change the zoom mode by pressing the appropriate button on the top of your keyboard, shown here.
Now you will see your XO icon in the center, and the Web icon in the surrounding circle.
Switching Between Activities
If you have more than one activity running, you can switch to it by clicking on the appropriate icon in the ring.
The size of the ring segment that an activity occupies is intended to represent its overall memory usage, but that feature does not work yet. When the ring fills up, no additional activities may be launched until some resources are freed up. In today's XO laptops, only a few activities can be started at the same time, and when memory is exhausted, one of them will die suddenly without any warning. Note: it is possible that work or play that is in progress may be lost.
There are currently ten activities on the frame. (The picture to the right is out of date.)
| | | | | ||||||
|---|---|---|---|---|---|---|---|---|---|
| Squeak Etoys dynamic media authoring system | Web Browser | Camera, a basic camera test | TamTam Play music and record compositions | Paint Image painting | BlockParty Game: blocks drop out of the sky, you arrange them | Calc Calculator | [News Reader] RSS Newsreader | Write Word processor | Read Book reader |
Closing or Sharing Activities
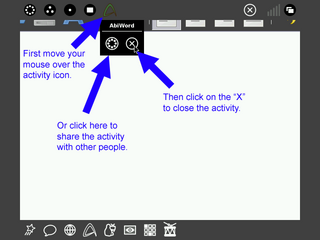
To close an activity that's already open, select it from the ring (for example, Write) if it is not already visible on the screen.
Then go to the top of the frame. You will see the activity's icon (e.g. the Write icon) at the top of the frame, near the center.
Move your mouse on the icon but don't click. Hover there for a moment. A little menu will appear below it.
Click on the "X-in-a-disc" icon to close the activity.
In the future you will be able to share an activity with other people, by clicking on a "Disc of a few dots" icon in the same menu. Currently that doesn't work. If it did, you could find out more about sharing activities with others, by reading about Neighborhood View Mode.
Internet Access
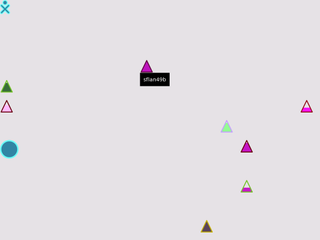
The Neighborhood view is intended to show you other machines and people that are connected to you via the wireless Internet built into the laptop. Each machine is represented by a different color combination.
The screen will hold a scattering of icons, placed randomly just to make life interesting. Note: May be uninteresting to have to search for your friends; perhaps sugar should allow arranging the icons in some order. Or use named corrals or playpens for your friends. The view will have an "XO" icon in it somewhere, representing your laptop, in the colors that you chose the first time you used Sugar. There may be other XO icons in different colors, representing other peoples' laptops. If there are any standard 802.11b wireless access points within range, you'll see a triangle for each one (in random colors). Each triangle may only be partly colored, showing that your laptop is receiving a faint signal from that access point. You'll also see a circle in more random colors, representing the "wireless mesh", which we'll explain later. These icons may move around or change every once in a while, seemingly at random.
There's more information "hidden" inside each icon. If you hover the mouse pointer over it, a little pop-up menu will tell you things. For example, each access point triangle has a name (its "SSID" or "ESSID"). You can't see these names all the time, but each one will pop up if you put the mouse on that triangle. The pop-up for XO icons will show you the name of that laptop (as entered into it when you first ran Sugar). The pop-up for the circle (the wireless mesh) doesn't have any useful information.
Your laptop won't be able to access the Internet until you tell it how to connect. If you want to use a standard wireless access point, you'll have to find its icon first. Hover over each visible icon for a moment, until you see the SSID of your access point. Then click on that access point to select it for use by your laptop. (It would be simpler if access points were always labeled with their names, but that would violate some deeply held belief of the Sugar designers.) If your access point is only partly colored, due to a low signal, you may be able to improve the signal by moving the laptop's antenna "ears", or by moving the whole laptop a few centimeters in some direction. It's hard to tell whether you are making things better or worse, though, because the icon's signal strength indication only updates every once in a long while, and there's no way to ask what the signal strength is "now".
If you are accessing the Internet via the wireless mesh, click on the circle. This will only work if there is another computer on the mesh which has been set up to relay to the Internet.
The icon for whatever method your laptop is currently using to access the Internet will blink slowly.
If the selected wireless network offers an IP address via DHCP, the laptop will use IPv4. If the network offers router discovery packets, the laptop will use IPv6. It can use both versions of TCP/IP at once.
There are bugs in the wireless access Sugar interface, and/or in the kernel drivers and/or firmware. Some people find it more reliable to get a terminal window and use traditional Unix commands to configure their Internet access. (For example, "iwconfig eth0 essid my-access-point-name; ifup eth0"). Please report any bugs that you find, so that we can make wireless Internet access work more reliably.
If wireless Internet access does not work well for you, the laptop is also able to connect to a wired Ethernet via a small USB adapter. See USB ethernet adaptors before you buy one, to find out which brands work with our kernel software drivers. Wired ethernet interfaces are not configured with the Neighborhood screen. Plug the Ethernet cable into the USB adapter, then plug the USB adapter into your laptop. The laptop will stop using its wireless radio, and switch to using the wired Ethernet. But beware: if you later go into the Neighborhood screen and click on anything there, Sugar will disable your wired Ethernet. Your laptop is perfectly capable of using multiple network interfaces, but Sugar will only enable one at a time.
Web Browser
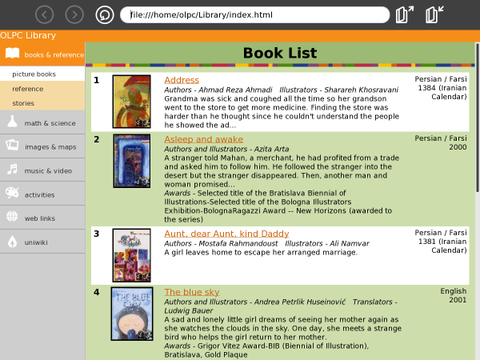
The Sugar Web browser is started by the clicking the wireframe globe icon in the bottom frame. ![]()
The browser uses a small bit of code from Mozilla Firefox, but is much more limited than Firefox.
It has a simple interface. It has one toolbar across the top, with back, forward, and reload buttons. There is a single box which sometimes holds the page title, sometimes holds the URL, and sometimes has a progress bar. It has two "book" icons, one with an out-arrow, for "Open", and one with an in-arrow, for "Save".
You can navigate by moving the mouse cursor over words or objects on the screen. Whenever the cursor changes into a pointing hand, clicking on that object will follow a "link" to some other web page. The laptop comes with a built-in library of books, stories, images, music, and other works. The same browser can also access pages over the Internet.
When you click on the title box, it will change to showing the URL of the current page. You can type in a new URL address and press Enter to make the browser go there. (Sometimes you'll have to click it two or three times before it will let you type.) The title box also shows the loading progress as a bar in the background.
Don't confuse the controls at the top with the similar looking Sugar frame. You can still move the cursor to the corner of the screen (or use the Frame key on the keyboard) to pop in the frame. To close the web browser, make the frame appear, hover over the colored globe icon in the middle of the top frame, and choose close (X in a disc) from the drop down menu.
This browser can only view one web page at a time. You can't keep a copy of one page, go off and look at a second page, and come back to the first one, without a lot of manual work.
There is a way to download files into the laptop. If you click on a link and the browser doesn't recognize its data type, it will be downloaded instead. The Frame will briefly pop in; downloads appear in the frame at the left edge of the screen. If you hover the cursor over the icon that appears there, more information will pop up. While it's downloading, there'll be a progress bar and a "Stop" menu (an X in a disc). The Stop menu doesn't appear to work. After a download has finished, there's a "Remove" menu (a dash in a disc). The Remove menu removes the icon from the left frame, but does not seem to remove the downloaded file. Downloaded files will end up in the /tmp directory on the laptop; you should move them elsewhere (by using a Linux shell) if you want to keep them permanently.
The Save command will save a copy of the currently displayed web page. letting you specify where it goes in the laptop's file system. The Open command will view a previously saved web page, popping up a file system navigation interface sure to confuse the naive user.
If you cannot get an internet connection in the sugar browser, and you're on the laptop, see Sugar Instructions#Internet Access above. If you're using QEMU, look here.
Terminal, Shell, or Linux Prompt
You can access a shell in two ways... Either hold down Ctrl+Alt+F1 to leave the Sugar screen and return to the text console's login prompt, or open the Developer Console activity within Sugar and select the terminal tab. Note: Don't do this when using the QEMU emulator - the result is that QEMU hangs and you have to forcibly restart your machine.
If you use Ctrl+Alt+F1 to leave Sugar, you can return to Sugar with Ctrl+Alt+F3. Note: do not attempt to do this at this time (12/1/2007) while running under QEMU. The machine hangs up and you must forcibly reboot.
If you use the terminal in the Developer Console, you won't be logged in as "root" but as "olpc". You need to be logged in as "root" to edit some of the setup files, such as "/boot/grub/grub.conf". You can gain root access by typing "su -". The prompt suffix will change to # which denotes that you are root. You will not be able to start any graphical programs as root using this method.
For example, if you want to edit "/boot/grub/grub.conf" with Write in Sugar, hold down Ctrl+Alt+F1 to leave Sugar, and type "root" for the log in. Type "chmod a+rw /boot/grub/grub.conf". Then return to Sugar by holding down Ctrl+Alt+F3. Now you can open and save that file in Write. However, for system control files, using "vi" in a terminal window is a much better choice than Write.
Some basic shell commands you can use at the prompt are:
- ls -al (get a list of the files)
- cd dirname (change to directory dirname)
- cat filename (show the contents of filename)
Friends View Mode
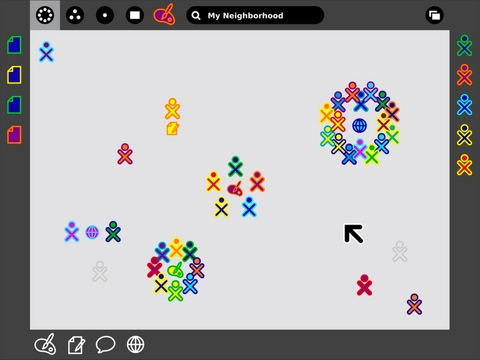
Friends mode is intended to show you other people connected on the network. Currently it doesn't work at all. Later, it will also show you which activities they are running, and which activities are being shared. Each person is represented by a different color combination.
The activities are colour coded with the colours of whoever started the activity. In this case the painting activity was started by the orange and purple girl, who you can see surrounding the orange and purple activity in the Friends view in the middle of that screen.
The left frame is the clipboard. You can copy multiple items to the clipboard.
The right frame is your buddy list. It shows your friends that are online.
The bottom frame is like the windows start menu that you use for launching applications. The icons represent different activities that you can start. In the above screen shot, the activities are from left-to-right: painting, word processor, chat, and web browser. You will also have other activities on your laptop. A shooting star icon will represent Squeak e-toys, which is a fun visual programming and drawing application.
When you receive an invitation from your friend to join an activity, it will appear in the bottom frame in colour. A pop-up menu lets you accept or reject the invitation. Notifications may also appear in the bottom frame.
The top of the frame has the icons for "neighborhood", "friends", "home", and "bulletin board", just like on the keyboard. It also has something like the Windows "task bar" with the icons for the currently running activities.
We are considering adding functionality to the friends view to allow one to collect "favorite" access points.
Shortcut Keys
You can use the following shortcut keys in Sugar:
- F1 : Zoom to Neighborhood view
- F2 : Zoom to Friends view
- F3 : Zoom to Home view
- F4 : Zoom to Activity view
The following key combinations use modifier keys. For example "Alt+f" means "Hold down the 'Alt' key, then press the 'f' key, then release both keys."
- Alt+f : Toggle the frame
- Alt+r : Rotate the screen
- Alt+q : Quit Sugar when running within a development environment (i.e. not when running an emulator image or on an OLPC laptop)
- These combinations do not work in Sugar on a Stick.
The following Linux key combinations can be used when running Sugar in an emulator image or on an OLPC laptop:
- Ctrl+Alt+F1 (hold down) : Leave the Sugar screen, and go to the Linux prompt, so you can log in as "root" with no password.
- Ctrl+Alt+F3 (hold down) : Return to the Sugar screen
- Ctrl+Alt+Backspace : Terminate Sugar immediately without closing down properly. It will restart automatically in the background (use Ctrl+Alt+F3 to see it restarted).
Note: The shortcut keys seem to change with some regularity--apparently the most accurate information is found in the Sugar README or the source.
To take a screenshot:
- Use alt+1 to take the screenshot.
- In the journal, select 'Image' from the first dropdown menu. It would show you recent screenshots. Click on a screenshot and using the copy button (top toolbar, second button from the right) copy it to a USB device.
Shutting Down the System
To shut down the whole system, simply push the power button on the bezel; it's below the lower right corner of the screen. This currently only works when the screen is showing graphics (as it is now). The system should leap to action immediately, and turn itself off within half a minute or so. If this doesn't happen, you can also force a power-off by pressing and holding the power button for a few seconds.
Sugar Activities
This list provides more information about the activities available or under development.
Under the Hood
Detailed description of the Sugar Interface
For more info on the Sugar interface, have a look at the Human User Interface Guidelines.
