XO-1.75: Difference between revisions
(Add bare details about GPU (from web research)) |
No edit summary |
||
| (29 intermediate revisions by 7 users not shown) | |||
| Line 2: | Line 2: | ||
{{TOCright}} |
{{TOCright}} |
||
The [[Hardware#XO-1.75_Laptop|XO-1.75 laptop]] is a refresh of the [[Hardware#XO-1_Laptop|XO-1]] and [[Hardware#XO-1.5_Laptop|XO-1.5]] laptops. |
The [[Hardware#XO-1.75_Laptop|XO-1.75 laptop]] is a refresh of the [[Hardware#XO-1_Laptop|XO-1]] and [[Hardware#XO-1.5_Laptop|XO-1.5]] laptops, using an [https://en.wikipedia.org/wiki/ARM_architecture ARM processor]. In order to maintain a low price point, OLPC is again refreshing its hardware to take advantage of new components. This design uses the same ultra-low-power design as the [[XO-3]] tablet, within the industrial design and batteries of the [[Hardware#XO-1_Laptop|XO-1]]. Power consumption and purchase cost are both lower than the XO-1.5 |
||
XO-1.75 machines |
XO-1.75 machines ship with a [[Releases|new software release]] based on Fedora 18, including both [http://sugarlabs.org Sugar] and [http://gnome.org GNOME] software. |
||
== Identification == |
== Identification == |
||
[[Image:XO-1.75_siblings.jpg|400px|center]] |
[[Image:XO-1.75_siblings.jpg|400px|center]] |
||
The XO-1.75 laptops are identified by a set of seven dots on both sides of the hinge cover. |
The XO-1.75 laptops are identified by a set of seven dots on both sides of the hinge cover as can be seen on the image. |
||
[[Image:XO-1.75_Hinge_Cover.jpg|thumb|right|XO-1.75 Hinge Cover]] |
[[Image:XO-1.75_Hinge_Cover.jpg|thumb|right|XO-1.75 Hinge Cover]] |
||
== Specifications == |
== Specifications == |
||
| ⚫ | |||
[[Image:Olpc XO dim-Optimized.png|thumb|Dimensioned Drawing of XO, click to enlarge]] |
[[Image:Olpc XO dim-Optimized.png|thumb|Dimensioned Drawing of XO, click to enlarge]] |
||
The definitive XO-1.75 laptop specification is only available in [[Media:CL2_Hdwe_Design_Spec.pdf|PDF form]] ("CL2" is the model identifier in the [[manufacturing data]] for the XO-1.75 hardware). |
|||
::''The specs below are not authoritative, please refer to the PDF version of the spec linked above.'' |
::''The specs below are not authoritative, please refer to the PDF version of the spec linked above.'' |
||
| Line 22: | Line 21: | ||
===Physical dimensions=== |
===Physical dimensions=== |
||
* Approximate dimensions: 245mm × 230mm × 30.5mm (see drawing to the right for detailed dimensions) |
* Approximate dimensions: 245mm × 230mm × 30.5mm (see drawing to the right for detailed dimensions) |
||
* Approximate weight with LiFePO4 battery: 1. |
* Approximate weight with LiFePO4 battery: 1.36KG (~3lbs); |
||
* Configuration: Convertible laptop with pivoting, reversible display; dirt- and moisture-resistant system enclosure; no fan. |
* Configuration: Convertible laptop with pivoting, reversible display; dirt- and moisture-resistant system enclosure; no fan. |
||
===Core electronics=== |
===Core electronics=== |
||
| ⚫ | |||
XO-1.75 is designed around the [http://www.marvell.com/application-processors/armada-600/armada-610.jsp Armada 610] system on a chip. |
XO-1.75 is designed around the [http://www.marvell.com/application-processors/armada-600/armada-610.jsp Armada 610] system on a chip. |
||
| Line 42: | Line 42: | ||
** externally accessible full-size SD card slot; |
** externally accessible full-size SD card slot; |
||
** No rotating media. |
** No rotating media. |
||
| ⚫ | |||
| ⚫ | |||
{{anchor|Display}} |
{{anchor|Display}} |
||
| Line 53: | Line 52: | ||
:(1) Grayscale (B&W) reflective mode: for outdoor use—sunlight-readable; primarily lit from the front by ambient light; high-resolution (200 DPI), 1200(H) × 900(V) grayscale pixels; power consumption 0.1–0.2Watts; |
:(1) Grayscale (B&W) reflective mode: for outdoor use—sunlight-readable; primarily lit from the front by ambient light; high-resolution (200 DPI), 1200(H) × 900(V) grayscale pixels; power consumption 0.1–0.2Watts; |
||
:(2) Color, backlight mode: for indoor use; primarily lit from behind by the LED backlight; built in sub-pixel sampling of the displayed color information results in a perceived resolution of approximately [http://pixelqi.com/blog1/2008/05/27/higher-resolution-than-we-thought-the-xo-laptop-screen/ 984(H) × 738(V)]; power consumption 0.2–1.0Watts; |
:(2) Color, backlight mode: for indoor use; primarily lit from behind by the LED backlight; built in sub-pixel sampling of the displayed color information results in a perceived resolution of approximately [http://pixelqi.com/blog1/2008/05/27/higher-resolution-than-we-thought-the-xo-laptop-screen/ 984(H) × 738(V)]; power consumption 0.2–1.0Watts; |
||
* The [[DCON|display-controller chip (DCON)]] formats data for the display. |
* The [[DCON|display-controller chip (DCON)]] formats data for the display. ( [[Media:DCON_datasheet_HX8837-A.pdf|DCON Datasheet]] ) |
||
: ''Note: web browser images are currently scaled up so that an image of very roughly [800 × 600] fills up the browser window.'' |
: ''Note: web browser images are currently scaled up so that an image of very roughly [800 × 600] fills up the browser window.'' |
||
===eBook Reader=== |
|||
The screen can pivot and folded backwards so the XO becomes an ebook reader. Several buttons on the frame offer different modes of paging, scrolling, etc. This position is also used for playing games certain games. |
|||
===Integrated peripherals=== |
===Integrated peripherals=== |
||
| Line 74: | Line 76: | ||
** Marvell 88w8686 WLAN module, with SDIO interface, on removable module; |
** Marvell 88w8686 WLAN module, with SDIO interface, on removable module; |
||
** Remains powered while the laptop suspends, waking the laptop if a packet addressed to it arrives. |
** Remains powered while the laptop suspends, waking the laptop if a packet addressed to it arrives. |
||
** Ad-hoc networking |
** Ad-hoc networking available |
||
* [[Accelerometer]]: ST |
* [[Accelerometer]]: ST LIS3DH three axis accelerometer ([http://www.st.com/internet/com/TECHNICAL_RESOURCES/TECHNICAL_LITERATURE/DATASHEET/CD00274221.pdf data sheet (PDF)]) |
||
* Status indicators: |
* Status indicators: |
||
** Power, battery, Wi-Fi, one software controlled (intended for onboard flash access), visible with lid open or closed; |
** Power, battery, Wi-Fi, one software controlled (intended for onboard flash access), visible with lid open or closed; |
||
| Line 92: | Line 94: | ||
===Battery=== |
===Battery=== |
||
* Pack type: 2 cell LiFePO4, approx. |
* Pack type: 2 cell LiFePO4, approx. 6.5V series configuration; |
||
* Capacity: |
* Capacity: 2800 mAh; |
||
* Fully-enclosed “hard” case; user removable; |
* Fully-enclosed “hard” case; user removable; |
||
* Electronics integrated with the pack provide: |
* Electronics integrated with the pack provide: |
||
| Line 123: | Line 125: | ||
* 2-3mm plastic walls (1.3mm is typical for most systems). |
* 2-3mm plastic walls (1.3mm is typical for most systems). |
||
=== |
===Certifications=== |
||
* Detailed at [[XO_1.75_Certifications|XO-1.75 Certifications]] |
|||
* The usual US and EU EMI/EMC (electromagnetic-interference and electromagnetic-compatibility) requirements; |
|||
* The laptop meets IEC 60950-1, EN 60950-1, and CSA/UL 60950-1 (safety) specifications. It also complies with UL 1310 and UL 498. In order to guarantee the safety of children using the laptop, it passes ASTM F 963 (Standard Consumer Safety Specification on Toy Safety, 2003 edition); |
* The laptop meets IEC 60950-1, EN 60950-1, and CSA/UL 60950-1 (safety) specifications. It also complies with UL 1310 and UL 498. In order to guarantee the safety of children using the laptop, it passes ASTM F 963 (Standard Consumer Safety Specification on Toy Safety, 2003 edition); |
||
* The external power adapter complies with IEC, EN, and CSA/UL 60950-1; |
* The external power adapter complies with IEC, EN, and CSA/UL 60950-1; |
||
* The removable battery pack complies with IEC, EN, and CSA/UL 60950-1 and UL 2054; |
* The removable battery pack complies with IEC, EN, and CSA/UL 60950-1 and UL 2054; |
||
* RoHS (Restriction of Hazardous Substances Directive – EU) compliant. |
|||
== Block Diagram == |
== Block Diagram == |
||
| Line 140: | Line 141: | ||
* [[Embedded_controller|Embedded controller (EC)]] firmware, (see [[#Upgrading_OFW]] below). |
* [[Embedded_controller|Embedded controller (EC)]] firmware, (see [[#Upgrading_OFW]] below). |
||
Open Firmware automatically upgrades the EC firmware at boot time, if the installed version is older than the version included in Open Firmware. The laptop must have both a charged battery and external power supplied at boot time for this to happen. |
|||
As usual, |
As usual, the operating system image automatically upgrades Open Firmware if necessary. |
||
===Upgrading OFW=== |
===Upgrading OFW=== |
||
XO-1.75 use |
XO-1.75 laptops use Q4Dxx firmware releases. These will not work on an XO-1 or XO-1.5. The current firmware release for XO-1.75 can be found at [[Firmware#XO-1.75]]. |
||
To upgrade the version of [[Open Firmware]], place a recent release of the Q4XYY firmware onto an SD device, and place it in the external SD slot, or on a USB drive. |
To upgrade the version of [[Open Firmware]], place a recent release of the Q4XYY firmware onto an SD device, and place it in the external SD slot, or on a USB drive. |
||
| Line 153: | Line 154: | ||
Type: |
Type: |
||
flash ext:\ |
flash ext:\q4cNN.rom |
||
Or for a USB drive: |
Or for a USB drive: |
||
flash u:\ |
flash u:\q4cNN.rom |
||
The laptop will automatically reboot. |
The laptop will automatically reboot. |
||
| Line 166: | Line 167: | ||
===Upgrading EC=== |
===Upgrading EC=== |
||
This is now done automatically by |
This is now done automatically by Open Firmware. |
||
However, if you need to do it manually ... download the latest EC code from: [http://dev.laptop.org/pub/ec/ http://dev.laptop.org/pub/ec/]. It should be prefixed by "cl2" (e.g. cl2-4.0.2.02.img). Place this file on a USB drive or SD card, and insert it into the laptop being reprogrammed. |
However, if you need to do it manually ... download the latest EC code from: [http://dev.laptop.org/pub/ec/ http://dev.laptop.org/pub/ec/]. It should be prefixed by "cl2" (e.g. cl2-4.0.2.02.img). Place this file on a USB drive or SD card, and insert it into the laptop being reprogrammed. |
||
From |
From Open Firmware, type: |
||
flash-ec u:\your_filename.img |
flash-ec u:\your_filename.img |
||
| Line 183: | Line 184: | ||
* were previously available at [http://build.laptop.org/F14-arm/ http://build.laptop.org/F14-arm/], the last being os42, |
* were previously available at [http://build.laptop.org/F14-arm/ http://build.laptop.org/F14-arm/], the last being os42, |
||
====Installing from |
====Installing from Open Firmware using USB==== |
||
You will need the .zd version of the OS image. Download it, then: |
You will need the .zd version of the OS image. Download it, then: |
||
# Place the image on a USB stick, and insert it into any of the XO-1.75 laptop's USB ports. |
# Place the image on a USB stick, and insert it into any of the XO-1.75 laptop's USB ports. |
||
| Line 190: | Line 191: | ||
fs-update u:\os19.zd |
fs-update u:\os19.zd |
||
====Installing from |
====Installing from Open Firmware using SD card==== |
||
You will need the .zd version of the OS image. Download it, then: |
You will need the .zd version of the OS image. Download it, then: |
||
# Place the image on an SD card, and insert it into the XO-1.75 laptop's external SD slot. |
# Place the image on an SD card, and insert it into the XO-1.75 laptop's external SD slot. |
||
| Line 202: | Line 203: | ||
... and then power down, remove the SD card, and insert it in the XO-1.75. |
... and then power down, remove the SD card, and insert it in the XO-1.75. |
||
====Installing from |
====Installing from Open Firmware using an XO-1.5==== |
||
You will need the .zd version of the OS image. Download it, then: |
You will need the .zd version of the OS image. Download it, then: |
||
# Place the image on a USB stick, and insert it into the XO-1.5 laptop's USB port. |
# Place the image on a USB stick, and insert it into the XO-1.5 laptop's USB port. |
||
| Line 231: | Line 232: | ||
== More Information == |
== More Information == |
||
* [[XO_1.75_Certifications|Safety and RF Certifications]] |
|||
* [[XO_1.75_C2|XO-1.75 C2]] production version |
* [[XO_1.75_C2|XO-1.75 C2]] production version |
||
* [[XO_1.75_C1|XO-1.75 C1]] pre-production prototype |
* [[XO_1.75_C1|XO-1.75 C1]] pre-production prototype |
||
* [[XO_1.75_B1|XO-1.75 B1]] pre-production prototype |
* [[XO_1.75_B1|XO-1.75 B1]] pre-production prototype |
||
* [[XO1.75_Tinderbox_Power|Power Measurements]] |
|||
* [[XO_1.75_Motherboard|Motherboard photos]] |
* [[XO_1.75_Motherboard|Motherboard photos]] |
||
* [[XO_1.75_JTAG|JTAG Interface]] |
|||
* [[Firmware#XO-1.75|Firmware]] |
* [[Firmware#XO-1.75|Firmware]] |
||
* [[Forth_Lesson_20#ARM_Startup|Open Firmware ARM Startup]] |
* [[Forth_Lesson_20#ARM_Startup|Open Firmware ARM Startup]] |
||
| Line 242: | Line 246: | ||
For firmware, operating system and kernel debugging a [[Serial_adapters|serial adapter]] is required. We are using our third generation serial adapter with the XO-1.75, which has 3.3V serial on the target side, and a USB B socket on the host side. |
For firmware, operating system and kernel debugging a [[Serial_adapters|serial adapter]] is required. We are using our third generation serial adapter with the XO-1.75, which has 3.3V serial on the target side, and a USB B socket on the host side. |
||
[[Image:1.75_serial_connector.png|thumbnail|Location of serial port]] |
|||
To use the serial port, [[Disassembly_top|disassemble the laptop (instructions)]] and connect the serial adapter to the motherboard using the at the point shown. The heat spreader does not have to be removed. |
|||
[[Category:Hardware]] |
[[Category:Hardware]] |
||
Latest revision as of 04:21, 4 March 2014
The XO-1.75 laptop is a refresh of the XO-1 and XO-1.5 laptops, using an ARM processor. In order to maintain a low price point, OLPC is again refreshing its hardware to take advantage of new components. This design uses the same ultra-low-power design as the XO-3 tablet, within the industrial design and batteries of the XO-1. Power consumption and purchase cost are both lower than the XO-1.5
XO-1.75 machines ship with a new software release based on Fedora 18, including both Sugar and GNOME software.
Identification
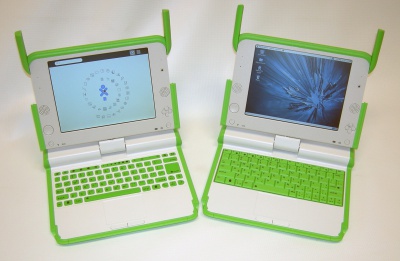
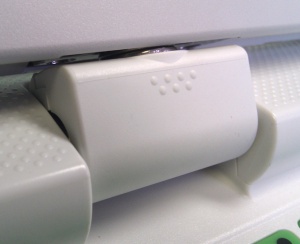
The XO-1.75 laptops are identified by a set of seven dots on both sides of the hinge cover as can be seen on the image.
Specifications
The definitive XO-1.75 laptop specification is only available in PDF form ("CL2" is the model identifier in the manufacturing data for the XO-1.75 hardware).
- The specs below are not authoritative, please refer to the PDF version of the spec linked above.
Physical dimensions
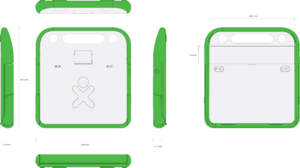
- Approximate dimensions: 245mm × 230mm × 30.5mm (see drawing to the right for detailed dimensions)
- Approximate weight with LiFePO4 battery: 1.36KG (~3lbs);
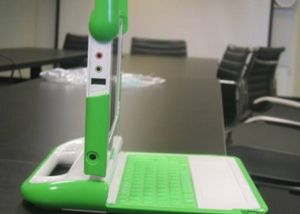
- Configuration: Convertible laptop with pivoting, reversible display; dirt- and moisture-resistant system enclosure; no fan.
Core electronics
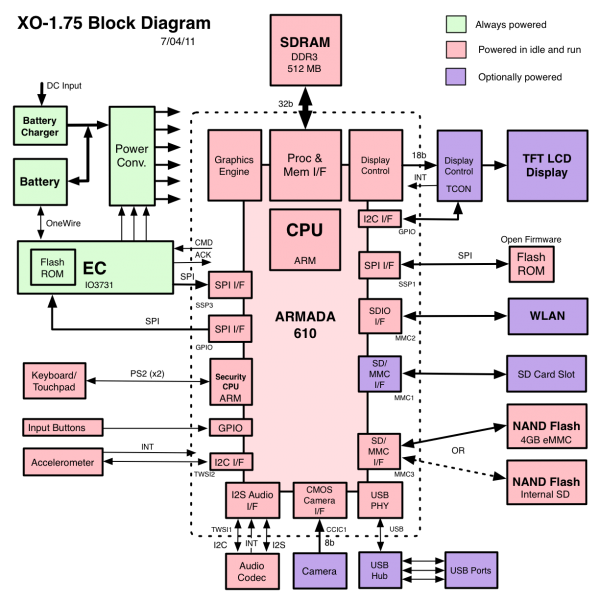
XO-1.75 is designed around the Armada 610 system on a chip.
- CPU: Marvell Sheeva ARM (PJ4);
- CPU clock speed: 800 MHz (superscalar and out-of-order instruction execution);
- ARM instruction set compatible (including Thumb-2 and Wireless MMX2);
- ARMv7 architecture compatible;
- 32 KB L1 I-cache, 32 KB L1 D-cache, 256KB L2 cache;
- The 610 includes hardware video encode/decode, a Vivante GC1000 3D graphics engine, display controller, USB, SDIO, and other system interface and management functions
- DRAM memory: 512 MB or 1GB DDR3 dynamic RAM;
- Mass storage: 4 GiB or 8GiB NAND flash in an eMMC device soldered to the motherboard.
- an internal microSD card slot for repair/replacement -- requires soldering the microSD bracket;
- externally accessible full-size SD card slot;
- No rotating media.
Display
- Main article: Display
- Liquid-crystal display: 7.5” dual-mode TFT display;
- Viewing area: 152.4 mm × 114.3 mm;
- Two "modes" depending on lighting conditions:
- (1) Grayscale (B&W) reflective mode: for outdoor use—sunlight-readable; primarily lit from the front by ambient light; high-resolution (200 DPI), 1200(H) × 900(V) grayscale pixels; power consumption 0.1–0.2Watts;
- (2) Color, backlight mode: for indoor use; primarily lit from behind by the LED backlight; built in sub-pixel sampling of the displayed color information results in a perceived resolution of approximately 984(H) × 738(V); power consumption 0.2–1.0Watts;
- The display-controller chip (DCON) formats data for the display. ( DCON Datasheet )
- Note: web browser images are currently scaled up so that an image of very roughly [800 × 600] fills up the browser window.
eBook Reader
The screen can pivot and folded backwards so the XO becomes an ebook reader. Several buttons on the frame offer different modes of paging, scrolling, etc. This position is also used for playing games certain games.
Integrated peripherals
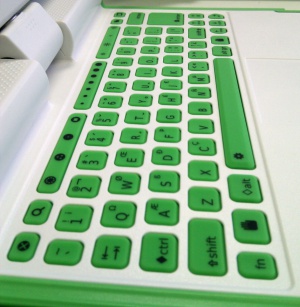
- Keyboard: 80+ keys, 1.0mm stroke; sealed rubber-membrane key-switch assembly;
- Keyboard Layouts
- Layout pictures: English, Arabic, Thai, West African (Nigeria), Portuguese, Spanish, Amharic, French, Urdu, Cyrillic, Turkish (not final), Nepali, Mongolian, Kazakh, Devanagari, Uzbek, Pashto, Dari, Pulaar (Fula), Italian
- A non-membrane "traditional" keyboard is also available.
- Gamepad: Two sets of four-direction cursor-control keys;
- Touchpad: Capacitance touchpad
- Audio: Internal stereo speakers and amplifier; internal monophonic microphone; jacks for stereo external headphones and microphones.
- Realtek ALC5631 audio codec (I2S)
- Camera: integrated color video camera; 640 x 480 resolution at 30 FPS;
- Independent (and undefeatable by software) display of microphone and camera recording status;
- The camera and device driver support disabling AGC and automatic color balancing, to enable its use as a photometric sensor for educational applications;
- Omnivision OV7670
- Wireless Networking: Integrated 802.11b/g (2.4GHz) interface; dual adjustable, rotating antennas;
- Marvell 88w8686 WLAN module, with SDIO interface, on removable module;
- Remains powered while the laptop suspends, waking the laptop if a packet addressed to it arrives.
- Ad-hoc networking available
- Accelerometer: ST LIS3DH three axis accelerometer (data sheet (PDF))
- Status indicators:
- Power, battery, Wi-Fi, one software controlled (intended for onboard flash access), visible with lid open or closed;
- Microphone In-Use, and Camera In-Use, visible when lid is open.
- Light Sensor: a reverse biased LED.
External connectors
- DC power: 6mm (1.65mm center pin) connector; 11 to 24 V input usable, –32 to +40V input tolerated; power draw limited to 25 W; - see power connector dimensions at Battery and power.
- Maximum Power Point Tracking alters voltage/current for maximum battery-charging power from solar panels
- Headphone output: standard 3.5mm 3-pin switched stereo audio jack;
- Microphone input: standard 3.5mm 3-pin switched stereo microphone jack; selectable 2V DC bias; selectable sensor-input mode (DC or AC coupled);
- USB: Three Type-A USB 2.0 connectors; Up to 1A power supplied (total, available through a single connector);
- Flash Expansion: full-size SD Card slot.
Battery
- Pack type: 2 cell LiFePO4, approx. 6.5V series configuration;
- Capacity: 2800 mAh;
- Fully-enclosed “hard” case; user removable;
- Electronics integrated with the pack provide:
- Identification;
- Battery charge and capacity monitoring chip (Maxim DS2756 data sheet);
- Thermal and over-current sensors along with cutoff switch to protect battery;
- Minimum 2,000 charge/discharge cycles (to 50% capacity of new).
See Laptop Batteries or more information.
BIOS/loader
On XO-1.75, there are two different firmwares installed:
- A small bootloader written in Forth and interpreted by CForth runs on the security processor
- Open Firmware runs on the main (PJ4) processor
The bootloader run by the CForth interpreter on the security processor is responsible for initializing the SoC pins and the main memory. It then loads Open Firmware into main memory and starts it executing on the main processor. This CForth bootloader then continues to execute on the security processor, processing input from the keyboard and touchpad.
Open Firmware (OFW) initializes the system peripherals, then loads the OS kernel into memory and starts executing it. OFW also includes hardware diagnostics.
- A dedicated 1 MiB SPI-interface flash ROM contains both CForth (first 128KB) and OFW;
- Hardware support is provided to prevent reprogramming of the OFW flash ROM by malicious software;
Environmental specifications
- Temperature: 0 to 50 degrees Celsius (operating); -20 to 60 degrees Celsius (non-operating)
- Humidity: UL certification planned to IP42 when closed, the unit should seal well enough that children walking to and from school need not fear rainstorms and dust;
- Maximum altitude: –15m to 3048m (14.7 to 10.1 PSIA) (operating), –15m to 12192m (14.7 to 4.4 PSIA) (non-operating);
- Shock 125g, 2ms, half-sine (operating) 200g, 2ms, half-sine (non-operating);
- Random vibration: 0.75g zero-to-peak, 10Hz to 500Hz, 0.25 oct/min sweep rate (operating); 1.5g zero-to-peak, 10Hz to 500Hz, 0.5 oct/min sweep rate (nonoperating);
- 2-3mm plastic walls (1.3mm is typical for most systems).
Certifications
- Detailed at XO-1.75 Certifications
- The laptop meets IEC 60950-1, EN 60950-1, and CSA/UL 60950-1 (safety) specifications. It also complies with UL 1310 and UL 498. In order to guarantee the safety of children using the laptop, it passes ASTM F 963 (Standard Consumer Safety Specification on Toy Safety, 2003 edition);
- The external power adapter complies with IEC, EN, and CSA/UL 60950-1;
- The removable battery pack complies with IEC, EN, and CSA/UL 60950-1 and UL 2054;
Block Diagram
Software
There are three distinct pieces of software on the XO-1.75:
- Operating System and user interface, (see #Upgrading_Linux below),
- Open Firmware (OFW), (see #Upgrading_OFW below),
- Embedded controller (EC) firmware, (see #Upgrading_OFW below).
Open Firmware automatically upgrades the EC firmware at boot time, if the installed version is older than the version included in Open Firmware. The laptop must have both a charged battery and external power supplied at boot time for this to happen.
As usual, the operating system image automatically upgrades Open Firmware if necessary.
Upgrading OFW
XO-1.75 laptops use Q4Dxx firmware releases. These will not work on an XO-1 or XO-1.5. The current firmware release for XO-1.75 can be found at Firmware#XO-1.75.
To upgrade the version of Open Firmware, place a recent release of the Q4XYY firmware onto an SD device, and place it in the external SD slot, or on a USB drive.
Interrupt the Open Firmware (OFW) boot process by pressing the ESC key.
Type:
flash ext:\q4cNN.rom
Or for a USB drive:
flash u:\q4cNN.rom
The laptop will automatically reboot.
If you need to do this to a bare motherboard, you can use the flash! command which skips the tests for two sources of power.
If the version of OFW installed on the laptop isn't working, you might be able to upgrade it using CForth or using JTAG.
Upgrading EC
This is now done automatically by Open Firmware.
However, if you need to do it manually ... download the latest EC code from: http://dev.laptop.org/pub/ec/. It should be prefixed by "cl2" (e.g. cl2-4.0.2.02.img). Place this file on a USB drive or SD card, and insert it into the laptop being reprogrammed.
From Open Firmware, type:
flash-ec u:\your_filename.img
If you need to do this to a bare motherboard, you can use the flash-ec! command which skips the tests for two sources of power.
Upgrading Linux
Linux images for the XO-1.75:
- are available at http://build.laptop.org/11.3.1/ ... select the highest number and then xo-1.75, the first being os10,
- are available at http://download.laptop.org/11.3.0 ... as build os883/Release 11.3.0, without suspend and resume.
- were previously available at http://build.laptop.org/11.3.0/ ... the first being os4, the last being os8,
- were previously available at http://build.laptop.org/F14-arm/, the last being os42,
Installing from Open Firmware using USB
You will need the .zd version of the OS image. Download it, then:
- Place the image on a USB stick, and insert it into any of the XO-1.75 laptop's USB ports.
- Get the Ok prompt,
- Install onto the internal SD card, by typing:
fs-update u:\os19.zd
Installing from Open Firmware using SD card
You will need the .zd version of the OS image. Download it, then:
- Place the image on an SD card, and insert it into the XO-1.75 laptop's external SD slot.
- Get the Ok prompt,
- Install onto the internal SD card, by typing:
fs-update ext:\os19.zd
Installing from Linux using an XO-1.5
To install on an XO-1.5, boot an XO-1.5 to Linux, insert the SD card in the XO-1.5 external slot, then:
zcat os19.img.gz > /dev/mmcblk1
... and then power down, remove the SD card, and insert it in the XO-1.75.
Installing from Open Firmware using an XO-1.5
You will need the .zd version of the OS image. Download it, then:
- Place the image on a USB stick, and insert it into the XO-1.5 laptop's USB port.
- Get the Ok prompt,
- To install onto the internal SD card, type:
fs-update u:\os41.zd
To install an image onto the external SD card, you need to type:
devalias fsdisk ext:0
fs-update u:\os41.zd
... and then power down, remove the SD card, and insert it in the XO-1.75.
Software Restrictions
- the Write activity hangs the laptop when it scrolls, <trac>11321</trac>, <trac>11399</trac>, <trac>11450</trac>,
- suspend and resume are being worked on <trac>10835</trac> <trac>11194</trac> <trac>11142</trac>, are in build os15, but there are some problems,
- loss of wireless <trac>11510</trac>,
- corruption of cursor <trac>11491</trac> (looks like a QR code),
- loss of touchpad function <trac>11486</trac> <trac>11496</trac> <trac>11379</trac>, and
- slightly higher power consumption because DRAM driver terminators remain on,
- audio support in the kernel is being worked on, is in build os15, but there are some problems, such as Record will not record audio, and plugging headphones in does not turn off the speakers <trac>11409</trac>,
- graphics performance is not yet tuned, <trac>10830</trac>,
(list last reviewed for os15)
More Information
- Safety and RF Certifications
- XO-1.75 C2 production version
- XO-1.75 C1 pre-production prototype
- XO-1.75 B1 pre-production prototype
- Power Measurements
- Motherboard photos
- JTAG Interface
- Firmware
- Open Firmware ARM Startup
Serial Adapter
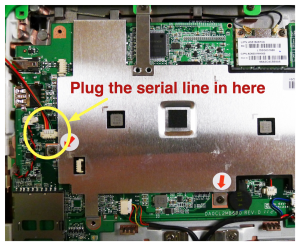
For firmware, operating system and kernel debugging a serial adapter is required. We are using our third generation serial adapter with the XO-1.75, which has 3.3V serial on the target side, and a USB B socket on the host side.
To use the serial port, disassemble the laptop (instructions) and connect the serial adapter to the motherboard using the at the point shown. The heat spreader does not have to be removed.
