XOrduino/bootloader: Difference between revisions
< XOrduino
Jump to navigation
Jump to search
Tonyforster (talk | contribs) No edit summary |
Tonyforster (talk | contribs) No edit summary |
||
| Line 1: | Line 1: | ||
The bootloader can be installed using another Arduino |
The bootloader can be installed using another Arduino, first install the Arduino IDE onto your laptop: |
||
sudo yum install arduino |
sudo yum install arduino |
||
you are then given the option of upgrading to version 1.0.1, note where you save to (in my case /home/olpc/arduino-1.0.1/) |
you are then given the option of upgrading to version 1.0.1, note where you save to (in my case /home/olpc/arduino-1.0.1/), version21 starts from the Gnome Applications menu but to start version 1.0.1 do the following: |
||
$ su |
$ su |
||
| Line 20: | Line 20: | ||
* Tools/Programmer Arduino as ISP |
* Tools/Programmer Arduino as ISP |
||
* Tools/Burn bootloader |
* Tools/Burn bootloader |
||
If the burning of the bootloader is successful, the yellow LED on the XOrduino will end up flashing once a second. |
|||
Revision as of 06:30, 6 November 2012
The bootloader can be installed using another Arduino, first install the Arduino IDE onto your laptop:
sudo yum install arduino
you are then given the option of upgrading to version 1.0.1, note where you save to (in my case /home/olpc/arduino-1.0.1/), version21 starts from the Gnome Applications menu but to start version 1.0.1 do the following:
$ su
bash-4.1# /home/olpc/arduino-1.0.1/arduino
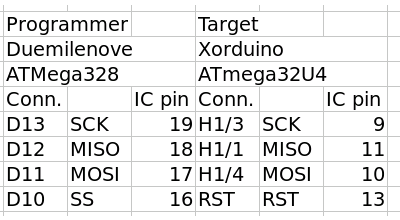
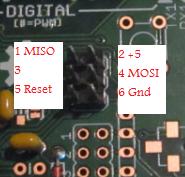
The programming technique is described at [1] but the pins are different, see the diagrams below
- Load arduinoISP from the examples
- Tools/board to match the Arduino being used as a programmer
- Upload
- Tools/board Leonardo (the XOrduino)
- Tools/Programmer Arduino as ISP
- Tools/Burn bootloader
If the burning of the bootloader is successful, the yellow LED on the XOrduino will end up flashing once a second.

