Emulating the XO/Quick Start/Mac: Difference between revisions
(Mention need to clean up, missing "Enabling SSH" section. Link to Emulating the XO/Mac.) |
(cosmetics + cleanup) |
||
| Line 1: | Line 1: | ||
This page needs some cleaning to become a nice quickstart. Non-quickstart mac-specific content can be moved to [[Emulating the XO/Mac]]. The mentioned "Enabling SSH" section was missing even before this was copied here. If found, it can go in [[Emulating the XO]]. [[User:MitchellNCharity|MitchellNCharity]] 03:34, 24 May 2007 (EDT) |
This page needs some cleaning to become a nice quickstart. Non-quickstart mac-specific content can be moved to [[Emulating the XO/Mac]]. The mentioned "Enabling SSH" section was missing even before this was copied here. If found, it can go in [[Emulating the XO]]. [[User:MitchellNCharity|MitchellNCharity]] 03:34, 24 May 2007 (EDT) |
||
== Installing QEMU for MacOS-X == |
|||
[[User:Bert|Bert]]: I successfully ran OLPC on OS X using the following method on a Powerbook G4 (867 MHz), albeit very slowly. |
|||
You should already have an [[OS images#Latest Stable Build|XO build image]]. |
|||
[[User:Justin|Justin]]: Likewise, I successfully ran the latest disk image (Build 385) through QEMU on OS X (10.4) on and Intel Apple using the instructions below. |
|||
The port of [[Qemu]] for MacOSX is called '''Q''' and can be found in [http://kju-app.org/kju/ kju-app.org]. Download and install '''Q.app''' [http://kju-app.org/kju/index.php?p=dd&build=Q-0.8.1a35.dmg stable version 0.8.1a35]. Other builds are here: [http://www.kberg.ch/q/builds/ kberg.ch/q/builds/] |
|||
*Download a disk image (build 59 worked, 73 did not), double-click to unzip. (Note: See point (1) in Section "Enabling SSH" below before choosing an image.) |
|||
*Double-click Q.app [[Media:Q_empty.jpg|Example]] |
|||
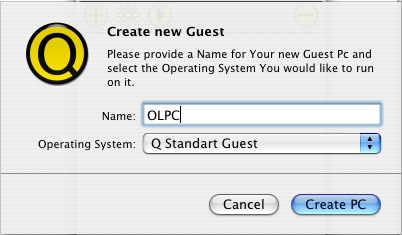
*Click (+) to add a new PC [[Media:Q_create_new_guest.jpg|Example]] |
|||
** Name: OLPC |
|||
| ⚫ | |||
** Click (Create PC) |
|||
*Configure Settings: |
|||
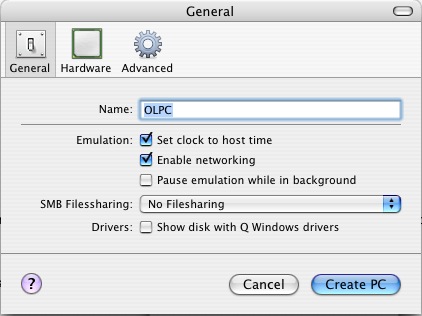
** General: No file sharing [[Media:Q_general_prefs.jpg|Example]] |
|||
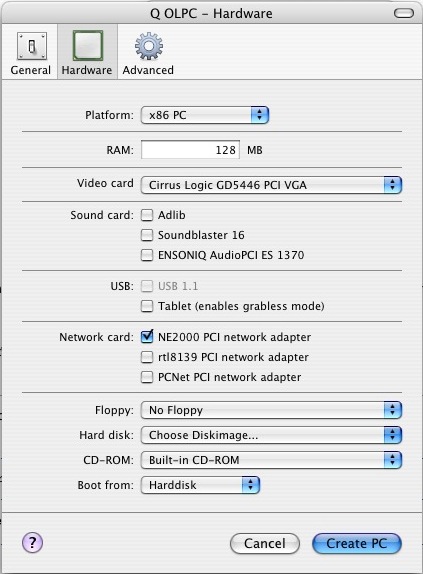
** Hardware - Hard disk: Select your unzipped disk image [[Media:Q_hardware_prefs.jpg|Example]] |
|||
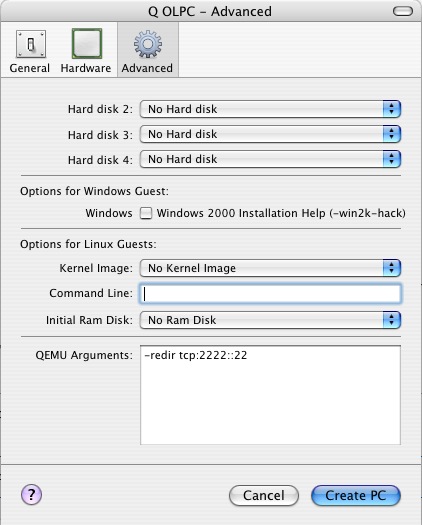
** Advanced - QEMU Arguments: type "-redir tcp:2222::22" (without quotes) [[Media:Q_advanced_prefs.jpg|Example]] |
|||
** Click (Create PC) |
|||
*Double-click "OLPC" to run: |
|||
** press space to get into GRUB, [[Media:Grub_start.png|Example]] |
|||
**choose "OLPC for Qemu Target", [[Media:Grub_choose_qemu.png|Example]] |
|||
| ⚫ | |||
**select "kernel" line, and press "e", [[Media:Grub_choose_the_line.png|Example]] |
|||
**add "single" option at the end of the line, [[Media:Grub_edit_the_line.png|Example]] |
|||
| ⚫ | |||
** set some root password (necessary for SSH), sync (Note: See point (2) in Section "Enabling SSH" below) |
|||
** reboot (power-off button or run "init 6") |
|||
*once it's up, from a terminal, log into OLPC using "ssh -p 2222 root@localhost" (Note: See point (3) in Section "Enabling SSH" below) |
|||
=== Setting up === |
|||
[[User:Jonb|Jonb]]: I had trouble running this using Q.app. I guess Q.app doesn't have USB 1.1 support for "real" USB devices yet http://www.kju-app.org/proj/wiki/KjuUSBSupport. Their documentation says something about using the USB Tablet to emulate the mouse, no idea what this is about. The result is that I do not get a keyboard in OLPC on my G4 Mac (USB Keyboard, obviously). I assume [[User:bert]] got it to work using his PowerBook because PCMCIA emulation works? |
|||
[[Image:Q empty.jpg|thumb|left|Q.app]] <!-- |
|||
[[User:Shekay|Shekay]]: I was able to run Q.app from the command line. for example: |
|||
[[Image:Q create new guest.jpg|100px|right]] |
|||
[[Image:Q general prefs.jpg|100px|right]] |
|||
[[Image:Q hardware prefs.jpg|100px|right]] |
|||
[[Image:Q advanced prefs.jpg|100px|right]] --> |
|||
Click on the '''(+)''' button to create a new guest: |
|||
'''[[Media:Q create new guest.jpg|Create new Guest]]: Name:''' OLPC |
|||
| ⚫ | |||
-- click '''(Create PC)''' -- |
|||
Proceed to configure its preferences: |
|||
'''[[Media:Q general prefs.jpg|General Prefs]] | SMB Filessharing:''' No file sharing |
|||
'''[[Media:Q hardware prefs.jpg|Hardware Prefs]] | Hard disk:''' ''Select your unzipped build image'' |
|||
'''[[Media:Q advanced prefs.jpg|Advanced Prefs]] | QEMU Arguments:''' -redir tcp:2222::22 |
|||
-- click '''(Create PC)''' -- |
|||
<br clear="all"> |
|||
== Starting OLPC Environment == |
|||
| ⚫ | |||
Double click on the newly created "<tt>OLPC</tt>" to launch a window for it. |
|||
; NOTE : what follows may not be required. If you happen to do with or without it, please let us know in the [[Talk:{{PAGENAME}}|discussion page]] (signing it) so this section can be updated accordingly. |
|||
[[Image:Grub start.png|100px|left]] — press "<tt>space</tt>" to get into GRUB |
|||
<br clear="all"> |
|||
[[Image:Grub_choose_qemu.png|100px|left]] — choose "<tt>OLPC for Qemu Target</tt>", |
|||
| ⚫ | |||
<br clear="all"> |
|||
[[Image:Grub choose the line.png|100px|left]] — select "<tt>kernel</tt>" line, and press "<tt>e</tt>" |
|||
<br clear="all"> |
|||
[[Image:Grub_edit_the_line.png|100px|left]] — add "<tt>single</tt>" option at the end of the line |
|||
| ⚫ | |||
<br clear="all"> |
|||
== Advanced == |
|||
You may encounter some issues [http://www.kju-app.org/proj/wiki/KjuUSBSupport supporting USB devices]. |
|||
You can run '''Q.app''' from the command line: |
|||
| ⚫ | |||
=== Ctrl-Alt combos in Qemu (or Q.app) === |
|||
{{cleanup}} |
|||
: ''This section about keys should go somewhere else...'' |
|||
According to [[Sugar Instructions#Terminal, Shell, or Linux Prompt|Sugar Instructions]] you need to "hold down <tt>Ctrl+Alt+F1</tt> to leave the Sugar screen and return to the login prompt" and then "you can return to Sugar with <tt>Ctrl+Alt+F7</tt>". Unfortunately for me the "<tt>Ctrl+Alt</tt>" action seems to be grabbed by the Q.app "mouse pointer ungrab" functionality. |
|||
Under Linux, this will be grabbed by the X server running on your computer, and not the one running in the emulator, and will switch your own computer to a terminal. |
|||
The other method(s) suggested for opening a terminal activity didn't work for me either (OLPC build 239). I eventually discovered that Q.app actually has a "Monitor" accessible by "<tt>ctrl-alt-2</tt>". When in this monitor mode you can send key-presses directly to the OLPC emulation by using the "sendkey" command. For example: |
|||
sendkey ctrl-alt-f1 # to switch to the shell |
|||
sendkey ctrl-alt-f7 # to return to Sugar |
|||
Note: you will need to exit the monitor mode and return to the emulated machine by pressing "<tt>ctrl-alt-1</tt>" once you type either of the above commands. |
|||
Note: you type the ''name'' of the keys to send, you don't actually press the keys. |
|||
Revision as of 16:48, 24 May 2007
This page needs some cleaning to become a nice quickstart. Non-quickstart mac-specific content can be moved to Emulating the XO/Mac. The mentioned "Enabling SSH" section was missing even before this was copied here. If found, it can go in Emulating the XO. MitchellNCharity 03:34, 24 May 2007 (EDT)
Installing QEMU for MacOS-X
You should already have an XO build image.
The port of Qemu for MacOSX is called Q and can be found in kju-app.org. Download and install Q.app stable version 0.8.1a35. Other builds are here: kberg.ch/q/builds/
Setting up
Click on the (+) button to create a new guest:
Create new Guest:              Name:  OLPC
                   Operating System:  Q Standard Guest
                -- click (Create PC) --
Proceed to configure its preferences:
 General Prefs | SMB Filessharing:  No file sharing
Hardware Prefs |        Hard disk:  Select your unzipped build image
Advanced Prefs |   QEMU Arguments:  -redir tcp:2222::22
                -- click (Create PC) --
Starting OLPC Environment
Double click on the newly created "OLPC" to launch a window for it.
- NOTE
- what follows may not be required. If you happen to do with or without it, please let us know in the discussion page (signing it) so this section can be updated accordingly.

— press "space" to get into GRUB

— choose "OLPC for Qemu Target",
— press "e" to edit commands,

— select "kernel" line, and press "e"

— add "single" option at the end of the line
— hit "return", then "b" to boot
Advanced
You may encounter some issues supporting USB devices.
You can run Q.app from the command line:
- $ /Applications/Q.app/Contents/MacOS/i386-softmmu.app/Contents/MacOS/i386-softmmu -hda olpc/olpc-redhat-stream-development-devel_ext3.img -serial stdio
Ctrl-Alt combos in Qemu (or Q.app)
- This section about keys should go somewhere else...
According to Sugar Instructions you need to "hold down Ctrl+Alt+F1 to leave the Sugar screen and return to the login prompt" and then "you can return to Sugar with Ctrl+Alt+F7". Unfortunately for me the "Ctrl+Alt" action seems to be grabbed by the Q.app "mouse pointer ungrab" functionality.
Under Linux, this will be grabbed by the X server running on your computer, and not the one running in the emulator, and will switch your own computer to a terminal.
The other method(s) suggested for opening a terminal activity didn't work for me either (OLPC build 239). I eventually discovered that Q.app actually has a "Monitor" accessible by "ctrl-alt-2". When in this monitor mode you can send key-presses directly to the OLPC emulation by using the "sendkey" command. For example:
  sendkey ctrl-alt-f1       # to switch to the shell
  sendkey ctrl-alt-f7       # to return to Sugar
Note: you will need to exit the monitor mode and return to the emulated machine by pressing "ctrl-alt-1" once you type either of the above commands.
Note: you type the name of the keys to send, you don't actually press the keys.