Fix Clock: Difference between revisions
(Clarified repair procedure) |
|||
| Line 4: | Line 4: | ||
Laptops with this problem show one of two symptoms: |
Laptops with this problem show one of two symptoms: |
||
# The power LED turns on, but the screen never turns on (not even the backlight). The microphone LED may flash briefly, but stays off. This symptom can only happen with OFW versions Q2D05 and Q2D06. |
|||
# The laptop screen lights up and shows "Invalid System Date" and then powers off. This symptom can happen with any OFW version, but Q2D05 and Q2D06 usually exhibit the first symptom instead. |
|||
The problem is caused by bad date information stored in the Real Time Clock (RTC) chip. There are three ways that the date could become bad: |
|||
According to Mitch Bradley, there are three different issues with RTC date: |
|||
* The factory did not set the date. This is rare. |
|||
* The user explicitly set the date to an incorrect value, either by mistake or as an attempt to defeat activation security. This is also rare. |
|||
* The RTC chip lost all power. This should have been rare, because the RTC chip has a "coin cell" backup battery that powers the RTC chip when the AC and the main battery are not present. Unfortunately, some of the early production machines were manufactured with a defective holder for the coin cell battery. On those machines, the coin cell battery can become loose or even pop out entirely during normal shipping and handling. |
|||
"RTC chip lost power" is by far the most common cause of the problem. |
|||
* Prior to Q2D05, the firmware would turn on the screen, but wouldn't let you boot anything if the RTC date was less than Aug 2007 |
|||
* >= Q2D05 will still display the message saying that the date is wrong, but will proceed to boot actos. |
|||
* Q2D06 will not turn on the screen at all if the RTC month field is 0. |
|||
| ⚫ | |||
Early production machines had firmware version Q2D04, Q2D05, and Q2D06, which had a bug that caused the machine not to start if the Real Time Clock chip's date had been reset to 0. This could happen if that chip lost all power, including its backup power from an internal "coin cell" battery. |
|||
Fixing the problem has three phases: |
|||
To make matters worse, some of the early units were manufactured with defective holders for that coin cell battery, so that the battery could became loose or even pop out entirely. |
|||
* Securing the battery in the holder so the problem doesn't happen again |
|||
* Setting the date |
|||
* Updating Open Firmware to the current version |
|||
==What You Will Need== |
|||
To diagnose the problem, remove the back cover from the laptop (exposing the motherboard). If the coin cell battery is loose (you can easily remove it with your fingers) or out of its holder and the system is an early production unit, this is probably the problem. To be completely sure, you must connect a serial terminal to J1 on the motherboard, via a special low-voltage interface adapter. If the system has this problem, you will see "Page Fault" on the serial console shortly after power up. |
|||
To secure the battery, you will need a screwdriver to open the machine and some glue as described later in [[#Fix the loose battery]]. |
|||
| ⚫ | |||
The requirements for the rest of the repair depend on which of the two symptoms the system displays. |
|||
If you can't get a developer key for this machine, fixing this requires opening up the laptop and exposing its circuit boards, having a second laptop (XO or otherwise), *plus* having a unique little hardware board called a "serial to USB converter", and some skill in working with bare computer boards. The following instructions are for repair technicians, not for the public! |
|||
*If the screen does not turn on (symptom 1), you will a special hardware adapter - an [[Serial_adapters|OLPC serial adapter]] - and a second working computer (XO or otherwise). |
|||
*If the screen does turn on (symptom 2), you will need a [[Activation and Developer Keys#Getting a Developer Key if the Machine Won't Boot|"developer key"]] for this machine, on a USB storage stick. |
|||
| ⚫ | |||
==Accessing the Motherboard== |
==Accessing the Motherboard== |
||
| Line 71: | Line 76: | ||
==Fix the loose battery== |
==Fix the loose battery== |
||
First, you must re-seat the coin cell battery in its holder and secure it so it doesn't come out again. One way to secure it is to put a drop of glue where the battery contacts the holder, away from the metallic contact. The best glue that Mitch has found for this purpose is clear solvent-based household cement. Technically, it is "nitro cellulose" cement. It is also known as "model airplane glue", marketed under various trade names such as "Duco Cement" |
First, you must re-seat the coin cell battery in its holder and secure it so it doesn't come out again. One way to secure it is to put a drop of glue where the battery contacts the holder, away from the metallic contact. The best glue that Mitch has found for this purpose is clear solvent-based household cement. Technically, it is "nitro cellulose" cement. It is also known as "model airplane glue", marketed under various trade names such as "Duco Cement", "Tarzan's Grip". Loctite "Stik'n Seal", etc. (Alleskleber, in Germany, maybe?) The solvent in this kind of cement is toxic and flammable, so keep it away from children! Stronger adhesives like epoxy or cyanoacrylate (super glue) would probably work too, but it might be difficult to remove the battery later without damaging the holder. Don't even think of "Gorilla Glue"; that's polyurethane, which foams as it cures. RTV silicone would be good, except that the common variety releases corrosive acetic acid as it cures - if it smells like vinegar, don't use it on electronics. Ordinary "white glue" (PVA, or polyvinyl acetate) will probably work, but it flows easily and goes down underneath the battery - that is probably okay if you are careful not to use too much. Hot melt glue doesn't work, because it doesn't stick very well to these materials. |
||
==Serial Procedure - for symptom 1 (screen does not turn on)== |
|||
| ⚫ | |||
| ⚫ | |||
| ⚫ | |||
| ⚫ | |||
| ⚫ | |||
| ⚫ | |||
# The serial port settings should be 115200 baud, 8 data bits, no parity, and 1 stop bit |
# The serial port settings should be 115200 baud, 8 data bits, no parity, and 1 stop bit |
||
| Line 94: | Line 101: | ||
# Now, all you have to do is type: minicom USB0 (this will open minicom to the settings you want) |
# Now, all you have to do is type: minicom USB0 (this will open minicom to the settings you want) |
||
== |
===Getting to the prompt=== |
||
| ⚫ | |||
| ⚫ | |||
| ⚫ | |||
** If you don't see anything on the serial terminal, either |
|||
| ⚫ | |||
*** The serial terminal is not connected correctly, or |
|||
| ⚫ | |||
*** Something else is wrong with the machine - the machine is quite quite dead and it's not an instance of the symptom 1 RTC problem. |
|||
| ⚫ | |||
** If you see a lot of startup messages, but the last one isn't "Page Fault" followed by "ok", then the machine is largely working, but the problem is not symptom 1 RTC problem. If the screen comes on, you should be following the "Developer Key Procedure" below, not this serial procedure. |
|||
| ⚫ | |||
ok select /rtc |
|||
| ⚫ | |||
| ⚫ | |||
| ⚫ | |||
| ⚫ | |||
| ⚫ | |||
* The machine should reboot automatically afterwards. You can then remove the USB stick, and the system should work correctly. You can disconnect the serial adapter and reassemble the machine. |
|||
==Set the clock to the correct date== |
|||
==Developer Key Procedure - for symptom 2 (screen turns on)== |
|||
| ⚫ | |||
''All these commands are typed on the OLPC keyboard of the laptop that has the bad clock'' |
|||
# power up the laptop (one with the bad clock), and hit ‘i’ a bunch (on the laptop connected serially) after seeing ‘Forth’ (easy to miss, just re-try) |
|||
| ⚫ | |||
## ok debug secure-startup (sets a break point at secure startup) |
|||
## ok resume (runs and breaks at secure start up) |
|||
## f (gives a forth 'ok' prompt) |
|||
## ok clock-node @ iselect |
|||
| ⚫ | |||
| ⚫ | |||
# power off (the laptop with the bad clock), and try booting. |
|||
| ⚫ | |||
* Also put the [[Firmware|latest firwmare version]] on the USB storage stick |
|||
* Insert the USB stick into the laptop |
|||
* Power on the laptop |
|||
* When the screen says "Type the Esc key to interrupt automatic startup", type the upper left key on the XO keyboard before the countdown expires. You should get an "ok" prompt. (If you don't see that message, something is wrong with the developer key.) |
|||
* Type these commands to set the date (hitting enter after each one): |
|||
ok select /rtc |
|||
ok decimal |
|||
ok sec min hour day month year set-time (sec, min, hour, etc. should be numbers correlating to the current date) (e.g. 00 48 3 13 12 2007 set-time) |
|||
* Type this command to update the firmware, substituting the correct .rom filename: |
|||
ok flash u:\q2d16.rom |
|||
* The machine should reboot automatically afterwards. You can then remove the USB stick, and the system should work correctly. You can reassemble the machine. |
|||
[[Category:HowTo]] |
[[Category:HowTo]] |
||
Revision as of 22:53, 3 June 2008
This page is on how to fix the real-time clock on a secure laptop.
Problem Description
Laptops with this problem show one of two symptoms:
- The power LED turns on, but the screen never turns on (not even the backlight). The microphone LED may flash briefly, but stays off. This symptom can only happen with OFW versions Q2D05 and Q2D06.
- The laptop screen lights up and shows "Invalid System Date" and then powers off. This symptom can happen with any OFW version, but Q2D05 and Q2D06 usually exhibit the first symptom instead.
The problem is caused by bad date information stored in the Real Time Clock (RTC) chip. There are three ways that the date could become bad:
- The factory did not set the date. This is rare.
- The user explicitly set the date to an incorrect value, either by mistake or as an attempt to defeat activation security. This is also rare.
- The RTC chip lost all power. This should have been rare, because the RTC chip has a "coin cell" backup battery that powers the RTC chip when the AC and the main battery are not present. Unfortunately, some of the early production machines were manufactured with a defective holder for the coin cell battery. On those machines, the coin cell battery can become loose or even pop out entirely during normal shipping and handling.
"RTC chip lost power" is by far the most common cause of the problem.
Repair Process
Fixing the problem has three phases:
- Securing the battery in the holder so the problem doesn't happen again
- Setting the date
- Updating Open Firmware to the current version
What You Will Need
To secure the battery, you will need a screwdriver to open the machine and some glue as described later in #Fix the loose battery.
The requirements for the rest of the repair depend on which of the two symptoms the system displays.
- If the screen does not turn on (symptom 1), you will a special hardware adapter - an OLPC serial adapter - and a second working computer (XO or otherwise).
- If the screen does turn on (symptom 2), you will need a "developer key" for this machine, on a USB storage stick.
Accessing the Motherboard
Step 1
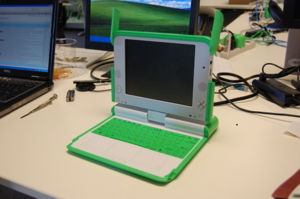
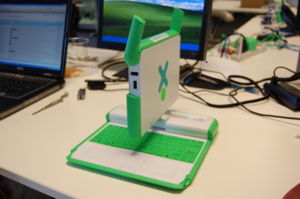
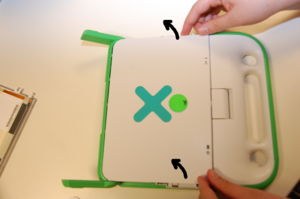
Open the laptop and flip the screen up. Rotate it a 90 degree angle as shown in the sequence below. Next, remove the screws from the bottom of the screen - there are two on each side (right/left) of the XO, so make sure to get all four.
Step 2
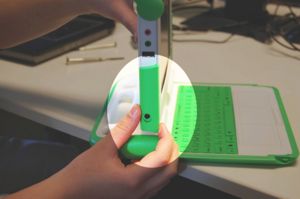
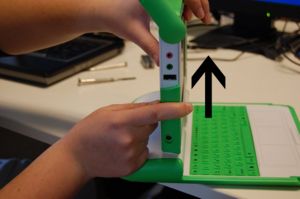
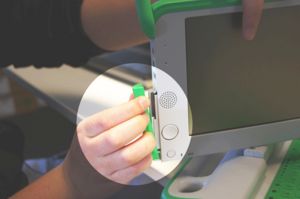
Remove the two green panels from the side of the XO. Slide them upwards and lift them off as shown.
Step 3
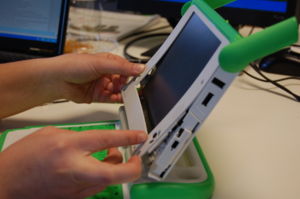
Finally, pull off the front panel. It is tabbed, so it can simply be pulled out. Pull the bottom out (where the screws came out), and gently slide the piece downwards and out.
Step 4
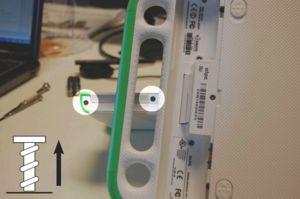
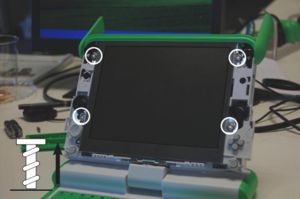
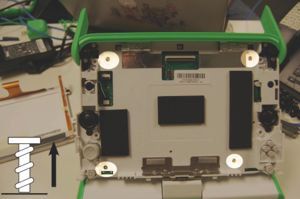
To get the screen out, remove the four screws highlighted.
Step 5
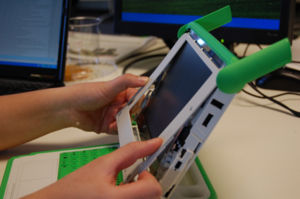
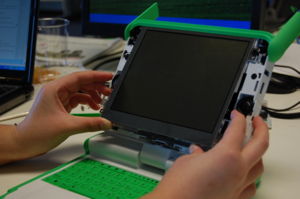
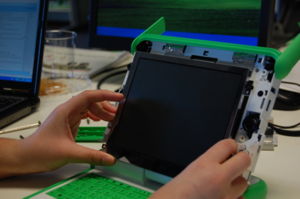
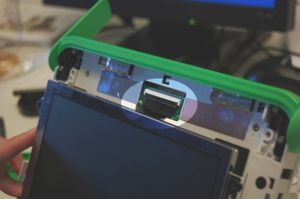
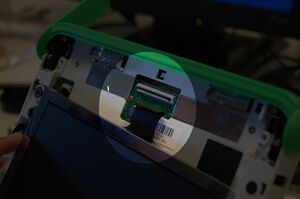
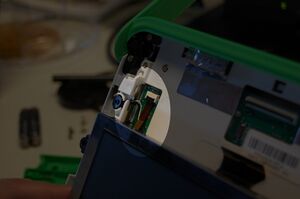
Next, carefully slide the screen out, pulling the bottom out. Do not tug it or let go, as it will still be connected to the motherboard by two cables.
Step 6
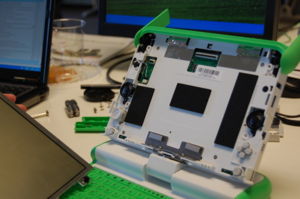
Access the motherboard by removing the back plate. Keep the screen out of the way until the replacement is complete.
Fix the loose battery
First, you must re-seat the coin cell battery in its holder and secure it so it doesn't come out again. One way to secure it is to put a drop of glue where the battery contacts the holder, away from the metallic contact. The best glue that Mitch has found for this purpose is clear solvent-based household cement. Technically, it is "nitro cellulose" cement. It is also known as "model airplane glue", marketed under various trade names such as "Duco Cement", "Tarzan's Grip". Loctite "Stik'n Seal", etc. (Alleskleber, in Germany, maybe?) The solvent in this kind of cement is toxic and flammable, so keep it away from children! Stronger adhesives like epoxy or cyanoacrylate (super glue) would probably work too, but it might be difficult to remove the battery later without damaging the holder. Don't even think of "Gorilla Glue"; that's polyurethane, which foams as it cures. RTV silicone would be good, except that the common variety releases corrosive acetic acid as it cures - if it smells like vinegar, don't use it on electronics. Ordinary "white glue" (PVA, or polyvinyl acetate) will probably work, but it flows easily and goes down underneath the battery - that is probably okay if you are careful not to use too much. Hot melt glue doesn't work, because it doesn't stick very well to these materials.
Serial Procedure - for symptom 1 (screen does not turn on)
Hook the laptop up to another one through the serial port
- Using an OLPC serial adapter, connect the laptop to your personal laptop
- Use a program like minicom (for Linux) or HyperTerminal (for Windows) to access the laptop serially
- The serial port settings should be 115200 baud, 8 data bits, no parity, and 1 stop bit
How to set up an XO as a serial terminal
- Install any build 650 or later
- Boot the laptop, and connect to the internet.
- Go to the terminal and: yum install minicom
- After it is done, type: minicom -s (to set up minicom)
- Go to 'Serial port setup' and hit enter.
- Press 'a' and change it to /dev/ttyUSB0, and then hit enter twice.
- Go to 'Modem and dialing' and hit enter.
- Clear the contents of both 'Init string' and 'Reset string' (you get to those by hitting 'a' and 'b'
- Hit enter to get back to the 'configuration' menu.
- Go to 'Save setup as..' and hit enter.
- Name the setup as 'USB0' and hit enter.
- Go to 'Exit from Minicom' and hit enter.
- Now, all you have to do is type: minicom USB0 (this will open minicom to the settings you want)
Getting to the prompt
All these commands are typed on the "other" laptop that is connected serially to the one with the bad clock
- Connect a serial terminal (115200,8,n,1) and power on the machine. You should see "Page Fault" on the serial terminal, followed by an "ok" prompt. If you don't see "Page Fault", there are several possibilities:
- If you don't see anything on the serial terminal, either
- The serial terminal is not connected correctly, or
- Something else is wrong with the machine - the machine is quite quite dead and it's not an instance of the symptom 1 RTC problem.
- If you see a lot of startup messages, but the last one isn't "Page Fault" followed by "ok", then the machine is largely working, but the problem is not symptom 1 RTC problem. If the screen comes on, you should be following the "Developer Key Procedure" below, not this serial procedure.
- If you don't see anything on the serial terminal, either
- To set the date, do the following commands at the ok prompt (hitting enter after each one):
 ok select /rtc
 ok decimal
 ok sec min hour day month year set-time (sec, min, hour, etc. should be numbers correlating to the current date) (e.g. 00 48 3 13 12 2007 set-time)
- Insert a USB key containing the latest firwmare version.
- To update the firmware, type the following command line at the ok prompt, substituting the correct .rom filename:
ok probe-pci probe-usb flash u:\q2d16.rom
- The machine should reboot automatically afterwards. You can then remove the USB stick, and the system should work correctly. You can disconnect the serial adapter and reassemble the machine.
Developer Key Procedure - for symptom 2 (screen turns on)
All these commands are typed on the OLPC keyboard of the laptop that has the bad clock
- Get a "developer key" for this machine and put it on a USB storage stick
- Also put the latest firwmare version on the USB storage stick
- Insert the USB stick into the laptop
- Power on the laptop
- When the screen says "Type the Esc key to interrupt automatic startup", type the upper left key on the XO keyboard before the countdown expires. You should get an "ok" prompt. (If you don't see that message, something is wrong with the developer key.)
- Type these commands to set the date (hitting enter after each one):
ok select /rtc
ok decimal
ok sec min hour day month year set-time (sec, min, hour, etc. should be numbers correlating to the current date) (e.g. 00 48 3 13 12 2007 set-time)
- Type this command to update the firmware, substituting the correct .rom filename:
ok flash u:\q2d16.rom
- The machine should reboot automatically afterwards. You can then remove the USB stick, and the system should work correctly. You can reassemble the machine.
