XO 4 C1: Difference between revisions
m (→Identification) |
|||
| Line 12: | Line 12: | ||
* Touchscreen units have a slightly recessed screen, with a narrow (1 mm) black stripe between the gray bezel and the display. |
* Touchscreen units have a slightly recessed screen, with a narrow (1 mm) black stripe between the gray bezel and the display. |
||
C1 laptops will be produced with a variety of keyboard, memory, eMMC storage, language, and other options. |
C1 laptops will be produced with a variety of keyboard, memory, eMMC storage, language, and other options. An [[Manufacturing_data#XO-4|SKU]] is assigned to a particular set of options, and identified in the battery compartment. |
||
Photographs: |
Photographs: |
||
Revision as of 04:26, 12 October 2012
XO-4 Touch Laptop C-stage test model, also known as C-test or C1.
Description
The C1 is the first attempt at a production ready version of the XO-4 Touch. The C1 bring up is scheduled for the beginning of November, 2012. Most C1 units are XO-4 Touch, having multi-touch touchscreens using touchscreen technology from Neonode, while some are simply XO-4, a slightly lower cost alternative.
Identification
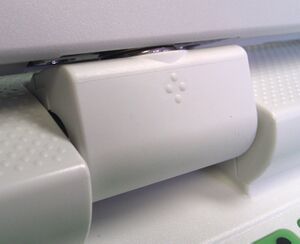
- Four bumps (arranged in a diamond shape) on the Hinge Cover.
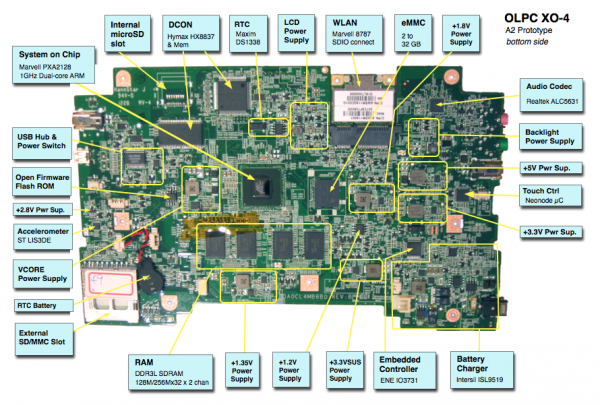
- Rev. D motherboard
- Touchscreen units have a slightly recessed screen, with a narrow (1 mm) black stripe between the gray bezel and the display.
C1 laptops will be produced with a variety of keyboard, memory, eMMC storage, language, and other options. An SKU is assigned to a particular set of options, and identified in the battery compartment.
Photographs:
Actually an A2 motherboard. Changes are minor, however. To be updated when new motherboards become available.
Software Support
- The current Linux image is called F18 build 4 (13.1.0, the target OS for production). Look for it at http://build.laptop.org/13.1.0/os5/xo-4/
- The current Open Firmware release is Q7B03.
- The Q7Bxx series of Open Firmware cannot be used with XO-4 A2 motherboards. Starting with XO-4 B1, the size of OFW is 2MBytes.
- This will not work on an XO-1, XO-1.5, or XO-1.75. As with XO-1.75, Open Firmware and the EC firmware are separate --- Open Firmware contains a recent version of the EC firmware and will automatically update an older version given two sources of power, but a more recent version may actually be programmed into the EC.
- The current EC Firmware release is 7.0.2.02.
It is strongly recommended that you have two sources of power (a charged battery and an external power source) when you upgrade your EC or Open Firmware. Failure to do so may require the use of an SPI programmer to recover your laptop.
Upgrading the EC code
Using Open Firmware and WiFi
- requires Q7B01 or later
ok wifi name
ok flash-ec http:\\dev.laptop.org\pub\ec\cl4-7_0_2_01.img
Reading http:\\dev.laptop.org\pub\ec\cl4-7_0_2_01.img
Scan for: name found
Associate with: name
DHCP got 10.0.0.170
EC firmware verison: XO-EC 7 0.2.01
Erasing ...

Writing ...
fff0
Verifying ...
fff0
Board powers down at this point due to EC restart. Power up manually.
Using Open Firmware
- requires Q7B01 or later
Place the EC firmware on a USB key and type:
ok flash-ec u:firmware-name
EC firmware verison: XO-EC 7 0.2.01
Erasing ...

Writing ...
fff0
Verifying ...
fff0
Board powers down at this point due to EC restart. Power up manually.
Upgrading OFW
Using a USB Stick
Place a recent release of the Q7XYY firmware onto a USB stick, and place it in one of the laptops USB ports. Provide external power to the laptop.
Interrupt the OFW boot process by pressing the ESC key.
Type (assuming a q7b02 release):
flash u:\q7b02.rom
Reboot by holding down the power button once this is completed.
Using an SD Card
Place a recent release of the Q7XYY firmware onto an SD device, and place it in the external SD slot. Provide external power to the laptop.
Interrupt the OFW boot process by pressing the ESC key.
Type (assuming a q7b02 release):
flash ext:\q7b02.rom
Reboot by holding down the power button once this is completed.
See SPI Flash Recovery using JTAG if necessary.
Upgrading Linux
Installing from Open Firmware
You will need the .zd version of the OS image. Download it, then:
- Place the image on a USB stick, and insert it into the XO-4 laptop's external SD slot.
- Get the Ok prompt,
- Install onto the internal SD card, type:
fs-update u:os1.zd
Installing from Linux using an XO-1.75
To install on an XO-1.75, boot an XO-1.75 to Linux, insert the SD card in the XO-1.75 external slot, then:
zcat os1.img.gz > /dev/mmcblk1
... and then power down, remove the SD card, and insert in the XO-4.
Installing from Open Firmware using an XO-1.75
You will need the .zd version of the OS image. Download it, then:
- Place the image on a USB stick, and insert it into the XO-1.75 laptop's USB port.
- Get the Ok prompt,
To install an image onto the external SD card, you need to type:
devalias fsdisk ext:0
fs-update u:\os1.zd
... and then power down, remove the SD card, and insert it in the XO-4.
Setting the Date
The simplest way to set the date after replacing/changing the RTC battery is boot into Open Firmware and type:
wifi <your_essid>
ntp-set-clock
Restrictions
There is a list of recommended modifications (ECOs).
Second serial port
As with XO-1.75, there is a second serial port provided for deep debugging of kernel issues. Unlike XO-1.75, this serial port is not populated by default. If you need to use this serial port, you will have to populate CN23, Q38, Q44, R408, R373, and R98. Like the main serial port, this one operates at +3.3V (using a voltage translator on the motherboard, as the actual SoC pins only tolerate +1.8V).
Documentation
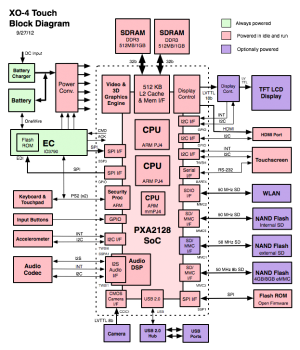
Supporting documentation for these boards (all in PDF):
Please note that production boards might have different pin mappings and connector locations.
See also:
- XO-4 Parts -- what SKU has what memory and eMMC chip
- XO-4 Touchscreen Testing
- XO-4 Memory Testing -- from CForth
- XO-1.75 JTAG -- XO-1.75 used the same JTAG connector
- SPI FLASH Recovery for XO-4 Using CForth
- SPI FLASH Recovery for XO-4 Using JTAG
- Debugging Open Firmware Startup
Followed by
- ?


