User:Mchua/Braindumps/upgrade draft
Contents
Getting 8.2.0 on your XO
So you want to get 8.2.0 on your XO! It has shiny new things.
If you want to wipe out everything on your XO and have fresh versions of the 8.2.0 release and Activities, see the "Making my XO like new" section. Your Journal entries will be lost - you are erasing all your data and starting over with the new software!
If you want to keep the work you've done in your Journal but get the new software, see the "Keep my work, but give me the new software" section. You will need to have your XO connected to the internet - otherwise, you will have to use the instructions above. When you upgrade to 8.2.0, you might not be able to use all the Activities you were using with the previous build, so you might not be able to use all your Journal entries if they were made using Activities that do not work with 8.2.0.
Making my XO like new
With Internet connectivity, you can prepare yourself to reflash (restore) an XO to its factory-default settings. This procedure is called a "clean-install" and is described in more detail at http://wiki.laptop.org/go/Clean-install_procedure. Clean-installing works by completely reformatting your XO with a software image stored on a USB storage device. YOU WILL LOSE ALL YOUR DATA!
What you will need
- A USB storage device that is at least 1GB in size. It should be empty.
- A computer with fast Internet access.
How long it will take
This depends on how fast your internet connection is. You will be downloading two special files that are about 300-400MB in size. On a fast internet connection, this should take less than an hour.
After you download these two files, you will put them on your USB storage device and then perform a reflashing process on your XO that will take about 10 minutes.
Preparing your USB Storage Device
- Download these files (do not open them - on a non-XO computer, you will usually want to do a right-click and "Save As."):
- You now have two files: gg-767.img and fs.zip. Copy these two files onto your USB storage device. They should be the only files there.
- Unmount the USB storage device and disconnect it from your computer when it is safe to do so.
Reflashing your XO
- Turn off your XO.
- Connect your USB storage device to your XO.
- Hold down all four gamepad keys (on the right side of the screen, above the power button). While continuing to hold down the four gamepad keys, push the power button to turn the XO on. Do not release the gamepad keys yet.
- When you see a message that tells you to "Release the game key to continue", release the gamepad keys.
- If you see a grid of colored boxes on your screen, congratulations - your XO is reflashing.
Finishing up
That's it! The reflashing process will run automatically. The XO will color in the grid of boxes, and then you will see the words "Rebooting in 10 seconds..." right before the XO reboots itself. You can remove the USB storage device after the XO reboots itself.
Your XO now has a clean image of release 8.2.0 along with the Activities that came with it. You can now choose a name and colors for your XO and then start playing with the Activities. Congratulations!
If something goes wrong
If you see a "Bad hash at eblock #0" message while reflashing your XO, it means there was a mistake copying the files to your USB storage device. You should try repeating these instructions again, but with a different USB storage device.
Keep my work, but give me the new software
- Determine which version your XO is running.
- Plug the XO into AC Power
- Connect XO to the internet
- Launch the update command
- Update activities
Step 1: Determine which version your XO is running
Follow these instructions to open a console window which shows you the current build (AKA release) which is running on your XO.
- Press ctrl+alt+F2 (the F2 key is the same as the Group key
 . The Ctrl key has a solid diamond on it (♦); the Alt key has an open diamond on it (♢). See Keyboard Shortcuts for more details.)
 - Read the build number from the first line of text that appears in the console window
Sample transcript:
OLPC build 656 (stream ship.2: variant devel_jffs2)
kernel 2.6.22-20070919.2.olpc.0987654321abcdefabcedf on an i586
xo-05-29-BB login:
The OS build number in the above example is 656.
To return to the Sugar graphical display press ctrl+alt+F3 . (The F3 key is the same as the Home key (![]() ).)
).)
Step 2: Plug the XO into AC Power
Upgrading could be a long process. For this reason, ensure first that your XO is connected to reliable AC Power. Be sure to have enough time to do the full process (about 1 hour).
Step 3: Connect XO to the internet
During the upgrade process, your XO will download the new release. So you should ensure that the XO is connected to the internet before launching the upgrade. See Connecting Guide or Wifi Connectivity for instructions. Use Browse activity to test your connection.
Step 4: Launch the update command
Open the Terminal Activity ![]() or a console and type the following (press the Enter key after each line):
or a console and type the following (press the Enter key after each line):
If your XO is on build 650, 653, or 656:
su -
olpc-update official-os860
If your XO is on build 703 or later:
sudo olpc-update official-os860
If the update program successfully connects to the update server, some messages should display similar to this:
Downloading contents of build official-os860
Updating to version hash xxxxxxxxxxxxxxxxxxxxxxxxxxxxxxxx
Making clean /versions/updates/xxxxxxxxxxxxxxxxxxxxxxxxxxxxxxxx
Trying irsync_pristine update from rsync://updates.laptop.org/build-official-os860
- Cleaning tree.
- Fetching contents.
- Performing incremental rsync.
Verifying update.
Installing update in /versions/{pristine,run}/xxxx
This process may take more than thirty minutes. When the process is complete, you need to reboot.
Important Note: On the first reboot after upgrading, the XO will run slowly for about 1 minute. After that it will run normally.
Step 5: Update activities
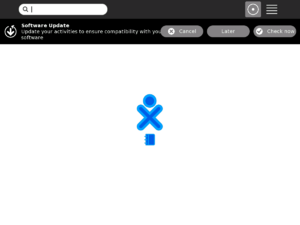
On rebooting the first time after updating to release 8.2, the XO will notify you that your activities should be updated.
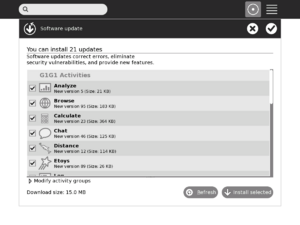
If you are connected to the Internet, click "OK" to update your activities. If it is not connected to the Internet, click "Cancel". Connect to the Internet and then open the Software Updater from the Control Panel.
When the Software Update starts you will see a progress bar as your XO looks for updated versions of the activities you have installed. When it is done, choose the activities you want update and click "Install selected". You will see another progress bar, as the activities are updated.
Some activities may not successfully update, due to errors in the activity files or due to transient network errors. In this case, some activities will remain in the "available updates" list after the installation process has completed. If a network error was the cause, you may wish to immediately retry the installation; otherwise, you probably need to wait until the activity author uploads a corrected version of their bundle.

