Active Antenna: Difference between revisions
No edit summary |
m (Reverted edits by Rafaelcarter (Talk) to last revision by Gregorio) |
||
| (15 intermediate revisions by 9 users not shown) | |||
| Line 1: | Line 1: | ||
{{translations}} |
|||
{{OLPC}} |
{{OLPC}} |
||
This page is about the Active Antenna, which is a standalone version of the XO laptop's [[Mesh_Network_Details|wireless mesh network interface]]. |
This page is about the Active Antenna, which is a standalone version of the XO laptop's [[Mesh_Network_Details|wireless mesh network interface]]. '''The active antenna is not available for deployments yet. It is still in development.''' |
||
=Description= |
=Description= |
||
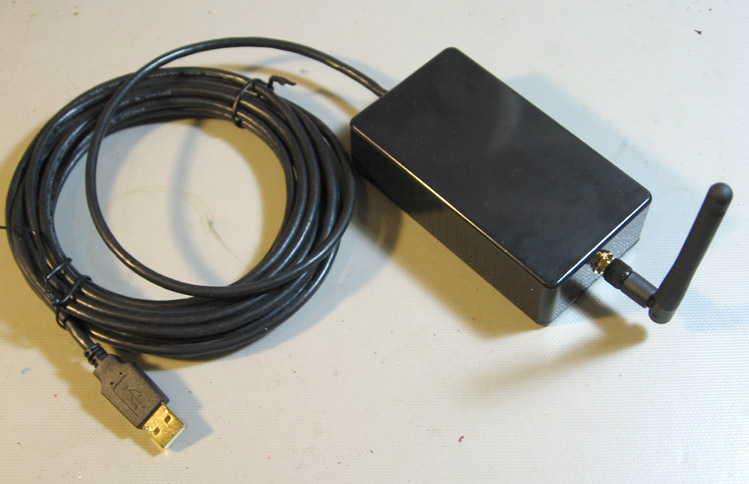
The Active Antenna is a standalone version of the [[Mesh_Network_Details|wireless mesh network interface]] used in the XO laptop. It connects to a host or power source through a 5m (16ft) USB cable. As a mesh networking interface, it both serves as network interface for any host connected through USB and as a repeater node in the mesh. |
The Active Antenna is still in development and not available for outside testing or deployments. It is a standalone version of the [[Mesh_Network_Details|wireless mesh network interface]] used in the XO laptop. It connects to a host or power source through a 5m (16ft) USB cable. As a mesh networking interface, it both serves as network interface for any host connected through USB and as a repeater node in the mesh. When the active antenna is ready for deployment, two or three Antennas can be used with each [[School server]], one may be connected to an XO or other laptop to allow mesh networking, or they may simply be connected to a wall brick providing power. |
||
A similar device is the Solar Repeater, where an Active Antenna is integrated with a solar cell and battery unit. |
A similar device is the [[Solar Repeater]], where an Active Antenna is integrated with a solar cell and battery unit. This product is also still in development. |
||
The Active Antenna requires around 200mA at +5V for normal operation. If connected to a USB host (and not just a power supply), it requires a specialized driver which uploads firmware and manages the mesh functionality. This driver is available for Linux (libertas) and Windows. |
|||
==Obtaining one== |
==Obtaining one== |
||
Currently Active Antennas are not available for testing outside of OLPC. |
|||
If you have a need for one or more Active Antenna for a project that OLPC might be interested in supporting, please apply through the [[Developers_program#How_to_apply_for_an_Active_Antenna|developers program]]. Currently, our supply is very limited, but we hope to have enough to provide them to qualified developers. |
|||
=Versions= |
=Versions= |
||
There are different |
There are different versions of Active Antenna, with different availability dates: Production, Pre-Build, and Prototype. |
||
==Production== |
==Production== |
||
The Active Antenna production units |
The Active Antenna production units are not scheduled to be built at this time. |
||
==Pre-Build== |
==Pre-Build== |
||
A version of the Active Antenna will be built using the production electronics and a temporary packaging solution, while the molds for the final package are completed and tested. |
A version of the Active Antenna will be built using the production electronics and a temporary packaging solution, while the molds for the final package are completed and tested. These units will not have any regulatory approval, and are solely for test use. |
||
[[Image:AApre-build.jpg|center]] |
[[Image:AApre-build.jpg|center]] |
||
The picture shows Michail Bletsas, OLPC's chief connectivity officer, holding a pre-build Active Antenna. |
The picture shows [http://www.laptop.org/en/vision/people/MichailBletsas/ Michail Bletsas], OLPC's chief connectivity officer, holding a pre-build Active Antenna. |
||
We should have pre-build units available by |
We should have pre-build units available by the end of February, 2008. |
||
==Prototype== |
==Prototype== |
||
| Line 38: | Line 41: | ||
About a hundred and twenty of these have been made. They do not have any regulatory approvals, and are solely for testing purposes. |
About a hundred and twenty of these have been made. They do not have any regulatory approvals, and are solely for testing purposes. |
||
===Reprogramming=== |
|||
Most of the early Active Antenna prototypes suffered from a problem where they entered stand-alone repeater mode too quickly, preventing their proper operation when plugged into a server on boot. This can be corrected by [[Active_Antenna_Reprogramming|reprogramming them]]. |
|||
===Details=== |
|||
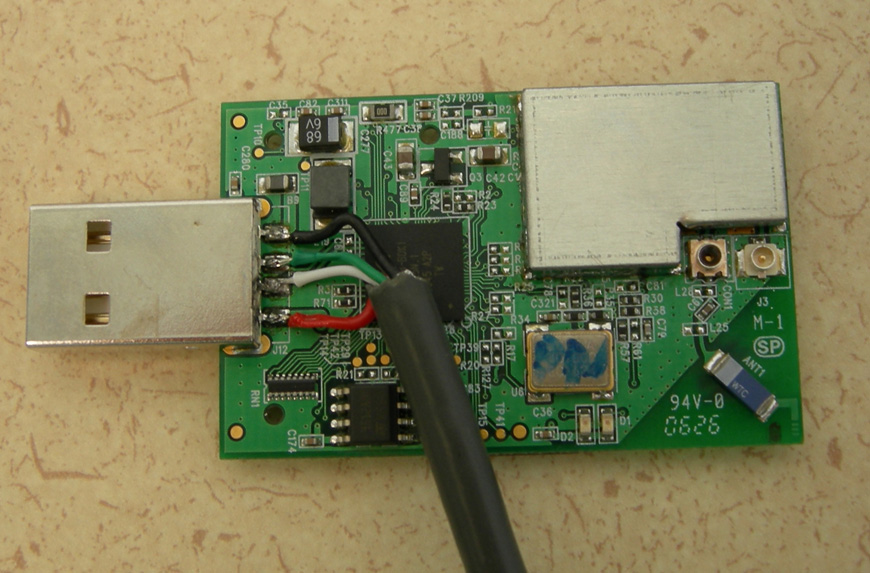
This is a closeup of the USB connection to the Marvell engineering module: |
|||
[[Image:AAprototypeCloseup.jpg]] |
[[Image:AAprototypeCloseup.jpg]] |
||
Note the components D1 and D2 on the lower edge. These are diagnostic LEDs controlled by GPIO lines on the controller. The LEDs are not visible outside the case. The default LED configuration may not be optimal. To set them to display in the same way as the XO, use this command: |
|||
iwpriv eth7 ledgpio 1 1 2 0 |
|||
To turn them off to minimise power usage, use this command: |
|||
iwpriv eth7 ledgpio 1 16 2 16 |
|||
== See Also == |
|||
* [[Peripherals/Active Antenna]] |
|||
[[Category:Developers]] |
[[Category:Developers]] |
||
[[Category: |
[[Category:SchoolServer]] |
||
[[Category:Network]] |
[[Category:Network]] |
||
Latest revision as of 12:47, 3 June 2011
This page is about the Active Antenna, which is a standalone version of the XO laptop's wireless mesh network interface. The active antenna is not available for deployments yet. It is still in development.
Description
The Active Antenna is still in development and not available for outside testing or deployments. It is a standalone version of the wireless mesh network interface used in the XO laptop. It connects to a host or power source through a 5m (16ft) USB cable. As a mesh networking interface, it both serves as network interface for any host connected through USB and as a repeater node in the mesh. When the active antenna is ready for deployment, two or three Antennas can be used with each School server, one may be connected to an XO or other laptop to allow mesh networking, or they may simply be connected to a wall brick providing power.
A similar device is the Solar Repeater, where an Active Antenna is integrated with a solar cell and battery unit. This product is also still in development.
The Active Antenna requires around 200mA at +5V for normal operation. If connected to a USB host (and not just a power supply), it requires a specialized driver which uploads firmware and manages the mesh functionality. This driver is available for Linux (libertas) and Windows.
Obtaining one
Currently Active Antennas are not available for testing outside of OLPC.
Versions
There are different versions of Active Antenna, with different availability dates: Production, Pre-Build, and Prototype.
Production
The Active Antenna production units are not scheduled to be built at this time.
Pre-Build
A version of the Active Antenna will be built using the production electronics and a temporary packaging solution, while the molds for the final package are completed and tested. These units will not have any regulatory approval, and are solely for test use.
The picture shows Michail Bletsas, OLPC's chief connectivity officer, holding a pre-build Active Antenna.
We should have pre-build units available by the end of February, 2008.
Prototype
An early Active Antenna prototype was built using engineering samples provided by Marvell. These early prototypes suffered from a problem where they did not reset consistently, but allowed School Server development and trial usage to occur.
About a hundred and twenty of these have been made. They do not have any regulatory approvals, and are solely for testing purposes.
Reprogramming
Most of the early Active Antenna prototypes suffered from a problem where they entered stand-alone repeater mode too quickly, preventing their proper operation when plugged into a server on boot. This can be corrected by reprogramming them.
Details
This is a closeup of the USB connection to the Marvell engineering module:
Note the components D1 and D2 on the lower edge. These are diagnostic LEDs controlled by GPIO lines on the controller. The LEDs are not visible outside the case. The default LED configuration may not be optimal. To set them to display in the same way as the XO, use this command:
iwpriv eth7 ledgpio 1 1 2 0
To turn them off to minimise power usage, use this command:
iwpriv eth7 ledgpio 1 16 2 16


