Fix Clock: Difference between revisions
DanielDrake (talk | contribs) |
|||
| (130 intermediate revisions by 14 users not shown) | |||
| Line 2: | Line 2: | ||
{{Translations}} |
{{Translations}} |
||
How to fix an XO laptop suffering from problems with the [http://en.wikipedia.org/wiki/Real-time_clock Real Time Clock] (RTC, or clock). If the laptop has security enabled, this problem may prevent booting, usually with the error "Invalid System Date". |
|||
= Problem Description = |
= Problem Description = |
||
Laptops with this problem show one of these symptoms: |
|||
# The laptop screen lights up and shows "Invalid System Date" and then powers off, or continues to boot, seeking an activation lease. Activating the laptop will result in the laptop working temporarily, but returning to the same problem on next boot. |
# The laptop screen lights up and shows "Invalid System Date" and then powers off, or continues to boot, seeking an activation lease. Activating the laptop will result in the laptop working temporarily, but returning to the same problem on next boot. Affects XO-1, XO-1.5, XO-1.75 and XO-4. |
||
# The power LED turns on, but the screen never turns on (not even the backlight). The microphone LED may flash briefly, but stays off. This symptom can only happen |
# The power LED turns on, but the screen never turns on (not even the backlight). The microphone LED may flash briefly, but stays off. This symptom can only happen with very old versions of [[Firmware|firmware]] ([[OLPC_Firmware_q2d05|Q2D05]] and [[OLPC_Firmware_q2d06|Q2D06]]). Affects XO-1 only. |
||
# The power LED turns on for only about 0.8 of a second, then turns off, and the screen never turns on<!-- mechanism: real time clock oscillator manually stopped by firmware or kernel programmer -->. Affects XO-1 only. |
|||
# The boot animation never stops<!-- mechanism: time_t is negative due to kernel seeing year 1963, elapsed time calculations fail in powerd, and so powerd never unfreezes the display on boot, see #12621 -->. Affects 12.1.0 and 13.1.0 only. |
|||
= Diagnosis = |
|||
The problem is caused by bad date information stored in the Real Time Clock (RTC) chip. There are three ways that the date could become bad: |
|||
* The RTC chip lost all power. The RTC chip has a "coin cell" backup battery (ML1220) that powers the RTC chip when the AC and the main battery are not present, but unfortunately, problems with this backup battery are common. |
|||
These symptoms are caused by bad date information stored in the clock. |
|||
** Some of the early production XO-1 machines were manufactured with a defective holder for the coin cell battery. On those machines, the coin cell battery can become loose or even pop out entirely during normal shipping and handling. |
|||
** Another occasional problem is leakage or corrosion from the battery, causing a loss of contact between the battery and the metal contacts inside the holder. [http://dev.laptop.org/~dsd/20090406/ Some photos here.] |
|||
= Cause = |
|||
** It is also possible (and not too uncommon) that the coin cell battery simply does not work (or has ceased to work). |
|||
The following diagram shows the causes of the problem. The colours have meaning: |
|||
* blue boxes are possible signs, symptoms, or observations, |
|||
* green boxes are deduced causes, or diagnosis, |
|||
* red boxes are the resultant problems. |
|||
[[Image:Ofw-fix-clock-causes.png]] |
|||
There are several causes: |
|||
* The clock lost all power, which is by far the most common cause. The clock has a "coin cell" battery (ML1220) that powers the clock when the AC and the main battery are not present. Power may have been lost because: |
|||
** The battery discharged during storage. This is common. |
|||
** Some of the early production XO-1 laptops were made with a defective holder for the clock battery, which can come loose or even pop out during normal handling. |
|||
** Leakage from the battery, causing corrision, a loss of contact between the battery and the metal contacts inside the holder. [http://dev.laptop.org/~dsd/20090406/ Some photos here.] |
|||
** The clock battery ceased to work. |
|||
* The factory did not set the date. This is rare. |
* The factory did not set the date. This is rare. |
||
* The user |
* The user set the date to an incorrect value, either by mistake or as an attempt to defeat activation security. This is also rare. |
||
See [[/Background|background for how this works]]. |
|||
= Root Cause = |
|||
This is a firmware bug. The problem is fixed in the latest firmware, compare the diagram above to the new diagram below, which shows how the latest firmware will respond: |
|||
[[Image:Ofw-fix-clock-causes-q2f19.png]] |
|||
For laptops without a lease, they will boot normally with the date set to 2013. For laptops with a lease, they will boot seeking a new lease from the school network. |
|||
However, the bug strikes before the firmware checks for a new version, so you must repair. |
|||
= Repair = |
|||
The repair process is: |
|||
"RTC chip lost power" is by far the most common cause of the problem. |
|||
# [[#Check_the_battery_and_holder|check the battery and holder]], |
|||
# [[#Set_the_clock|set the clock]], |
|||
# [[#Upgrade_the_firmware|upgrade the firmware]], |
|||
# [[#Charge_the_clock_battery|charge the clock battery]], and; |
|||
# [[#Check_the_clock_is_set_after_removing_power|check the clock is set after removing power]]. |
|||
Here are English and French diagrams of the process: |
|||
= Repair process = |
|||
{| border="1" cellspacing="0" cellpadding="2" class="wikitable" |
|||
The overall process is: |
|||
! English |
|||
# Examine the battery and its holder, securing the battery in place if necessary |
|||
! French |
|||
# Reprogram the time and date |
|||
|- |
|||
#* If running a very old version, update [[Open Firmware]] to the [[Firmware#Firmware_Releases|current version]]. |
|||
| [[File:Debrick-4.png|thumb|centre|]] |
|||
# Perform a verification test |
|||
| [[File:Debrick-4-fr.png|thumb|centre|]] |
|||
|} |
|||
== |
== Check the battery and holder == |
||
To access the |
To access the clock battery, remove the main battery, and power cable, and follow the [[Disassembly_top|instruction for removing the back cover]]. |
||
=== XO-1 === |
=== XO-1 === |
||
Examine the battery and its holder. Is there any sign of acid leakage? Can the battery move in its holder? |
|||
On newer models of the XO-1, the RTC battery and its holder may be covered by a circular strip of rubber (a hardware improvement attempting to reduce the frequency of this issue). You can remove this cover simply by peeling it off. |
|||
On newer models of the XO-1, the clock battery and its holder may be covered by a circular strip of rubber to try to fix this. You can remove this cover by peeling it off. |
|||
Remove the battery from the socket. Check for signs of leakage underneath the battery, in the holder, and on the motherboard and components around the battery holder. |
Remove the battery from the socket, by prying underneath with a plastic tool. (Just removing the battery will fix symptom #3, when the power LED turns on for under a second). Check for signs of leakage underneath the battery, in the holder, and on the motherboard and components around the battery holder. |
||
'''If there |
'''If there are signs of battery leakage''': |
||
# Remove the leaking |
# Remove the leaking clock battery and discard it. |
||
# Carefully clean any leakage/corrosion in the battery holder, using e.g. a damp toothbrush. |
# Carefully clean any leakage/corrosion in the battery holder, using e.g. a damp toothbrush. |
||
# |
# Neutralize the leakage/corrosion area with some baking soda. |
||
# Using a magnifying glass, look for damage to surrounding components or electrical tracks |
# Using a magnifying glass, look for damage to surrounding components or electrical tracks |
||
#* If present, you are advised to treat the motherboard as broken or dead-on-arrival. |
#* If present, you are advised to treat the motherboard as broken or dead-on-arrival. |
||
# Obtain a replacement cell battery (these parts are very standard) and install in the socket. |
# Obtain a replacement cell battery (these parts are very standard) and install in the socket. |
||
#* Any decent electrical/DIY store will stock these, they are known as ML1220 batteries and commonly found in calculators. |
#* Any decent electrical/DIY store will stock these, they are known as ML1220 batteries and commonly found in calculators. |
||
#* (Never use CR1220; they are not designed to be recharged, will not run the clock for very long, may leak, and may erupt in fire.) |
|||
[[image: |
[[image:white_battery.jpg|thumb|If your battery holder is white, then you shouldn't have a problem here.]] |
||
[[image:motherboard.jpg|thumb|The battery holder in the motherboard.]] |
|||
[[image:XO_bad_rtc.jpg|thumb|Bad clock battery holder (from earlier laptops model) - notice the straight grip]] [[image:XO_good_rtc.jpg|thumb|Good clock battery holder - notice the curved grip]] |
|||
'''If the battery does not fit well in the socket''', carefully examine the shape of the socket. Early production units had a defective battery holder, pictured here. The photos do not make the problem very obvious; the issue is that the shape of the battery holder does not 'grip' the battery. In other words, a side angle view of the battery holder should show the shape as follows: |
|||
'''If the battery does not fit well in the socket''', carefully examine the shape of the socket. Early laptops had a defective battery holder, pictured here. The photos do not make the problem very obvious; the issue is that the shape of the battery holder does not 'grip' the battery. In other words, a side angle view of the battery holder should be shaped like this: |
|||
(_____) |
(_____) |
||
| Line 61: | Line 102: | ||
(these crude diagrams are exaggerated) |
(these crude diagrams are exaggerated) |
||
If your XO |
If your XO has a defective holder, you must re-seat the clock battery and secure it so it doesn't come out again. This can be done by putting a drop of glue where the battery contacts the holder, away from the metallic contact. |
||
* The best glue that Mitch has found for this purpose is clear solvent-based household cement. Technically, it is "nitro cellulose" cement. It is also known as "model airplane glue", marketed under various trade names such as "Duco Cement", "Tarzan's Grip". Loctite "Stik'n Seal", etc (Alleskleber, in Germany, maybe?). The solvent in this kind of cement is toxic and flammable, so keep it away from children! |
* The best glue that Mitch has found for this purpose is clear solvent-based household cement. Technically, it is "nitro cellulose" cement. It is also known as "model airplane glue", marketed under various trade names such as "Duco Cement", "Tarzan's Grip". Loctite "Stik'n Seal", etc (Alleskleber, in Germany, maybe?). The solvent in this kind of cement is toxic and flammable, so keep it away from children! |
||
* Stronger adhesives like epoxy or cyanoacrylate (super glue) would probably work too, but it might be difficult to remove the battery later without damaging the holder. |
* Stronger adhesives like epoxy or cyanoacrylate (super glue) would probably work too, but it might be difficult to remove the battery later without damaging the holder. |
||
* Don't |
* Don't use "Gorilla Glue"; that's polyurethane, which foams as it cures. |
||
* RTV silicone |
* Don't use RTV silicone; the common variety releases corrosive acetic acid as it cures - if it smells like vinegar, don't use it on electronics. |
||
* Don't use hot melt glue; because it doesn't stick very well to these materials. |
|||
* Ordinary "white glue" (PVA, or polyvinyl acetate) will probably work, but it flows easily and goes down underneath the battery - that is probably okay if you are careful not to use too much. |
|||
* Ordinary "white glue" (PVA, or polyvinyl acetate) will probably work, but it flows easily and goes down underneath the battery - perhaps okay if you are careful not to use too much. |
|||
* Hot melt glue doesn't work, because it doesn't stick very well to these materials. |
|||
If your XO had a black rubber strip covering the battery in the holder, install the cover again now. |
If your XO had a black rubber strip covering the battery in the holder, install the cover again now. |
||
| Line 76: | Line 116: | ||
[[image:Xo_1_5_coincell.jpg|thumb|New XO-1.5 battery holder]] |
[[image:Xo_1_5_coincell.jpg|thumb|New XO-1.5 battery holder]] |
||
On the XO-1.5, the |
On the XO-1.5, the clock battery is not in a holder. The battery is encased in shrink tubing, and connected to the motherboard with a short cable. (Eliminating the socket was an attempt to reduce the number of socket issues experienced on XO-1.) The battery, in its protective tubing, is stuck down to the motherboard to prevent it from moving around. |
||
Even though the same standard |
Even though the same standard ML1220 is used, replacing the battery alone is difficult. The shrink tubing will be destroyed as you open it, and it will be difficult, and perhaps even dangerous, to reconnect the wires to a replacement battery. |
||
* It may be possible to repair the tubing with some tape, or to discard the tubing and create your own enclosure with some electrical tape. |
* It may be possible to repair the tubing with some tape, or to discard the tubing and create your own enclosure with some electrical tape. |
||
* The battery shipped in the laptop is a ''leggy'' battery - it has the wires spot-welded to the battery during fabrication. It is a very bad idea to attempt to solder wires to a new battery (it can explode) |
* The battery shipped in the laptop is a ''leggy'' battery - it has the wires spot-welded to the battery during fabrication. It is a very bad idea to attempt to solder wires to a new battery (it can explode). It is far better purchase ''leggy'' replacement batteries (e.g. [http://www.pchub.com/uph/laptop/602-25682-4052/Sanyo-ML1220-Battery-Coin-Rechargeable.html here, maybe]). |
||
If available, one could also take the entire component (connector + cable + tubing + battery) from another laptop, or from a spare parts supply sourced from OLPC. |
|||
=== XO-1.75 === |
|||
== Reprogram the time/date == |
|||
See above, the same battery, packaging, and wiring is used as in the XO-1.5. |
|||
Note that in all cases, the date/time should be set to the [http://en.wikipedia.org/wiki/UTC Coordinated Universal Time] value, rather than the time in your local timezone. |
|||
=== XO-4 === |
|||
=== If the screen turns on and you can boot into Linux === |
|||
See above, the same battery, packaging, and wiring is used as in the XO-1.5. |
|||
The most simplistic situation is when Linux can be booted - for example, the system has activation security disabled, or the dateless system is able to retrieve an activation lease as it is booting. |
|||
== Set the clock == |
|||
Once Linux has booted, login at a a root terminal (e.g. press Ctrl+Alt+F1). |
|||
There are several methods to fix the clock, depending on the symptoms: |
|||
Set the current UTC date/time using the <tt>date</tt> command, e.g. for the current date/time: |
|||
date -s "{{CURRENTYEAR}}-{{CURRENTMONTH}}-{{CURRENTDAY}} {{CURRENTHOUR}}:{{CURRENTMINUTE}}:{{CURRENTSECOND}}" |
|||
* if the [[#If_the_screen_turns_on_and_you_can_boot_into_Linux|screen turns on and you can boot into Linux]], the easiest situation, which happens if the laptop has activation security disabled, or the laptop without a date is able to retrieve an activation lease, |
|||
=== If the screen turns on but you cannot enter Linux === |
|||
* if the [[#If_the_screen_turns_on_but_you_cannot_enter_Linux|screen turns on but you cannot enter Linux]], the next easiest, |
|||
* if the [[#If_the_screen_does_not_turn_on|screen does not turn on]], the worst situation, the power LED will be on, but a bug will stop the firmware before it turns on the screen, or; |
|||
* if the [[#If_the_screen_does_not_turn_on_and_nor_does_the_power_LED|screen does not turn on and nor does the power LED]]. |
|||
The clock must be set to the [http://en.wikipedia.org/wiki/UTC Coordinated Universal Time] value, rather than your local time. |
|||
Reprogramming the time and date can also be done through the OpenFirmware ''ok'' prompt. |
|||
(The numbers in some of the commands below are the time and date in UTC ({{CURRENTYEAR}}-{{CURRENTMONTH}}-{{CURRENTDAY}} {{CURRENTHOUR}}:{{CURRENTMINUTE}}:{{CURRENTSECOND}}), but in reverse order; second, minute, hour, day of month, month, and year. When you visited this page, our Wiki server used it's own clock to generate this command for you.) |
|||
If there is something visible on the display, you simply need to disable the XO laptop security system and press the escape key once you hear the bootup sound to access the OpenFirmware prompt. |
|||
=== If the screen turns on and you can boot into Linux === |
|||
In order to disable the security system (assuming it is enabled, which is generally only true for large deployments and G1G1 customers), you will need a [[Activation and Developer Keys#Getting a Developer Key if the Machine Won't Boot|"developer key"]] for this machine, on a USB storage stick. |
|||
In this situation, you must boot Linux, login at a root terminal (e.g. the [[Terminal_Activity|Terminal activity]], or press Ctrl+Alt+F2 to get to the [[Console]]). |
|||
Turn on the XO and hit Escape upon hearing the bootup jingle. |
|||
Set the system time, type: |
|||
At the ''ok'' prompt, type these commands to set the date (hitting enter after each one): |
|||
sudo date --utc --set="{{CURRENTYEAR}}-{{CURRENTMONTH}}-{{CURRENTDAY}} {{CURRENTHOUR}}:{{CURRENTMINUTE}}:{{CURRENTSECOND}}" |
|||
ok select /rtc |
|||
ok decimal |
|||
ok sec min hour day month year set-time |
|||
Then copy the system time into the clock, type: |
|||
sec, min, hour, day, etc in the previous command should be numbers correlating to the current date. For the current time: |
|||
sudo hwclock --systohc |
|||
ok {{CURRENTSECOND}} {{CURRENTMINUTE}} {{CURRENTHOUR}} {{CURRENTDAY}} {{CURRENTMONTH}} {{CURRENTYEAR}} set-time |
|||
On XO-1 with releases 12.1.0 and 13.1.0, the above may hang for ten seconds and show a warning<!-- <trac>12622</trac> --> "''wait for clock tick timed out''". The hang and warning may be ignored, the clock will have been set. If you would like to avoid the hang and warning, type: |
|||
sudo hwclock --systohc --noadjfile --utc |
|||
=== If the screen turns on but you cannot enter Linux === |
|||
In this situation, you must use firmware to set the clock: |
|||
*[[collection stick|disable the security system]], |
|||
*turn on the laptop and get to the [[Ok]] prompt, |
|||
*set the clock, type: |
|||
select /rtc decimal {{CURRENTSECOND}} {{CURRENTMINUTE}} {{CURRENTHOUR}} {{CURRENTDAY}} {{CURRENTMONTH}} {{CURRENTYEAR}} set-time |
|||
You can now turn off the machine by pressing the power button for a few seconds. |
You can now turn off the machine by pressing the power button for a few seconds. |
||
| Line 119: | Line 171: | ||
=== If the screen does not turn on === |
=== If the screen does not turn on === |
||
In this situation, you must: |
|||
Very old versions of OpenFirmware for the XO-1 laptop had a bug which would cause the screen to fail to power up when this RTC clock problem was encountered. If this happens, the recovery procedure involves linking up a special cable to another computer, and then using that other computer to reprogram the time and date. |
|||
* connect a [[Serial_adapters|serial adapter]] to the XO-1 and another computer, see [[Serial_adapters#XO-1|where to connect it]], |
|||
As there are numerous opporuntities for error, it is suggested practice to test serial console communications with a known good laptop before debugging broken ones! |
|||
* use [[Serial_adapters#Software|a serial terminal program]] on the other computer to access the XO-1 via the adapter, |
|||
* turn on the XO-1, and you should soon see "Page Fault" on the serial terminal, followed by an "ok" prompt. See [[/Log/Q2D06]] for what it may look like. If you don't see "Page Fault", there are several possibilities: |
|||
** if you don't see anything on the serial terminal, either |
|||
*** the serial adapter is not connected correctly, |
|||
*** the serial terminal is not configured correctly, see [[serial adapter#software|settings]], or |
|||
*** something else is wrong with the XO-1, perhaps it is quite quite dead and it's not an instance of this known clock problem after all. |
|||
** if you see a lot of startup messages, and the last one isn't "Page Fault" followed by "ok", then the machine is not suffering from the this known clock problem, but may have a broken display or display cable. |
|||
* using the serial terminal, type this command to set the clock: |
|||
select /rtc decimal {{CURRENTSECOND}} {{CURRENTMINUTE}} {{CURRENTHOUR}} {{CURRENTDAY}} {{CURRENTMONTH}} {{CURRENTYEAR}} set-time |
|||
* restart the laptop, type this command: |
|||
bye |
|||
* check that the screen lights up. |
|||
See [[/Log/Q2D06]] for what is expected on the serial terminal. |
|||
# Using an [[Serial_adapters|OLPC serial adapter]], connect the laptop to your personal laptop. On the laptop's motherboard, the serial adapter should be connected to [[XO_Motherboard_Repair|J1]]. J1 is a small white connector near the wireless module. |
|||
# Use a program like minicom (for Linux) or HyperTerminal (for Windows) to access the laptop serially |
|||
# The serial port settings should be 115200 baud, 8 data bits, no parity, and 1 stop bit and handshake parameter is disabled. |
|||
# Power on the laptop under test. You should see "Page Fault" on the serial terminal, followed by an "ok" prompt. If you don't see "Page Fault", there are several possibilities: |
|||
#* If you don't see anything on the serial terminal, either |
|||
#** The serial terminal is not connected correctly, or |
|||
#** Something else is wrong with the machine - the machine is quite quite dead and it's not an instance of the symptom 1 RTC problem. |
|||
#* If you see a lot of startup messages, but the last one isn't "Page Fault" followed by "ok", then the machine is largely working, but the problem is not symptom 1 RTC problem. If the screen comes on, you should be following the "Developer Key Procedure" below, not this serial procedure. |
|||
(There are numerous opportunities for error, so if you have more than one XO-1 laptop practice serial communications with working ones before debugging broken ones). |
|||
Using the "other" laptop that is connected serially to the affected XO, type these commands at the ''ok'' prompt (hitting enter after each one): |
|||
ok select /rtc |
|||
ok decimal |
|||
ok sec min hour day month year set-time |
|||
=== If the screen does not turn on and nor does the power LED === |
|||
sec, min, hour, day, etc in the previous command should be numbers correlating to the current date. For the current time: |
|||
ok {{CURRENTSECOND}} {{CURRENTMINUTE}} {{CURRENTHOUR}} {{CURRENTDAY}} {{CURRENTMONTH}} {{CURRENTYEAR}} set-time |
|||
You must remove the clock battery briefly to fix this problem. If you did that, and the problem persists, then the cause is not the clock. Have the motherboard serviced. |
|||
At this point, you are strongly advised to perform a firmware update to a version that does not suffer from this blank-screen problem. That way, if the RTC loses power again, your diagnosis/recovery procedure will not be as painful. |
|||
== Upgrade the firmware == |
|||
# Insert a USB key containing the [[Firmware#Firmware_Releases|latest firwmare version]]. You will need to download the ''.rom'' file and place it on the key. |
|||
# To update the firmware, type the following command line at the ok prompt, substituting the correct ''.rom'' filename: |
|||
ok probe-pci probe-usb flash u:\q2d16.rom |
|||
Upgrade the firmware to make sure this problem does not return. See [[upgrading firmware]] for the latest firmware. |
|||
== Perform a verification test == |
|||
If you had the blank-screen problem, the firmware must be upgraded to the latest version. If not, and the clock loses power again, the repair will need a serial adapter again. |
|||
If you wish to manually upgrade, and you used a serial adapter and saw the "Page Fault" message, you must probe the PCI and USB before manually upgrading, type: |
|||
# Unplug the charger if it is plugged in. |
|||
probe-pci probe-usb flash u:\q2f19.rom |
|||
# Remove the regular XO battery from the underside of the laptop (Note: this refers to the main battery that is charged through AC power, and can be easily accessed by turning the laptop upside down. It does not refer to the coin cell battery, which you should not touch at this point). |
|||
# Leave the laptop in this state for 3-5 minutes |
|||
# Connect a power source (the battery, or the charger) and turn on the laptop |
|||
# Look carefully for an "Invalid System Date" error message appearing immediately |
|||
Or set the clock, allow time for the clock battery to charge, and use the usual [[upgrading firmware]] method. |
|||
The lack of an error message indiciates that the repair was a success. You may wish to go into Linux and run <tt>date</tt> in the Terminal activity to verify that the clock was programmed correctly, although this should not be necessary. |
|||
== Charge the clock battery == |
|||
If there is an error message, then 3 situations are possible: |
|||
# The RTC coin-cell battery is faulty and must be replaced. |
|||
Leave the laptop turned on for at least 30 minutes to charge the clock battery to normal levels. |
|||
* Half an hour is the [[/Background|minimum charge time]] before testing, for which you can use the main battery, |
|||
* The best charging time is 24 hours before storage, for which you must use a power adapter, |
|||
* Charging does not happen with the laptop on and suspended; the power LED must be on and not flashing, |
|||
Easiest method is to remove all USB drives, then hold down all four game keys while turning the power on; the laptop will eventually fail to boot and wait for you to ''Use power button to power off'', with the start time displayed in UTC: |
|||
Boot failed |
|||
OLPC C2, 256 MiB memory installed, S/N SHC92805B50 |
|||
OpenFirmware Q2F19 EC Firmware Ver:1.2.1 {{CURRENTYEAR}}-{{CURRENTMONTH}}-{{CURRENTDAY}} {{CURRENTHOUR}}:{{CURRENTMINUTE}}:{{CURRENTSECOND}} UTC |
|||
Use power button to power off |
|||
Or boot to [[Ok]] prompt. |
|||
Or boot to Linux and disable automatic power management. |
|||
== Check the clock is set after removing power == |
|||
Verify that the laptop is able to retain the time and date, otherwise this problem may return. |
|||
# Unplug the charger, |
|||
# Remove the main battery from the underside of the laptop, (not the clock battery), |
|||
# Leave the laptop without power for five minutes, |
|||
# Connect a power source (the battery, or the charger) and turn on the laptop, |
|||
# Check the clock using either the [[Ok]] prompt or by running <tt>date</tt> in the Terminal activity. |
|||
If the clock is still wrong, then 3 situations are possible: |
|||
# The clock battery is faulty and must be replaced. |
|||
#* You can verify this by installing a known-working battery, reprogramming the clock, and then repeating this verification test. Test pass would confirm this problem. |
#* You can verify this by installing a known-working battery, reprogramming the clock, and then repeating this verification test. Test pass would confirm this problem. |
||
# There is a problem with the battery holder or the motherboard, so the laptop should be replaced. |
# There is a problem with the battery holder or the motherboard, so the laptop should be replaced. |
||
#* You can verify this by installing a known-working battery, reprogramming the clock, and then repeating this verification test. Test fail would confirm this problem. |
#* You can verify this by installing a known-working battery, reprogramming the clock, and then repeating this verification test. Test fail would confirm this problem. |
||
# If you are dealing with a defective shape battery holder, perhaps the |
# If you are dealing with a defective shape battery holder, perhaps the clock battery is (still) not maintaining electrical contact with the connector inside the battery holder. |
||
= Automated repair script = |
|||
XO-1 only. |
|||
Repair center volunteers have made an automated script to repair laptops in bulk or as a method with fewer steps. The script can be run on a Linux computer or on an XO laptop. We call this second computer your "debricker". |
|||
To use it you must install ''pyserial''. You must be online when running (any of) the three following commands: |
|||
For Ubuntu or Debian, type: |
|||
sudo apt-get install python-serial |
|||
For Fedora, such as on an XO, type: |
|||
sudo yum install -y pyserial |
|||
Wait for the install to complete. |
|||
Then download and install d6.py, type: |
|||
wget --timestamping http://dev.laptop.org/~rsmith/d6.py |
|||
Connect a [[Serial adapters|serial adapter]] between the bricked XO (serial end of the cable) and the debricker computer (USB end of the cable). Then on the debricker computer type: |
|||
python d6.py |
|||
The script will search for the first USB serial port on the system that is available for use. (If your serial connection for the XO is not on the first available port then either modify the script to look for the other port first or open the other serial port with another program so its not available for use by d6.py.) |
|||
Once the script is up and running then turn to the bricked XO and power it on. Wait for the script to say it has finished. When it says this, the bricked XO is repaired, and you can disconnect and test. |
|||
The bricked XO will have been unlocked. |
|||
The date and time on the bricked XO will have been set to the date and time on the debricker. |
|||
To prevent the problem from returning, upgrade to the latest firmware. See [[upgrading firmware]]. |
|||
= Reproducing = |
|||
How to reproduce the problem, or test for it in different firmware versions: |
|||
* [[Disassembly|disassemble]] the laptop to expose the motherboard, |
|||
* connect a [[Serial adapter|serial adapter]] and a terminal, and test it by turning on the laptop, |
|||
* turn off the laptop, |
|||
* remove DC power cable and battery, |
|||
* disconnect the clock battery, |
|||
* wait a short time (four seconds on XO-1, 15 seconds on XO-1.75 and XO-4), |
|||
* reconnect the clock battery, |
|||
* insert DC power cable, |
|||
* turn on the laptop, |
|||
* note the response, (e.g. ''RTC cleared''), |
|||
* turn off the laptop, |
|||
* repeat the test with various alternate conditions. |
|||
= Measuring Charge Current = |
|||
To measure charge or discharge current of the clock battery, locate the series resistor from the following list, then use a multimeter to measure the voltage across the resistor. Use Ohms Law to calculate the current. |
|||
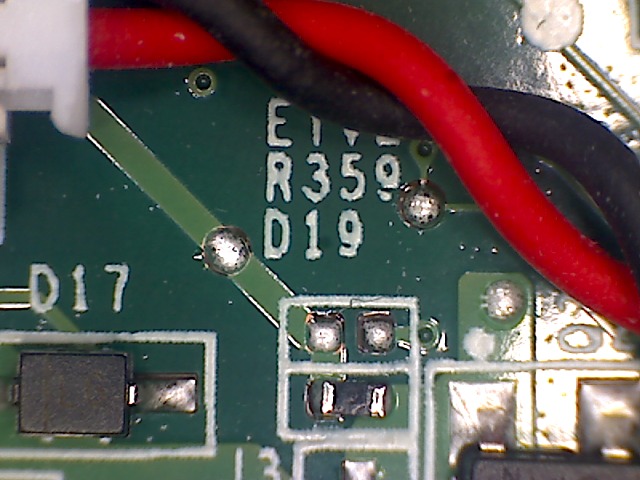
* XO-1, R250 100 ohms for discharge, R275 1k for charge, see [[Media:XO-1-C2-REV-J-R250-R275.jpg|photograph]], |
|||
* XO-1.5, R309, 1k, |
|||
* XO-1.75, R35, 1k 1%, |
|||
* XO-4, R359, 1k 1%, see [[Media:XO-4-C1-REV-D-R359.jpg|photograph]]. |
|||
= See Also = |
|||
* [[/Background|How the clock and battery work together]], |
|||
* [[Oatstime]], a tool for use by deployments in setting the clock on a large number of laptops, |
|||
* [[Reuse checklist|Refurbishing & Reuse Checklist]], |
|||
* [[XO Troubleshooting Guide]]. |
|||
[[Category:HowTo]] |
[[Category:HowTo]] |
||
Latest revision as of 05:28, 2 January 2014
How to fix an XO laptop suffering from problems with the Real Time Clock (RTC, or clock). If the laptop has security enabled, this problem may prevent booting, usually with the error "Invalid System Date".
Problem Description
Laptops with this problem show one of these symptoms:
- The laptop screen lights up and shows "Invalid System Date" and then powers off, or continues to boot, seeking an activation lease. Activating the laptop will result in the laptop working temporarily, but returning to the same problem on next boot. Affects XO-1, XO-1.5, XO-1.75 and XO-4.
- The power LED turns on, but the screen never turns on (not even the backlight). The microphone LED may flash briefly, but stays off. This symptom can only happen with very old versions of firmware (Q2D05 and Q2D06). Affects XO-1 only.
- The power LED turns on for only about 0.8 of a second, then turns off, and the screen never turns on. Affects XO-1 only.
- The boot animation never stops. Affects 12.1.0 and 13.1.0 only.
Diagnosis
These symptoms are caused by bad date information stored in the clock.
Cause
The following diagram shows the causes of the problem. The colours have meaning:
- blue boxes are possible signs, symptoms, or observations,
- green boxes are deduced causes, or diagnosis,
- red boxes are the resultant problems.

There are several causes:
- The clock lost all power, which is by far the most common cause. The clock has a "coin cell" battery (ML1220) that powers the clock when the AC and the main battery are not present. Power may have been lost because:
- The battery discharged during storage. This is common.
- Some of the early production XO-1 laptops were made with a defective holder for the clock battery, which can come loose or even pop out during normal handling.
- Leakage from the battery, causing corrision, a loss of contact between the battery and the metal contacts inside the holder. Some photos here.
- The clock battery ceased to work.
- The factory did not set the date. This is rare.
- The user set the date to an incorrect value, either by mistake or as an attempt to defeat activation security. This is also rare.
See background for how this works.
Root Cause
This is a firmware bug. The problem is fixed in the latest firmware, compare the diagram above to the new diagram below, which shows how the latest firmware will respond:

For laptops without a lease, they will boot normally with the date set to 2013. For laptops with a lease, they will boot seeking a new lease from the school network.
However, the bug strikes before the firmware checks for a new version, so you must repair.
Repair
The repair process is:
- check the battery and holder,
- set the clock,
- upgrade the firmware,
- charge the clock battery, and;
- check the clock is set after removing power.
Here are English and French diagrams of the process:
| English | French |
|---|---|


Check the battery and holder
To access the clock battery, remove the main battery, and power cable, and follow the instruction for removing the back cover.
XO-1
Examine the battery and its holder. Is there any sign of acid leakage? Can the battery move in its holder?
On newer models of the XO-1, the clock battery and its holder may be covered by a circular strip of rubber to try to fix this. You can remove this cover by peeling it off.
Remove the battery from the socket, by prying underneath with a plastic tool. (Just removing the battery will fix symptom #3, when the power LED turns on for under a second). Check for signs of leakage underneath the battery, in the holder, and on the motherboard and components around the battery holder.
If there are signs of battery leakage:
- Remove the leaking clock battery and discard it.
- Carefully clean any leakage/corrosion in the battery holder, using e.g. a damp toothbrush.
- Neutralize the leakage/corrosion area with some baking soda.
- Using a magnifying glass, look for damage to surrounding components or electrical tracks
- If present, you are advised to treat the motherboard as broken or dead-on-arrival.
- Obtain a replacement cell battery (these parts are very standard) and install in the socket.
- Any decent electrical/DIY store will stock these, they are known as ML1220 batteries and commonly found in calculators.
- (Never use CR1220; they are not designed to be recharged, will not run the clock for very long, may leak, and may erupt in fire.)


If the battery does not fit well in the socket, carefully examine the shape of the socket. Early laptops had a defective battery holder, pictured here. The photos do not make the problem very obvious; the issue is that the shape of the battery holder does not 'grip' the battery. In other words, a side angle view of the battery holder should be shaped like this:
(_____)
However, the shape of the defective units is more like:
\_____/
(these crude diagrams are exaggerated)
If your XO has a defective holder, you must re-seat the clock battery and secure it so it doesn't come out again. This can be done by putting a drop of glue where the battery contacts the holder, away from the metallic contact.
- The best glue that Mitch has found for this purpose is clear solvent-based household cement. Technically, it is "nitro cellulose" cement. It is also known as "model airplane glue", marketed under various trade names such as "Duco Cement", "Tarzan's Grip". Loctite "Stik'n Seal", etc (Alleskleber, in Germany, maybe?). The solvent in this kind of cement is toxic and flammable, so keep it away from children!
- Stronger adhesives like epoxy or cyanoacrylate (super glue) would probably work too, but it might be difficult to remove the battery later without damaging the holder.
- Don't use "Gorilla Glue"; that's polyurethane, which foams as it cures.
- Don't use RTV silicone; the common variety releases corrosive acetic acid as it cures - if it smells like vinegar, don't use it on electronics.
- Don't use hot melt glue; because it doesn't stick very well to these materials.
- Ordinary "white glue" (PVA, or polyvinyl acetate) will probably work, but it flows easily and goes down underneath the battery - perhaps okay if you are careful not to use too much.
If your XO had a black rubber strip covering the battery in the holder, install the cover again now.
XO-1.5

On the XO-1.5, the clock battery is not in a holder. The battery is encased in shrink tubing, and connected to the motherboard with a short cable. (Eliminating the socket was an attempt to reduce the number of socket issues experienced on XO-1.) The battery, in its protective tubing, is stuck down to the motherboard to prevent it from moving around.
Even though the same standard ML1220 is used, replacing the battery alone is difficult. The shrink tubing will be destroyed as you open it, and it will be difficult, and perhaps even dangerous, to reconnect the wires to a replacement battery.
- It may be possible to repair the tubing with some tape, or to discard the tubing and create your own enclosure with some electrical tape.
- The battery shipped in the laptop is a leggy battery - it has the wires spot-welded to the battery during fabrication. It is a very bad idea to attempt to solder wires to a new battery (it can explode). It is far better purchase leggy replacement batteries (e.g. here, maybe).
If available, one could also take the entire component (connector + cable + tubing + battery) from another laptop, or from a spare parts supply sourced from OLPC.
XO-1.75
See above, the same battery, packaging, and wiring is used as in the XO-1.5.
XO-4
See above, the same battery, packaging, and wiring is used as in the XO-1.5.
Set the clock
There are several methods to fix the clock, depending on the symptoms:
- if the screen turns on and you can boot into Linux, the easiest situation, which happens if the laptop has activation security disabled, or the laptop without a date is able to retrieve an activation lease,
- if the screen turns on but you cannot enter Linux, the next easiest,
- if the screen does not turn on, the worst situation, the power LED will be on, but a bug will stop the firmware before it turns on the screen, or;
- if the screen does not turn on and nor does the power LED.
The clock must be set to the Coordinated Universal Time value, rather than your local time.
(The numbers in some of the commands below are the time and date in UTC (2025-12-17 23:14:12), but in reverse order; second, minute, hour, day of month, month, and year. When you visited this page, our Wiki server used it's own clock to generate this command for you.)
If the screen turns on and you can boot into Linux
In this situation, you must boot Linux, login at a root terminal (e.g. the Terminal activity, or press Ctrl+Alt+F2 to get to the Console).
Set the system time, type:
sudo date --utc --set="2025-12-17 23:14:12"
Then copy the system time into the clock, type:
sudo hwclock --systohc
On XO-1 with releases 12.1.0 and 13.1.0, the above may hang for ten seconds and show a warning "wait for clock tick timed out". The hang and warning may be ignored, the clock will have been set. If you would like to avoid the hang and warning, type:
sudo hwclock --systohc --noadjfile --utc
If the screen turns on but you cannot enter Linux
In this situation, you must use firmware to set the clock:
- disable the security system,
- turn on the laptop and get to the Ok prompt,
- set the clock, type:
select /rtc decimal 12 14 23 17 12 2025 set-time
You can now turn off the machine by pressing the power button for a few seconds.
If the screen does not turn on
In this situation, you must:
- connect a serial adapter to the XO-1 and another computer, see where to connect it,
- use a serial terminal program on the other computer to access the XO-1 via the adapter,
- turn on the XO-1, and you should soon see "Page Fault" on the serial terminal, followed by an "ok" prompt. See /Log/Q2D06 for what it may look like. If you don't see "Page Fault", there are several possibilities:
- if you don't see anything on the serial terminal, either
- the serial adapter is not connected correctly,
- the serial terminal is not configured correctly, see settings, or
- something else is wrong with the XO-1, perhaps it is quite quite dead and it's not an instance of this known clock problem after all.
- if you see a lot of startup messages, and the last one isn't "Page Fault" followed by "ok", then the machine is not suffering from the this known clock problem, but may have a broken display or display cable.
- if you don't see anything on the serial terminal, either
- using the serial terminal, type this command to set the clock:
select /rtc decimal 12 14 23 17 12 2025 set-time
- restart the laptop, type this command:
bye
- check that the screen lights up.
See /Log/Q2D06 for what is expected on the serial terminal.
(There are numerous opportunities for error, so if you have more than one XO-1 laptop practice serial communications with working ones before debugging broken ones).
If the screen does not turn on and nor does the power LED
You must remove the clock battery briefly to fix this problem. If you did that, and the problem persists, then the cause is not the clock. Have the motherboard serviced.
Upgrade the firmware
Upgrade the firmware to make sure this problem does not return. See upgrading firmware for the latest firmware.
If you had the blank-screen problem, the firmware must be upgraded to the latest version. If not, and the clock loses power again, the repair will need a serial adapter again.
If you wish to manually upgrade, and you used a serial adapter and saw the "Page Fault" message, you must probe the PCI and USB before manually upgrading, type:
probe-pci probe-usb flash u:\q2f19.rom
Or set the clock, allow time for the clock battery to charge, and use the usual upgrading firmware method.
Charge the clock battery
Leave the laptop turned on for at least 30 minutes to charge the clock battery to normal levels.
- Half an hour is the minimum charge time before testing, for which you can use the main battery,
- The best charging time is 24 hours before storage, for which you must use a power adapter,
- Charging does not happen with the laptop on and suspended; the power LED must be on and not flashing,
Easiest method is to remove all USB drives, then hold down all four game keys while turning the power on; the laptop will eventually fail to boot and wait for you to Use power button to power off, with the start time displayed in UTC:
Boot failed
OLPC C2, 256 MiB memory installed, S/N SHC92805B50
OpenFirmware  Q2F19   EC Firmware Ver:1.2.1   2025-12-17 23:14:12 UTC

Use power button to power off
Or boot to Ok prompt.
Or boot to Linux and disable automatic power management.
Check the clock is set after removing power
Verify that the laptop is able to retain the time and date, otherwise this problem may return.
- Unplug the charger,
- Remove the main battery from the underside of the laptop, (not the clock battery),
- Leave the laptop without power for five minutes,
- Connect a power source (the battery, or the charger) and turn on the laptop,
- Check the clock using either the Ok prompt or by running date in the Terminal activity.
If the clock is still wrong, then 3 situations are possible:
- The clock battery is faulty and must be replaced.
- You can verify this by installing a known-working battery, reprogramming the clock, and then repeating this verification test. Test pass would confirm this problem.
- There is a problem with the battery holder or the motherboard, so the laptop should be replaced.
- You can verify this by installing a known-working battery, reprogramming the clock, and then repeating this verification test. Test fail would confirm this problem.
- If you are dealing with a defective shape battery holder, perhaps the clock battery is (still) not maintaining electrical contact with the connector inside the battery holder.
Automated repair script
XO-1 only.
Repair center volunteers have made an automated script to repair laptops in bulk or as a method with fewer steps. The script can be run on a Linux computer or on an XO laptop. We call this second computer your "debricker".
To use it you must install pyserial. You must be online when running (any of) the three following commands:
For Ubuntu or Debian, type:
sudo apt-get install python-serial
For Fedora, such as on an XO, type:
sudo yum install -y pyserial
Wait for the install to complete.
Then download and install d6.py, type:
wget --timestamping http://dev.laptop.org/~rsmith/d6.py
Connect a serial adapter between the bricked XO (serial end of the cable) and the debricker computer (USB end of the cable). Then on the debricker computer type:
python d6.py
The script will search for the first USB serial port on the system that is available for use. (If your serial connection for the XO is not on the first available port then either modify the script to look for the other port first or open the other serial port with another program so its not available for use by d6.py.)
Once the script is up and running then turn to the bricked XO and power it on. Wait for the script to say it has finished. When it says this, the bricked XO is repaired, and you can disconnect and test.
The bricked XO will have been unlocked.
The date and time on the bricked XO will have been set to the date and time on the debricker.
To prevent the problem from returning, upgrade to the latest firmware. See upgrading firmware.
Reproducing
How to reproduce the problem, or test for it in different firmware versions:
- disassemble the laptop to expose the motherboard,
- connect a serial adapter and a terminal, and test it by turning on the laptop,
- turn off the laptop,
- remove DC power cable and battery,
- disconnect the clock battery,
- wait a short time (four seconds on XO-1, 15 seconds on XO-1.75 and XO-4),
- reconnect the clock battery,
- insert DC power cable,
- turn on the laptop,
- note the response, (e.g. RTC cleared),
- turn off the laptop,
- repeat the test with various alternate conditions.
Measuring Charge Current
To measure charge or discharge current of the clock battery, locate the series resistor from the following list, then use a multimeter to measure the voltage across the resistor. Use Ohms Law to calculate the current.
- XO-1, R250 100 ohms for discharge, R275 1k for charge, see photograph,
- XO-1.5, R309, 1k,
- XO-1.75, R35, 1k 1%,
- XO-4, R359, 1k 1%, see photograph.
See Also
- How the clock and battery work together,
- Oatstime, a tool for use by deployments in setting the clock on a large number of laptops,
- Refurbishing & Reuse Checklist,
- XO Troubleshooting Guide.