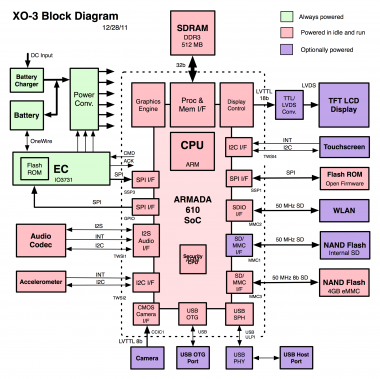
XO 3 A1
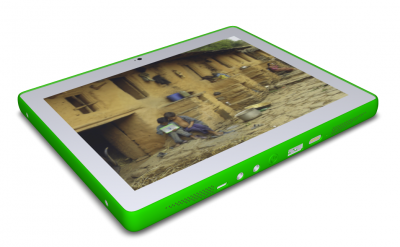
XO-3 Tablet Alpha test model, also known as A-test or A1.
Description
The A1 was the first prototype of the XO-3 built. The bring up happened in early December 2011.
The number of boards obtained was small, and distribution was limited to demonstrations, hardware testing, and UI development. Almost all of the software development is being done on XO-1.75 laptops, due to the similarities.
Identification
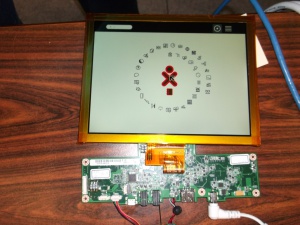
- Bare circuit board, no case or display
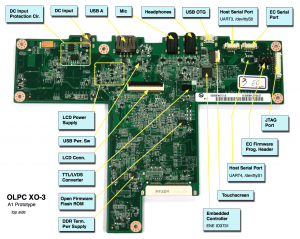
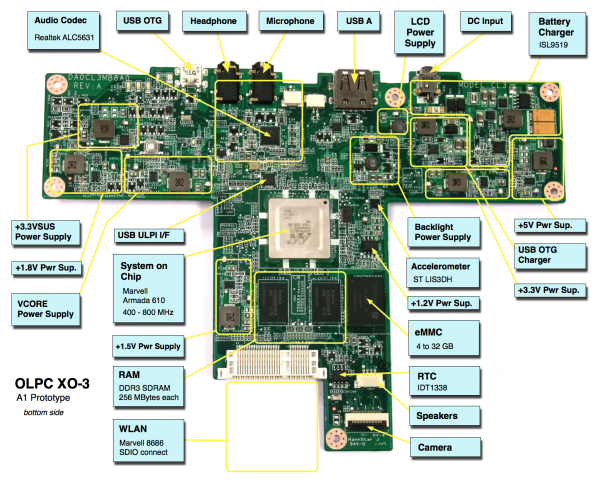
- Rev. A motherboard
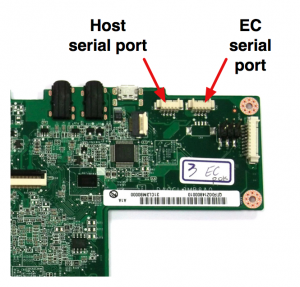
Photographs:
Please understand that this motherboard is still in the process of slimming down, and despite being less than half the area of an XO-1.75 motherboard, will continue to get smaller in coming months. We also intend to restore an internal SD slot, allowing for storage expansion and repair of motherboards with failed eMMC devices. --wad
Software Support
- The current EC Firmware release is cl3-5.0.1.02.
- The current OpenFirmware release is Q5A04. (XO-3 uses Q5xxx OpenFirmware releases. These will not work on an XO-1, XO-1.5, or an XO-1.75. As with XO-1.75, Open Firmware and the EC firmware are separate.)
- There is no current Linux image.
It is strongly recommended that you have two sources of power (a charged battery and an external power source) when you upgrade your EC or OpenFirmware. Failure to do so may require the use of an SPI programmer to recover your tablet.
OpenFirmware Change
One change from Open Firmware on the XO laptops is that the "u:" device which allows one to easily address files on a USB stick only works on the USB A port. If you are trying to access a file located on a USB device plugged into the USB microAB (OTG) port, you need to use the "o:" device.
Upgrading the EC code
Using OpenFirmware and WiFi
ok wifi SSID_name
ok flash-ec http:\\dev.laptop.org\pub\ec\cl3-0_1_2.img
Reading http:\\dev.laptop.org\pub\ec\cl3-0_1_2.img
Scan for: SSID_name found
Associate with: SSID_name
DHCP got 10.0.0.170
EC firmware verison: XO-EC 5 0.1.02 2011/12/06
Erasing ...

Writing ...
fff0
Verifying ...
fff0
Board powers down at this point due to EC restart. Power up manually.
Using the serial console
Dwonload the EC image, rename it to use FAT compatible names (8.3) and place it on a USB stick.
Insert the USB stick in the tablet, and turn it on. Interrupt the OFW boot process by touching the XO icon on the screen. Then type the following:
ok flash-ec u:\cl3-1_02.img
Upgrading OFW
Place a recent release of the Q5XYY firmware onto a USB stick, and insert it in the tablet. Interrupt the OFW boot process by touching the XO icon on the screen.
Type (assuming a q5a04 release):
flash ext:\q5a04.rom
Reboot by typing "bye" or holding down the power button once this is completed. If you don't have a battery present in your system, you will need to use the flash! command instead.
Upgrading Linux
Installing from OpenFirmware
You will need the .zd version of the OS image. Download the most recent for XO-1.75 from build.laptop.org, then:
- Place the image on a USB stick, and insert it into the tablet.
- Get the Ok prompt by interrupting the OFW boot process through touching the XO icon on the screen.
- Install onto the eMMC by typing:
fs-update u:\os23.zd
At this point, we don't have any unified builds for the XO-3, so you will also need to update the kernel before Linux will boot. Download the latest kernel from http://dev.laptop.org/~pgf/xo-3-bringup/ (currently zImage20) and place it on a USB stick. Install it from OFW using:
copy u:\zImage20 int:\boot\vmlinuz
Restrictions
These are still being discovered! A list of modifications made to the A1 motherboard in order to make it work is available.
USB OTG
Unless the USB OTG port on your motherboard has been reworked, you should not use it --- it is likely to fry anything plugged into it.
Even if it has been reworked, at this time neither OFW nor Linux properly support operation as a USB target device. Regardless of the cable plugged into the USB OTG port (microA or microB), the XO-3 currently acts as a USB host (<trac>11533</trac>).
Camera
While the cameras used for the XO-3 tablet use the same chip and same cable pinout as the cameras used in the XO laptops, the I/O voltage is different (+1.8V instead of +3V). A camera from an XO laptop will appear to work in an XO-3 tablet, but is likely to damage the Armada 610 SoC.
Please only use the cameras provided with the A1 prototypes! They may be identified by the flex cable being longer than the one on an XO laptop camera. (Some A1s may have reworked XO laptop cameras, identifiable by hot glue all over it.)
Documentation
Supporting documentation for these boards (all in PDF, coming soon!):
Please note that production boards will likely have different pin mappings and connector locations.
